<?xml version="1.0" encoding="UTF-8"?>
<!DOCTYPE html PUBLIC "-//W3C//DTD XHTML 1.1//EN" "http://www.w3.org/TR/xhtml11/DTD/xhtml11.dtd">
<html xmlns="http://www.w3.org/1999/xhtml" xml:lang="en">
<head>
<meta content="text/html; charset=UTF-8" http-equiv="content-type" />
<meta http-equiv="Content-Language" content="en" />
<meta name="generator" content="Pressbooks 5.35.0" />
<meta name="pb-authors" content="Jennifer Lapum" />
<meta name="pb-authors" content="Michelle Hughes" />
<meta name="pb-authors" content="Oona St-Amant" />
<meta name="pb-authors" content="Wendy Garcia" />
<meta name="pb-authors" content="Margaret Verkuyl" />
<meta name="pb-authors" content="Paul Petrie" />
<meta name="pb-authors" content="Frances Dimaranan" />
<meta name="pb-authors" content="Mahidhar Pemasani" />
<meta name="pb-authors" content="Nada Savicevic" />
<meta name="pb-title" content="Physical Examination Techniques: A Nurse's Guide" />
<meta name="pb-language" content="en-ca" />
<meta name="pb-cover-image" content="https://pressbooks.library.ryerson.ca/ippa/wp-content/uploads/sites/114/2020/12/IPPA-Version-2-1.jpg" />
<meta name="pb-book-license" content="cc-by-nc" />
<meta name="pb-publication-date" content="1609459200" />
<title>Physical Examination Techniques: A Nurse's Guide</title>
</head>
<body lang='en' >
<div id="half-title-page"><h1 class="title">Physical Examination Techniques: A Nurse&#039;s Guide</h1></div><div id="title-page">
			<h1 class="title">Physical Examination Techniques: A Nurse&#039;s Guide</h1>
		<h2 class="subtitle"></h2>
					<p class="author">Jennifer Lapum; Michelle Hughes; Oona St-Amant; Wendy Garcia; Margaret Verkuyl; Paul Petrie; Frances Dimaranan; Mahidhar Pemasani; and Nada Savicevic</p>
								<p class="publisher"></p>
		<p class="publisher-city"></p>
	</div>
<div id="copyright-page">
	<div class="ugc">
					
<div class="license-attribution"><p><img src="https://pressbooks.library.torontomu.ca/ippa/wp-content/themes/pressbooks-book/packages/buckram/assets/images/cc-by-nc.svg" alt="Icon for the Creative Commons Attribution-NonCommercial 4.0 International License" /></p><p>Physical Examination Techniques: A Nurse's Guide by Jennifer Lapum; Michelle Hughes; Oona St-Amant; Wendy Garcia; Margaret Verkuyl; Paul Petrie; Frances Dimaranan; Mahidhar Pemasani; and Nada Savicevic is licensed under a <a rel="license" href="https://creativecommons.org/licenses/by-nc/4.0/">Creative Commons Attribution-NonCommercial 4.0 International License</a>, except where otherwise noted.</p></div>

									</div>
</div>
<div id="toc">
	<h1>Contents</h1>
	<ul>
					<li class="front-matter introduction">
	<a href="#front-matter-introduction">
		<span class="toc-chapter-title">Introduction</span>
							</a>
	</li>

					<li class="part">
	<a href="#part-main-body">
					Main Body
			</a>
</li>

					<li class="chapter standard">
	<a href="#chapter-chapter-1">
		<span class="toc-chapter-title">Objective Assessment</span>
							</a>
	</li>

					<li class="chapter standard">
	<a href="#chapter-a-trauma-informed-assessment">
		<span class="toc-chapter-title">Trauma-informed Assessment</span>
							</a>
	</li>

					<li class="chapter standard">
	<a href="#chapter-preparing-for-the-objective-assessment">
		<span class="toc-chapter-title">Preparing for the Objective Assessment</span>
							</a>
	</li>

					<li class="chapter standard">
	<a href="#chapter-infection-prevention-and-control">
		<span class="toc-chapter-title">Infection Prevention and Control</span>
							</a>
	</li>

					<li class="chapter standard">
	<a href="#chapter-anatomical-locations">
		<span class="toc-chapter-title">Anatomical Locations</span>
							</a>
	</li>

					<li class="chapter standard">
	<a href="#chapter-inspection">
		<span class="toc-chapter-title">Inspection</span>
							</a>
	</li>

					<li class="chapter standard">
	<a href="#chapter-palpation">
		<span class="toc-chapter-title">Palpation</span>
							</a>
	</li>

					<li class="chapter standard">
	<a href="#chapter-percussion">
		<span class="toc-chapter-title">Percussion</span>
							</a>
	</li>

					<li class="chapter standard">
	<a href="#chapter-auscultation">
		<span class="toc-chapter-title">Auscultation</span>
							</a>
	</li>

					<li class="chapter standard">
	<a href="#chapter-closing-of-the-objective-assessment">
		<span class="toc-chapter-title">Closing of the Objective Assessment</span>
							</a>
	</li>

					<li class="chapter standard">
	<a href="#chapter-key-takeaways">
		<span class="toc-chapter-title">Key Takeaways</span>
							</a>
	</li>

					<li class="chapter standard">
	<a href="#chapter-references">
		<span class="toc-chapter-title">References</span>
							</a>
	</li>

					<li class="back-matter glossary">
	<a href="#back-matter-glossary">
		<span class="toc-chapter-title">Glossary</span>
							</a>
	</li>

			</ul>
</div>
<div class="front-matter introduction " id="front-matter-introduction" title="Introduction">
	<div class="front-matter-title-wrap">
		<p class="front-matter-number">1</p>
		<h1 class="front-matter-title"><span class="display-none">Introduction</span></h1>
								</div>
	<div class="ugc front-matter-ugc">
				 <p>
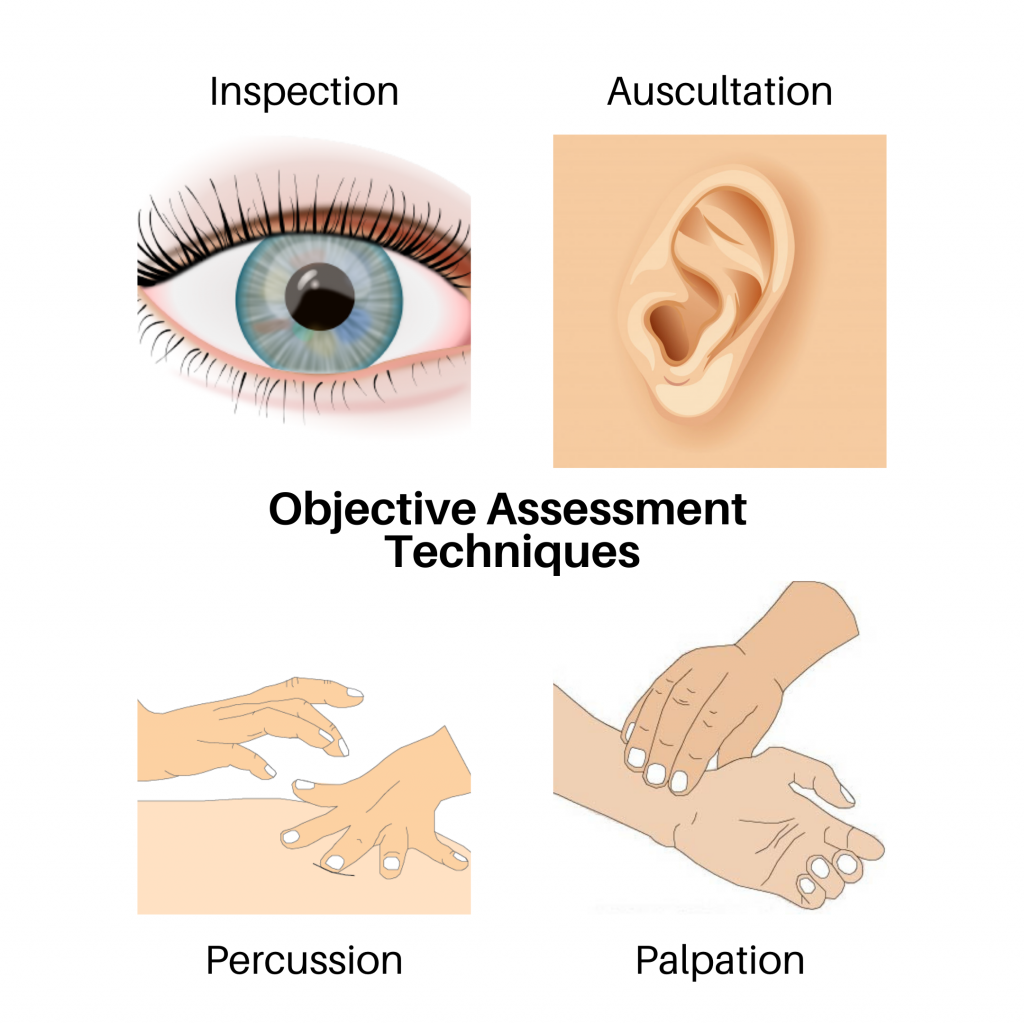
This open access textbook is an introductory resource to guide best practices of objective assessment techniques related to inspection, palpation, percussion, and auscultation (IPPA). Its intended audience is students in health-related post-secondary programs such as nursing.</p> <p>This book is&nbsp;<strong>best viewed via the online, Pressbooks format so that you can view the videos and participate in the interactive components</strong>. However, a pdf format is also available.</p> <p>&nbsp;</p> <p><strong>About the Authors</strong></p> <p>Jennifer Lapum, PhD, MN, BScN, RN, Professor, Daphne Cockwell School of Nursing, Ryerson University, Toronto, ON, Canada</p> <p>Michelle Hughes, MEd, BScN, RN, Professor, Professor, School of Community and Health Studies, Centennial College, Toronto, ON, Canada</p> <p>Oona St-Amant, PhD, MN, BScN, RN, Assistant Professor, Daphne Cockwell School of Nursing, Ryerson University, Toronto, ON, Canada</p> <p>Wendy Garcia, MN, BScN, RN, Instructor, Ryerson University, Faculty of Community Services, Daphne Cockwell School of Nursing, Toronto, ON, Canada</p> <p>Margaret Verkuyl, MN, NP:PHC, Professor, Centennial College, School of Community and Health Studies, Toronto, ON, Canada</p> <p>Paul Petrie, RN, BScN, MScN, Professor, George Brown College, Sally Horsfall Eaton School of Nursing, Toronto, ON, Canada</p> <p>Frances Dimaranan, BScN student, Ryerson, Centennial, George Brown Collaborative Nursing Degree Program, Ryerson University, Toronto, ON, Canada</p> <p>Mahidhar Pemasani, BScN student, Ryerson, Centennial, George Brown Collaborative Nursing Degree Program, Ryerson University, Toronto, ON, Canada</p> <p>Nada Savicevic, MA Interactive Design, MArch, BSc (Eng), Instructional Designer, Office of e-Learning, Ryerson University, Toronto, ON, Canada</p> <p>&nbsp;</p> <p>&nbsp;</p> <p><strong>Contact person</strong></p> <p>Dr. Jennifer L. Lapum</p> <p>jlapum@ryerson.ca</p> <p>415-979-5000 ex. 556316</p> <p>350 Victoria St.,&nbsp;Toronto, ON, M5B 2K3</p> <p>@7024thpatient</p> <p><strong>&nbsp;</strong></p> <p><strong>&nbsp;</strong></p> <p><strong>Note to Educators Using this Resource</strong></p> <p>We encourage you to use this resource and would love to hear if you have integrated some or all of it into your curriculum. If you are using it in your course, please consider notifying Dr. Lapum and include the course/program and the number of students.</p> <p><strong>Funding</strong></p> <p>This project was supported by a Ryerson University Library OER grant.</p> <p><strong>Student Advisory Committee</strong></p> <p>Agata Arent, BScN student, Ryerson, Centennial, George Brown Collaborative Nursing Degree Program, Ryerson University, Toronto, ON, Canada</p> <p>Lauren Baljeu, BScN student, Ryerson, Centennial, George Brown Collaborative Nursing Degree Program, Ryerson University, Toronto, ON, Canada</p> <p>Meera Chawda, BScN student, Ryerson, Centennial, George Brown Collaborative Nursing Degree Program, Ryerson University, Toronto, ON, Canada</p> <p>Nicolas D’Ambrosi, BScN student, Ryerson, Centennial, George Brown Collaborative Nursing Degree Program, Ryerson University, Toronto, ON, Canada</p> <p>Veronica Fedal, BScN student, Ryerson, Centennial, George Brown Collaborative Nursing Degree Program, Ryerson University, Toronto, ON, Canada</p> <p>Fonda Tran, BScN student, Ryerson, Centennial, George Brown Collaborative Nursing Degree Program, Ryerson University, Toronto, ON, Canada</p> <p>Jacqueline Zampese, BScN student, Ryerson, Centennial, George Brown Collaborative Nursing Degree Program, Ryerson University, Toronto, ON, Canada</p> <p><strong>Acknowledgments</strong></p> <p>Arina Bogdan, BScN, RN, Ryerson University (artist of the front cover artwork)</p> <p>Adam Chaboryk, IT Accessibility Specialist, Digital Media Projects, Ryerson University</p> <p>Linn Clark, Editor, Toronto, Ontario, Canada</p> <p>Ann Ludbrook, Copyright and Scholarly Engagement Librarian, Ryerson University</p> <p>Jeevan Marway, BScN, RN, MN, Trillium Health Partners.</p> <p>Nada Savicevic, Interactive Design, Educational Developer, Centre for Excellence in Learning and Teaching, Ryerson University, Toronto, Ontario, Canada</p> <p>Sally Wilson, Web Services Librarian, Ryerson University</p> <p><strong>Contributors – Voices of Experience</strong></p> <p>Yvette Dalrymple, RN(EC), NP Paediatric, CPHON</p> <p>Vikky Leung, MN, BScN, BSc, RN, Emergency Department, The Hospital for Sick Children, Nursing Clinical Instructor, Centennial College</p> <p>Andrea McGowan, BScN, RN, CNE, Island Health – Vancouver Island Health Authority</p> <p>Cheryl Tai, NP-PHC, MN, Contract Lecturer, Daphne Cockwell School of Nursing, Ryerson University</p> <p><strong>Customization</strong></p> <p>This textbook is licensed under a Creative Commons Attribution 4.0 International (CC-BY NC) license except where otherwise noted, which means that you are free to:</p> <p>SHARE – copy and redistribute the material in any medium or format</p> <p>ADAPT – remix, transform, and build upon the material for any purpose, even commercially.</p> <p>The licensor cannot revoke these freedoms as long as you follow the license terms.</p> <p>&nbsp;</p> <p>UNDER THE FOLLOWING TERMS:</p> <p>Attribution: You must give appropriate credit, provide a link to the license, and indicate if changes were made. You may do so in any reasonable manner, but not in any way that suggests the licensor endorses you or your use.</p> <p>No additional restrictions: You may not apply legal terms or technological measures that legally restrict others from doing anything the license permits.</p> <p>Notice: You do not have to comply with the license for elements of the material in the public domain or where your use is permitted by an applicable exception or limitation.</p> <p>No warranties are given. The license may not give you all of the permissions necessary for your intended use. For example, other rights such as publicity, privacy, or moral rights may limit how you use the material.</p> <p><strong>The following attribution statement should be included when using parts of this OER</strong>:</p> <p>© 2020 Ryerson University. Licensed under a Creative Commons Attribution 4.0 International License (CC-BY NC). Communication for the Nursing Professional (1st Canadian edition) by Jennifer L. Lapum, Michelle Hughes, Oona St-Amant, Wendy Garcia, Margaret Verkuyl, Paul Petrie, Frances Dimaranan, Mahidar Pemasani, Nada Savicevic. Download this book for free at:&nbsp;&nbsp;X</p> <p>&nbsp;</p> 
	</div>


	</div>
<div class="part-wrapper" id="part-main-body-wrapper">
    <div class="chapter standard " id="chapter-chapter-1" title="Objective Assessment">
	<div class="chapter-title-wrap">
		<p class="chapter-number">1</p>
		<h1 class="chapter-title">Objective Assessment</h1>
								</div>
	<div class="ugc chapter-ugc">
				 <p>Objective assessment involves the collection of data that you can <strong>observe and measure</strong> about the client’s state of health. Examples of objective assessment include observing a client’s <span class="glossary-term">gait</span>, physically feeling a lump on client’s leg, listening to a client’s heart, tapping on the body to elicit sounds, as well as collecting or reviewing laboratory and diagnostic tests such as blood tests, urine tests, X-ray etc. Typically, an objective assessment is conducted following the collection of <span class="glossary-term">subjective data</span>.</p> <p class="no-indent">The purpose of the objective assessment is to identify normal and abnormal findings. The abnormal findings are cues that signal a potential concern. An important part of the nursing process to ensure <strong><span class="glossary-term">client safety</span></strong> and <strong>effective care</strong> is:</p> <ul><li><strong>Recognizing </strong>abnormal cues.</li> <li><strong>Acting </strong>on abnormal cues.</li> </ul> <p>Failing to recognize or act upon abnormal cues can lead to significant negative consequences for the client.</p> <p>Objective data are analyzed in combination with your subjective assessment to make a clinical judgement. A <strong>clinical judgement</strong> is the outcome of thinking critically about the data, analyzing the cues as a whole, making decisions about the most significant concerns to address, and identifying how to best address these concerns based on the existing evidence (National Council of State Boards of Nursing, 2018). As a healthcare professional, developing strong clinical judgement is essential to ensuring client safety and maintaining your competency. Your clinical judgement will guide the prioritization and sequencing of assessment techniques. Your assessment of cues (both subjective and objective) will help you determine what data warrant further investigation and assessment. Therefore, it is important to think critically about the findings you collect during an assessment: Are they normal or abnormal for this specific client? Do they require you to act and/or seek further assistance?</p> <div class="textbox textbox--examples"><div class="textbox__header"><p class="textbox__title no-indent" style="text-align: center"><strong>Clinical Tip</strong></p> </div> <div class="textbox__content"><p><strong>Recognizing and acting on assessment findings</strong></p> <p>As a nursing student, you must have timely discussions with your clinical instructor or preceptor to assess the significance of abnormal findings. You will need to take initiative, develop confidence in seeking assistance, and never ignore an abnormal finding.</p> </div> </div> <p>In this chapter, you will focus on four objective assessment techniques: <strong>inspection</strong>, <strong>palpation</strong>, <strong>percussion</strong>, and <strong>auscultation.</strong> These involve your senses of sight, hearing, and touch (see <strong>Figure 1.1</strong>). You should also be aware of your sense of smell when conducting any physical assessment, as certain odours can act as a cue; for example, a foul odour may indicate an infection.</p> <ul><li>Inspection involves your visual sense to observe the client.</li> <li>Palpation involves your sense of touch to physically feel areas of the body.</li> <li>Percussion involves a combination of touch and hearing, but your focus is on hearing sounds when tapping the areas of the body.</li> <li>Auscultation involves your sense of hearing while listening to areas of the body with a stethoscope.</li> </ul> <p><img src="http://pressbooks.library.ryerson.ca/ippa/wp-content/uploads/sites/114/2020/08/unnamed-1024x1024.png" alt="" class="alignnone size-large wp-image-153" width="1024" height="1024" srcset="https://pressbooks.library.torontomu.ca/ippa/wp-content/uploads/sites/114/2020/08/unnamed-1024x1024.png 1024w, https://pressbooks.library.torontomu.ca/ippa/wp-content/uploads/sites/114/2020/08/unnamed-300x300.png 300w, https://pressbooks.library.torontomu.ca/ippa/wp-content/uploads/sites/114/2020/08/unnamed-150x150.png 150w, https://pressbooks.library.torontomu.ca/ippa/wp-content/uploads/sites/114/2020/08/unnamed-768x768.png 768w, https://pressbooks.library.torontomu.ca/ippa/wp-content/uploads/sites/114/2020/08/unnamed-1536x1536.png 1536w, https://pressbooks.library.torontomu.ca/ippa/wp-content/uploads/sites/114/2020/08/unnamed-2048x2048.png 2048w, https://pressbooks.library.torontomu.ca/ippa/wp-content/uploads/sites/114/2020/08/unnamed-65x65.png 65w, https://pressbooks.library.torontomu.ca/ippa/wp-content/uploads/sites/114/2020/08/unnamed-225x225.png 225w, https://pressbooks.library.torontomu.ca/ippa/wp-content/uploads/sites/114/2020/08/unnamed-350x350.png 350w" title="" /></p> <p><span style="color: #000000"><strong>Figure 1.1</strong>: Objective assessment techniques&nbsp;</span></p> <p>These techniques should be performed with methodical and deliberate action. Always perform <strong>inspection first</strong> because it is the least invasive and does not involve physical touch. Inspection also allows you to establish a baseline for your assessment. For example, if you observe someone crouched over in pain, this will inform the sequence of your subsequent assessment techniques. Typically, palpation, percussion, and then auscultation follow inspection. The <strong>sequencing of techniques may be rearranged</strong> for several reasons, including which system is being assessed and for safety reasons. For example, when assessing the abdomen, auscultation is generally performed before percussion and palpation. Client safety and comfort also influence the sequence of objective techniques. For example, with a sleeping infant, you should perform inspection and auscultation while the child is calm and to avoid awakening the client. You will learn more about modifications to the sequencing of techniques as you learn about specific body systems. Determining technique sequence also comes with experience.</p> <p>When applicable, these IPPA techniques are used to assess body systems (e.g., eyes, ears, heart and neck vessels, lungs and thorax, abdomen, musculoskeletal). However, not all techniques are applicable to all systems. For example, you would not auscultate an eye because it does not emit a sound that would give you relevant data. Additionally, developmental stage and age can influence how some IPPA techniques are performed and also the determination of normal and abnormal findings. For example, normal heart rates vary significantly between a newborn compared to an adult.</p> <p>Before you explore each technique, let’s discuss what you need to do before you begin the objective assessment!</p> <div class="textbox textbox--exercises"><div class="textbox__header"><p class="textbox__title no-indent" style="text-align: center"><strong>Voices of Experience</strong></p> </div> <div class="textbox__content"><p class="no-indent">Your foundational IPPA assessment techniques and the resultant findings will give you a baseline understanding of the client’s health status. These physical assessment skills, combined with subjective health assessment, are important parts of clinical judgement and can act as a prompt for urgent action, transfer to a higher level of care, and further diagnostic technologies. Your IPPA assessment skills will be even more important in areas with less access to resources and diagnostics (e.g., rural and remote areas and underdeveloped regions).</p> </div> </div> <h2>Activity: Check Your Understanding</h2> <div class="textbox interactive-content"><span class="interactive-content__icon"></span> <p>An interactive H5P element has been excluded from this version of the text. You can view it online here:<br /> <a href="https://pressbooks.library.torontomu.ca/ippa/?p=5#h5p-1" title="Objective Assessment" data-url="https://pressbooks.library.torontomu.ca/ippa/?p=5#h5p-1">https://pressbooks.library.torontomu.ca/ippa/?p=5#h5p-1</a> </p> </div> <p>&nbsp;</p> 
	</div>


	</div>
<div class="chapter standard " id="chapter-a-trauma-informed-assessment" title="Trauma-informed Assessment">
	<div class="chapter-title-wrap">
		<p class="chapter-number">2</p>
		<h1 class="chapter-title">Trauma-informed Assessment</h1>
								</div>
	<div class="ugc chapter-ugc">
				 <p>Performing an objective assessment involves the nurse <strong>physically touching</strong> the client. This touch can make clients feel vulnerable, particularly if they have experienced <span class="glossary-term">trauma</span> in their life. Clients may also be anxious, fearful, and/or uncertain about undergoing a physical assessment for many other reasons: it may be their first time undergoing a physical assessment; they may be experiencing physical ailments that they consider embarrassing; they may be self-conscious or have body image concerns; they may identify as transgender or gender-diverse; they may be children who are fearful of unfamiliar people; and they may have had a previous assessment conducted by a healthcare professional who was judgemental, prejudiced, not compassionate, or not accepting.</p> <p>Because you will not necessarily know whether the client has experienced trauma or is fearful or self-conscious, it is important to use a <strong>trauma-informed approach </strong>with every client when performing an objective assessment.</p> <p>Steps to inform a trauma-informed objective assessment include:</p> <ul><li>Introduce yourself and your role.</li> <li>Explain why you are there.</li> <li>Use the client’s identified name and pronouns.</li> <li>Ask permission to touch.</li> <li>Give the client choices about how to proceed.</li> <li>Explain what you are doing as you proceed.</li> <li>Provide privacy by closing the door and using a drape so that you only need to expose the areas that you are assessing.</li> </ul> <div class="textbox textbox--examples"><div class="textbox__header"><p class="textbox__title no-indent" style="text-align: center"><strong>Clinical Tip</strong></p> </div> <div class="textbox__content"><p class="no-indent">For each client, but particularly clients who have experienced trauma, you will need to modify your objective assessment based on their needs. For example, pay attention to cues or signals that notify you when they are feeling discomfort and distress. Cues may include becoming quiet, breathing fast or holding their breath, facial grimacing, and muscle contractions. It is good practice to continually obtain permission before touching areas of the body and narrate your steps aloud for clients so that they can anticipate touch and know what to expect and for how long. For example, you could state “I’m going to listen to valves of your heart by placing my stethoscope in four locations over your chest, I will listen for a few heart beats over each location. Feel free to stop me at anytime, if you need to take a break or if you have questions. Is it okay if I begin?”</p> </div> </div> <h2>Activity: Check Your Understanding</h2> <div class="textbox interactive-content"><span class="interactive-content__icon"></span> <p>An interactive H5P element has been excluded from this version of the text. You can view it online here:<br /> <a href="https://pressbooks.library.torontomu.ca/ippa/?p=22#h5p-2" title="Trauma Informed Assessment" data-url="https://pressbooks.library.torontomu.ca/ippa/?p=22#h5p-2">https://pressbooks.library.torontomu.ca/ippa/?p=22#h5p-2</a> </p> </div> <p>&nbsp;</p> <p>&nbsp;</p> 
	</div>


	</div>
<div class="chapter standard " id="chapter-preparing-for-the-objective-assessment" title="Preparing for the Objective Assessment">
	<div class="chapter-title-wrap">
		<p class="chapter-number">3</p>
		<h1 class="chapter-title">Preparing for the Objective Assessment</h1>
								</div>
	<div class="ugc chapter-ugc">
				 <p>In preparation for the objective assessment, you should consider several things.</p> <p>Inquire whether the client needs to <strong>go to the bathroom.</strong> Clients will be more comfortable during assessments if they have an empty bladder and bowels. This is especially true when performing assessments on the abdomen or assessments of pregnant women, because palpation may cause discomfort if the bladder or bowels are full. In addition to client comfort, it is important to anticipate other steps or possible actions when preparing for an objective assessment. For example, if the client’s reason for seeking care is pain upon urination, you will likely ask the client to collect a urine sample while they empty their bladder.</p> <p>You should also <strong>prepare the environment</strong> before beginning, including organizing the necessary equipment and supplies (e.g., hand sanitizer, alcohol pads, penlight, stethoscope, drape). See <strong>Figure 1.2 </strong>below for an overview of equipment used.</p> <p><span style="color: #993300;background-color: #ffff00"><img src="http://pressbooks.library.ryerson.ca/ippa/wp-content/uploads/sites/114/2020/04/doctors-office-1944117_1920-1024x768.jpg" alt="" class="alignnone size-large wp-image-128" width="1024" height="768" srcset="https://pressbooks.library.torontomu.ca/ippa/wp-content/uploads/sites/114/2020/04/doctors-office-1944117_1920-1024x768.jpg 1024w, https://pressbooks.library.torontomu.ca/ippa/wp-content/uploads/sites/114/2020/04/doctors-office-1944117_1920-300x225.jpg 300w, https://pressbooks.library.torontomu.ca/ippa/wp-content/uploads/sites/114/2020/04/doctors-office-1944117_1920-768x576.jpg 768w, https://pressbooks.library.torontomu.ca/ippa/wp-content/uploads/sites/114/2020/04/doctors-office-1944117_1920-1536x1152.jpg 1536w, https://pressbooks.library.torontomu.ca/ippa/wp-content/uploads/sites/114/2020/04/doctors-office-1944117_1920-65x49.jpg 65w, https://pressbooks.library.torontomu.ca/ippa/wp-content/uploads/sites/114/2020/04/doctors-office-1944117_1920-225x169.jpg 225w, https://pressbooks.library.torontomu.ca/ippa/wp-content/uploads/sites/114/2020/04/doctors-office-1944117_1920-350x263.jpg 350w, https://pressbooks.library.torontomu.ca/ippa/wp-content/uploads/sites/114/2020/04/doctors-office-1944117_1920.jpg 1920w" title="" /></span></p> <p><strong>Figure 1.2:</strong> Equipment</p> <p>When caring for young children, you might want to engage them in helping you set up the equipment. Children are often fearful or curious about equipment, and engaging them in setting up equipment can make the assessment and equipment seem less scary and also make them more familiar with you. You might show them your stethoscope and let them touch it. Infants and toddlers may be calmer if the care partner holds them on their lap. Make sure the room is well lit for the examination, and ensure the client’s privacy by closing the curtains or the door.</p> <p>Ensure the <strong>client’s privacy </strong>and <strong>warmth</strong>.</p> <ul><li>You should <strong>close</strong> the room door and/or the curtains.</li> <li>Depending on the assessment, you may need the client to put on a <strong>gown</strong>. For example, a gown is appropriate if you are doing a complete head-to-toe assessment. Most clients wear gowns when they are in hospital, but sometimes they prefer to wear their own clothing. If a gown is required, provide it to the client and explain that it should be tied up at the back, but occasionally the front, depending on the examination being performed. You should also indicate whether all clothing should be removed or whether they can leave on socks and undergarments. For privacy, leave the room as the client changes into the gown, unless they require assistance.</li> <li>Use a <strong><span class="glossary-term">drape</span></strong> and only expose the area of the body that you are assessing, and then cover the client back up. You can engage the client by having them hold the drape and guide them on how to cover themselves up. There are two types of drapes: <ul><li><strong>Disposable drapes</strong> – these are non-reusable and should be discarded in the garbage when done. They are often used in primary care clinics.</li> <li><strong>Reusable drapes</strong> – these are usually made of cotton or flannel and are like a small sheet. They can be disposed of in the laundry, washed, and reused.</li> </ul> </li> </ul> <p>You may need to reposition the client depending on the part of the body being examined. Consider what <strong>body positioning</strong> will be needed for you to conduct the examination. You should minimize repositioning as much as possible, especially with clients who have mobility difficulties, those who are experiencing pain, and those who may be medically unstable. &nbsp;Although this applies to all clients, you should be attentive to the older adults who tend to have more mobility and balance issues than younger clients. You may involve a <span class="glossary-term">care partner</span> in helping position a young child or older adult who needs assistance. With young children, it can be helpful to engage care partners in the assessment so that the child feels more comfortable with you. For example, you may encourage the care partner to hold the child in their lap as you assess so that the child is comfortable and you can obtain the best results.</p> <p>Consider <strong>your own body positioning </strong>and the importance of ergonomics and body mechanics to prevent or reduce any risk of injury. For example, raise the bed to a working level: this is usually to a height between your upper thigh to your waist, depending on the task. This will help you minimize twisting your body and having to reach down or up to perform the examination.</p> <div class="textbox shaded">Perform <strong>physical techniques on bare skin</strong>, so that your assessment is accurate.</div> <p>Modify your approach to the client’s <strong>developmental stage</strong>, which does not always align with their chronological age. This will require attention to elements such as language and cognitive and socio-emotional development. At times, you may need to modify your communication so that you are appropriately engaging with the client at a level that they understand. Specifically, you might want to:</p> <ul><li>Involve care partners (usually parents) when assessing <strong><span class="glossary-term">infants</span></strong> and <strong><span class="glossary-term">children</span></strong> to help position them. Use playful approaches, a friendly <span class="glossary-term">vocal intonation</span>, and smile to avoid frightening children. You could play peekaboo and let children grasp objects like stethoscopes. You might incorporate their favourite objects such a teddy bear or a blanket into the physical assessment, for example by using your stethoscope on their teddy bear. Distracting children from the assessment technique and engaging them in play while performing techniques will require practice.</li> <li>You may or may not have a care partner present when performing a physical assessment of an <strong><span class="glossary-term">adolescent</span></strong> client. It will often depend on the specific client, but you might consider offering options such as, “would you like to have your parent present for the first part of the physical exam, and then they can step out at the end?” This population will be experiencing changes in their body, so a non-judgemental and accepting attitude is important, as well as the use of permission statements.</li> <li>With <strong><span class="glossary-term">older adults</span>,</strong> you should modify your approach to their specific needs. Some older adults are quite independent and healthy, while others are experiencing significant changes in their body and its functioning. Thus, you should assess for hearing, vision, physical strength, and balance, which may affect how you explain and perform the assessment; this might also be needed for clients in other age groups.</li> </ul> <div class="textbox textbox--examples"><div class="textbox__header"><p class="textbox__title no-indent" style="text-align: center"><strong>Clinical Tip</strong></p> </div> <div class="textbox__content"><p class="no-indent">If there is a care partner present, <strong>ask the client</strong> whether they would like the care partner to step out or be present for the examination. It is common to have a care partner present for examinations of young children and some clients with cognitive impairments. It is common for a parent to hold infants during a physical examination.</p> </div> </div> <h2>Activity: Check Your Understanding</h2> <div class="textbox interactive-content"><span class="interactive-content__icon"></span> <p>An interactive H5P element has been excluded from this version of the text. You can view it online here:<br /> <a href="https://pressbooks.library.torontomu.ca/ippa/?p=24#h5p-3" title="Preparing for the objective assessment" data-url="https://pressbooks.library.torontomu.ca/ippa/?p=24#h5p-3">https://pressbooks.library.torontomu.ca/ippa/?p=24#h5p-3</a> </p> </div> <p>&nbsp;</p> <div class="textbox interactive-content"><span class="interactive-content__icon"></span> <p>An interactive H5P element has been excluded from this version of the text. You can view it online here:<br /> <a href="https://pressbooks.library.torontomu.ca/ippa/?p=24#h5p-4" title="Preparing for the objective assessment 2" data-url="https://pressbooks.library.torontomu.ca/ippa/?p=24#h5p-4">https://pressbooks.library.torontomu.ca/ippa/?p=24#h5p-4</a> </p> </div> 
	</div>


	</div>
<div class="chapter standard " id="chapter-infection-prevention-and-control" title="Infection Prevention and Control">
	<div class="chapter-title-wrap">
		<p class="chapter-number">4</p>
		<h1 class="chapter-title">Infection Prevention and Control</h1>
								</div>
	<div class="ugc chapter-ugc">
				 <p>Infection prevention and control (IPAC) refers to practices that <strong>prevent or reduce the transmission of microorganisms</strong>.</p> <p>As a healthcare professional, you have an <strong>important role</strong> to play in IPAC, and so do clients, care partners, and visitors. You should <strong>educate</strong> clients, care partners, and visitors about appropriate IPAC measures. Healthcare institutions usually display signs indicating to clients and visitors when to wash their hands or wear a mask, but nurses also play an important role in reminding people about the shared responsibility in reducing the spread of disease, particularly when specific precaution protocols are in place (e.g., in an isolation room, wearing a mask if someone has a cough).</p> <div class="textbox shaded"><p style="text-align: center"><strong>The #1 action you can take to prevent </strong><strong>healthcare-associated </strong></p> <p style="text-align: center"><strong>infections (HAI) </strong><strong>is </strong><strong>hand hygiene</strong></p> <p style="text-align: center">(Public Health Agency of Canada, [PHAC] 2012).</p> </div> <p>Hand hygiene practices include: using an alcohol-based hand rub (ABHR), sometimes referred to as hand hygiene gel/hand sanitizer, and handwashing with soap and water. It may also include surgical hand antisepsis, which is beyond the scope of this chapter.</p> <p>You should perform hand hygiene with an ABHR in front of the client prior to beginning and at the end of the examination (see <strong>Figure 1.3 </strong>below). The ABHR should have 70–90% alcohol concentration (Public Health Ontario, 2014).</p> <p><img src="http://pressbooks.library.ryerson.ca/ippa/wp-content/uploads/sites/114/2020/06/Hand-Sanitizer-1024x682-1.jpg" alt="" class="alignnone size-full wp-image-49" width="1024" height="682" srcset="https://pressbooks.library.torontomu.ca/ippa/wp-content/uploads/sites/114/2020/06/Hand-Sanitizer-1024x682-1.jpg 1024w, https://pressbooks.library.torontomu.ca/ippa/wp-content/uploads/sites/114/2020/06/Hand-Sanitizer-1024x682-1-300x200.jpg 300w, https://pressbooks.library.torontomu.ca/ippa/wp-content/uploads/sites/114/2020/06/Hand-Sanitizer-1024x682-1-768x512.jpg 768w, https://pressbooks.library.torontomu.ca/ippa/wp-content/uploads/sites/114/2020/06/Hand-Sanitizer-1024x682-1-65x43.jpg 65w, https://pressbooks.library.torontomu.ca/ippa/wp-content/uploads/sites/114/2020/06/Hand-Sanitizer-1024x682-1-225x150.jpg 225w, https://pressbooks.library.torontomu.ca/ippa/wp-content/uploads/sites/114/2020/06/Hand-Sanitizer-1024x682-1-350x233.jpg 350w" title="" /></p> <p><strong>Figure 1.3:</strong> Hand hygiene</p> <p>Certain occasions will require handwashing instead of relying on ABHR. You must <strong>wash your hands with soap and water</strong> if your hands are visibly soiled, have been exposed to any body fluids, have been exposed to norovirus or clostridium difficile, and following glove removal (PHAC, 2012; Public Health Ontario, 2014). The mechanical action of washing hands is important to remove bacteria. See <strong>Film Clip X</strong> of how to properly wash your hands.</p> <p>&nbsp;</p> <div class="textbox interactive-content interactive-content--oembed"><span class="interactive-content__icon"></span> <p>One or more interactive elements has been excluded from this version of the text. You can view them online here: <a href="#oembed-2" title="Hand Washing Video, including Key Points" data-url="https://pressbooks.library.torontomu.ca/ippa/?p=26#oembed-2">https://pressbooks.library.torontomu.ca/ippa/?p=26#oembed-2</a> </p> </div> <p><strong>Film Clip 1.1</strong>: Handwashing</p> <p><strong>Reusable equipment</strong> that touches intact skin and does not touch mucous membranes <strong>must be cleaned</strong> between clients. Examples of this equipment include stethoscopes, BP cuffs, and pulse oximeters. Most of this equipment does not become visibly soiled, so disinfecting the equipment with a wipe is usually sufficient (IPAC, 2018). Depending on the equipment size, this can be achieved with an alcohol pad or a larger disinfectant wipe with 60–80% alcohol concentration (Public Health Ontario, 2018).</p> <p>You should also <strong>consider your own health and safety</strong> as you provide care to clients. <strong>Personal protective equipment</strong> (<strong>PPE</strong>) such as gloves, masks, gowns, goggles, and face shields can prevent you from contact with microorganisms. Other precautions to think about include being mindful not to touch your face as you provide care because bacteria such as MRSA (methicillin-resistant staphylococcus aureus) and COVID-19 can live in the nasal passage for extended periods of time. Other ways to reduce exposure to microorganisms is to keep nails trimmed short and to keep hair tied back if it is longer than your shoulders. Avoid wearing jewelry and nail polish as they can harbor microorganisms. In addition to using PPE when appropriate, you may need to use isolation precautions for a client with a known or suspected infectious disease.</p> <p>Let’s move on and talk about each of the techniques now!</p> <h2>Activity: Check Your Understanding</h2> <div class="textbox interactive-content"><span class="interactive-content__icon"></span> <p>An interactive H5P element has been excluded from this version of the text. You can view it online here:<br /> <a href="https://pressbooks.library.torontomu.ca/ippa/?p=26#h5p-5" title="Infection Prevention and Control" data-url="https://pressbooks.library.torontomu.ca/ippa/?p=26#h5p-5">https://pressbooks.library.torontomu.ca/ippa/?p=26#h5p-5</a> </p> </div> <p>&nbsp;</p> <p>&nbsp;</p> 
	</div>


	</div>
<div class="chapter standard " id="chapter-anatomical-locations" title="Anatomical Locations">
	<div class="chapter-title-wrap">
		<p class="chapter-number">5</p>
		<h1 class="chapter-title">Anatomical Locations</h1>
								</div>
	<div class="ugc chapter-ugc">
				 <p style="text-align: justify">You need to be familiar with <strong>anatomical locations</strong> when performing a physical assessment for two reasons:</p> <ul><li>First, you need to use parts of your own hands to do particular assessments. <strong>Figure 1.4</strong> illustrates the parts of your hands that are commonly used to perform a physical assessment, including the dorsal and palmar aspect of the hands, fingertips, the ulnar surface, and the distal interphalangeal joints.</li> </ul> <p>&nbsp;</p> <ul><li>Second, you need to be able to accurately note the anatomical locations when communicating and documenting normal and abnormal findings. For example, it is too vague for a nurse to say that a client is having pain in their left arm. A more specific and accurate statement is the client is having pain on the anterior side of their left arm, two inches superior to the wrist. Therefore, it is important that you have access to a ruler or measuring tape so that you can accurately identify the location of any variations. For example, you may note swelling 2.5 cm distal to the right medial malleolus. This most accurately describes the location and allows you to measure any changes over time.</li> </ul> <p><img src="http://pressbooks.library.ryerson.ca/ippa/wp-content/uploads/sites/114/2020/08/IMG_4903-1-1024x576.png" alt="" class="alignnone size-large wp-image-140" width="1024" height="576" srcset="https://pressbooks.library.torontomu.ca/ippa/wp-content/uploads/sites/114/2020/08/IMG_4903-1-1024x576.png 1024w, https://pressbooks.library.torontomu.ca/ippa/wp-content/uploads/sites/114/2020/08/IMG_4903-1-300x169.png 300w, https://pressbooks.library.torontomu.ca/ippa/wp-content/uploads/sites/114/2020/08/IMG_4903-1-768x432.png 768w, https://pressbooks.library.torontomu.ca/ippa/wp-content/uploads/sites/114/2020/08/IMG_4903-1-1536x864.png 1536w, https://pressbooks.library.torontomu.ca/ippa/wp-content/uploads/sites/114/2020/08/IMG_4903-1-65x37.png 65w, https://pressbooks.library.torontomu.ca/ippa/wp-content/uploads/sites/114/2020/08/IMG_4903-1-225x127.png 225w, https://pressbooks.library.torontomu.ca/ippa/wp-content/uploads/sites/114/2020/08/IMG_4903-1-350x197.png 350w, https://pressbooks.library.torontomu.ca/ippa/wp-content/uploads/sites/114/2020/08/IMG_4903-1.png 1920w" title="" /></p> <p><strong>Figure 1.4: </strong>Hands</p> <p>Let’s examine how to identify these anatomical locations.</p> <p>You need to understand what the <strong>anatomical position</strong> is so that you can note findings based on this position. See <strong>Figure 1.5</strong> and <strong>Figure 1.6</strong> for an overview of the anterior and posterior view of the anatomical position with the client standing upright, facing forward, arms positioned at the side with palms of hands facing forward, and feet slightly apart and facing forward.</p> <p style="text-align: justify"><img src="http://pressbooks.library.ryerson.ca/ippa/wp-content/uploads/sites/114/2020/04/Anterior-768x1024.jpg" alt="" class="alignnone size-large wp-image-214" width="768" height="1024" srcset="https://pressbooks.library.torontomu.ca/ippa/wp-content/uploads/sites/114/2020/04/Anterior-768x1024.jpg 768w, https://pressbooks.library.torontomu.ca/ippa/wp-content/uploads/sites/114/2020/04/Anterior-225x300.jpg 225w, https://pressbooks.library.torontomu.ca/ippa/wp-content/uploads/sites/114/2020/04/Anterior-1152x1536.jpg 1152w, https://pressbooks.library.torontomu.ca/ippa/wp-content/uploads/sites/114/2020/04/Anterior-1536x2048.jpg 1536w, https://pressbooks.library.torontomu.ca/ippa/wp-content/uploads/sites/114/2020/04/Anterior-65x87.jpg 65w, https://pressbooks.library.torontomu.ca/ippa/wp-content/uploads/sites/114/2020/04/Anterior-350x467.jpg 350w, https://pressbooks.library.torontomu.ca/ippa/wp-content/uploads/sites/114/2020/04/Anterior-scaled.jpg 1920w" title="" /></p> <p><strong>Figure 1.5</strong>: Anterior view of anatomical position</p> <p>&nbsp;</p> <p><img src="http://pressbooks.library.ryerson.ca/ippa/wp-content/uploads/sites/114/2020/04/Posterior-768x1024.jpg" alt="" class="alignnone size-large wp-image-216" width="768" height="1024" srcset="https://pressbooks.library.torontomu.ca/ippa/wp-content/uploads/sites/114/2020/04/Posterior-768x1024.jpg 768w, https://pressbooks.library.torontomu.ca/ippa/wp-content/uploads/sites/114/2020/04/Posterior-225x300.jpg 225w, https://pressbooks.library.torontomu.ca/ippa/wp-content/uploads/sites/114/2020/04/Posterior-1152x1536.jpg 1152w, https://pressbooks.library.torontomu.ca/ippa/wp-content/uploads/sites/114/2020/04/Posterior-1536x2048.jpg 1536w, https://pressbooks.library.torontomu.ca/ippa/wp-content/uploads/sites/114/2020/04/Posterior-65x87.jpg 65w, https://pressbooks.library.torontomu.ca/ippa/wp-content/uploads/sites/114/2020/04/Posterior-350x467.jpg 350w, https://pressbooks.library.torontomu.ca/ippa/wp-content/uploads/sites/114/2020/04/Posterior-scaled.jpg 1920w" title="" /></p> <p><strong>Figure 1.6</strong>: Posterior view of anatomical position</p> <p>Specific anatomical reference points will help you identify and note locations. Avoid using vague terminology that can be misinterpreted, such as “beneath,” “inside,” “beside,” “above,” or “below.” Instead, use anatomical reference points such as proximal or distal, inferior or superior, medial or lateral, and superficial or deep.<span style="background-color: #ffff00"></span></p> <p>See <strong>Figure 1.7</strong> for an overview of anatomical reference points and the descriptions here:</p> <ul><li><strong>Anterior</strong> – the front side or further to the front (also sometimes referred to as ventral)</li> <li><strong>Posterior</strong> refers to the back side or further to the back (also sometimes referred to dorsal).</li> <li><strong>Medial</strong> – the midline of the body (e.g., a longitudinal line that runs down the centre of the body dividing it into the right and left side of the body) whereas <strong>lateral </strong>refers to moving further away from this line.</li> <li><strong>Proximal</strong> – nearest the trunk or centre of the body whereas <strong>distal </strong>refers to further away from the trunk of the body. These terms are typically used when referring to a point on the limbs (e.g., the arm or the leg).</li> <li><strong>Inferior</strong> – something below an anatomical location or near to the feet whereas <strong>superior</strong> refers to something above an anatomical location or near to the head.</li> <li><strong>Superficial</strong> – something close to the surface of the body whereas <strong>deep </strong>refers to something further away from the surface of the body.</li> </ul> <p>&nbsp;</p> <p><img src="https://ecampusontario.pressbooks.pub/app/uploads/sites/653/2019/11/108_Directional_Terms.jpg" alt="Directional terms applied to the human body. Image description available." title="" /></p> <p>&nbsp;</p> <p><strong>Figure 1.7</strong>: Anatomical reference points, from Betts, et al., 2013. Licensed under&nbsp;<a href="https://creativecommons.org/licenses/by/4.0/" data-url="https://creativecommons.org/licenses/by/4.0/">CC BY 4.0</a>.</p> <p>Each body system has specific anatomical reference points, which are explained in more detail in other resources related to each body system. And last, you will need to position the client in several different positions when performing a physical assessment including sitting upright on the edge of the bed, supine, lateral, high-fowlers, and semi-fowlers.</p> <p>&nbsp;</p> 
	</div>


	</div>
<div class="chapter standard " id="chapter-inspection" title="Inspection">
	<div class="chapter-title-wrap">
		<p class="chapter-number">6</p>
		<h1 class="chapter-title">Inspection</h1>
								</div>
	<div class="ugc chapter-ugc">
				 <p>Inspection is the technique of <strong>purposeful</strong> and <strong>systematic observation </strong>of the client – note that this does not involve touching, only careful visual observation. It begins as soon as the client walks in the room or you enter the client’s room and ends when you or the client leaves the room: you should maintain inspection constantly throughout the examination.</p> <div class="textbox textbox--examples"><div class="textbox__header"><p class="textbox__title no-indent" style="text-align: center"><strong>Clinical Tip</strong></p> </div> <div class="textbox__content"><p class="no-indent">Good overhead lighting is important to help you see the client. Tangential lighting with a penlight is also effective to help you see specific body areas or lesions, as it focuses the light and highlights contours and protrusions on a relatively flat surface. Tangential lighting involves using the penlight at a low angle and to one side of the area that you are viewing. For example, tangential lighting is often used to inspect the thyroid, the jugular pulsation, the apical impulse, and skin lesions. A magnifying glass may also be helpful to let you get a better look at a specific area.</p> </div> </div> <p>While inspecting, you should note both <strong>normal</strong> and <strong>abnormal</strong> findings. When doing so, you should complete a <strong>bilateral comparison</strong> in which you compare the left side of the body to the ride side for comparison. For example, if you notice that the upper left eye lid is drooping, is this the same for the upper right eye lid? This comparison is helpful because symmetry is usually a good thing, whereas asymmetry should draw your attention as a potential cue for an abnormal finding.</p> <p>The systematic process involves <strong>inspecting the client overall</strong> to gain a general impression, and then <strong>inspecting specific body areas</strong> and body systems to focus your assessment. For example, when inspecting the client overall, you may assess the following:</p> <ul><li><strong>Body position and posture</strong> <ul><li>Are they standing or sitting upright or are they bent/slumped over or leaning to one side? For example, findings may include “client sitting erect in chair” or “leaning to right side.”</li> </ul> </li> <li><strong>Gait </strong>(i.e., balance and movement of limbs while walking) <ul><li>Is it coordinated and balanced? Do they limp, stagger, shuffle, or is their gait uncoordinated or rigid? For example, findings may include “balanced gait” or “slow, shuffling feet with rigid movement of body and limbs.”</li> </ul> </li> <li><strong>Symmetry</strong> <ul><li>Are facial features symmetrical and are limbs symmetrical in length? Do you notice any bony protrusions or deformities on one side of the body, but not the other? For example, findings may include “symmetrical facial features with no deformities” or “asymmetrical facial features with left-sided facial droop.”</li> </ul> </li> <li><strong>Skin</strong> <ul><li>Do you notice any discolouration, bruising, <span class="glossary-term">lesions</span>, swelling, perspiration? It is important to note that not all discolouration is a cue for concern; hyperpigmentation, which is when patches of skin can become darker – this is common as people age and common in people with darker skin tones. For example, findings may include “redness and swelling on left <span class="glossary-term">radiocarpal joint</span>.”</li> </ul> </li> <li><strong>Behaviour</strong> <ul><li>Is their disposition and affect appropriate for the environment? Or does their facial expression and behaviours display cues that you should be concerned about (e.g., laughing or crying uncontrollably, unable to sit still)? Appropriate behaviour varies based on a client’s developmental age, so you should take this into consideration. For example, findings may include “client constantly moving in chair, fidgeting with hands, moving right leg up and down.”</li> </ul> </li> <li><strong>Dress and hygiene</strong> <ul><li>Is the client dressed appropriately for the environment? Are there any body odours or concerning scents? Be aware that clothing style and its appropriateness varies based on a client’s age, their geographical or cultural background, and their style preferences. For example, findings may include “client dressed appropriately for the weather.”</li> </ul> </li> </ul> <p>You will need to inspect specific body areas as you assess specific body systems. For example, you will inspect the chest area when you assess the cardiac system (i.e., the heart). Doing so in this systematic manner will allow you to only expose the area that you are assessing, while ensuring appropriate draping. It will also help you keep track of what you have and have not yet done.</p> <div class="textbox textbox--exercises"><div class="textbox__header"><p class="textbox__title no-indent" style="text-align: center"><strong>Voices of Experience</strong></p> </div> <div class="textbox__content"><p class="no-indent">Always consider what you are inspecting in the context of the overall presentation of the client. With infants, when exposing parts of their body, cover them up quickly to keep them warm; you should try to keep them covered as much as you can to prevent heat loss. This can also be an opportune time to inspect children while they are playing or interacting with their care partner. For toddlers, use a calm soothing voice and let them gradually get acquainted with you while inspecting. It is important to address the client’s developmental stage; for example, toddlers are more likely to be engaged and respond to your direction if you make them feel important.</p> </div> </div> <h2>Activity: Check Your Understanding</h2> <div class="textbox interactive-content"><span class="interactive-content__icon"></span> <p>An interactive H5P element has been excluded from this version of the text. You can view it online here:<br /> <a href="https://pressbooks.library.torontomu.ca/ippa/?p=30#h5p-6" title="Inspection" data-url="https://pressbooks.library.torontomu.ca/ippa/?p=30#h5p-6">https://pressbooks.library.torontomu.ca/ippa/?p=30#h5p-6</a> </p> </div> <p>&nbsp;</p> <div class="textbox interactive-content"><span class="interactive-content__icon"></span> <p>An interactive H5P element has been excluded from this version of the text. You can view it online here:<br /> <a href="https://pressbooks.library.torontomu.ca/ippa/?p=30#h5p-7" title="Inspection 2" data-url="https://pressbooks.library.torontomu.ca/ippa/?p=30#h5p-7">https://pressbooks.library.torontomu.ca/ippa/?p=30#h5p-7</a> </p> </div> 
	</div>


	</div>
<div class="chapter standard " id="chapter-palpation" title="Palpation">
	<div class="chapter-title-wrap">
		<p class="chapter-number">7</p>
		<h1 class="chapter-title">Palpation</h1>
								</div>
	<div class="ugc chapter-ugc">
				 <p>Palpation is the technique of using your hands/fingers to assess the client based on your <strong>sensation of touch</strong>. It provides the opportunity to use your sense of touch to assess the body and further examine cues that were identified during inspection.</p> <p>As you prepare to touch the client, it is important that you:</p> <ul><li>Ask <strong>permission to touch</strong>. Touch can sometimes be misinterpreted, so it is essential to be purposeful with each movement and explain what you are doing.</li> <li>Consider the <strong>warmth of your hands</strong>. Cold hands can be uncomfortable for the client. Do not blow on your hands to warm them up as this will transfer germs from your mouth to your hands. Instead, rub your hands together to create heat.</li> <li>Avoid <strong><span class="glossary-term">staccato touch</span></strong> unless indicated. The jerk-like movement can be difficult to anticipate for the client. When touching the client, use firm pressure unless otherwise indicated. Light pressure can be ticklish. In this case, sometimes incorporating the client’s hands, where possible, into your palpation technique to reduce tickling.</li> </ul> <p>Palpation provides useful information to assess and evaluate findings related to temperature, texture, moisture, thickness, swelling, elasticity, contour, lumps/masses/deformities, consistency/density, organ location and size, vibration, <span class="glossary-term">pulsatility</span>&nbsp;, <span class="glossary-term">crepitation</span>&nbsp;, and presence of pain. See <strong>Table 1.1</strong>&nbsp;for specifics of how to conduct palpation based on what you are attempting to assess.</p> <p>&nbsp;</p> <div class="textbox textbox--examples"><div class="textbox__header"><p class="textbox__title" style="text-align: center"><strong>Clinical Tip</strong></p> </div> <div class="textbox__content"><p>Always compare the right side and the left side of the body when palpating, because the best standard of comparison is the client’s own anatomy. The presence of a bilateral versus a unilateral finding is of clinical significance. For example, the left ankle should be symmetrical with the right ankle. The presence of edema in one ankle versus both ankles is meaningful for making judgements about the underlying pathology.</p> </div> </div> <p>&nbsp;</p> <p><strong>Table 1.1</strong>: Palpation techniques</p> <table class="lines" style="border-collapse: collapse;width: 100%;height: 1419px"><tbody><tr class="shaded" style="height: 14px"><td style="width: 49.4541%;height: 14px;vertical-align: top"><p class="no-indent"><strong>Technique and rationale</strong></p> </td> <td style="width: 50.4367%;height: 14px;vertical-align: top"><p class="no-indent"><strong>Consideration</strong></p> </td> </tr> <tr style="height: 14px"><td style="width: 49.4541%;height: 14px;vertical-align: top"><p class="no-indent">The dorsal aspect of your hand has thin skin relative to the rest of your hand and is therefore more sensitive to temperature. See <strong>Figure 1.8</strong>.</p> </td> <td style="width: 50.4367%;height: 14px;vertical-align: top"><p class="no-indent"><strong>Temperature</strong> refers to the degree of heat or cold an object holds. Use the dorsal surface of your own hands (i.e., the back of the hands), to assess the temperature of a surface (e.g., skin). For example, findings may include “warm skin temperature on arms, equal bilaterally.”</p> </td> </tr> <tr style="height: 14px"><td style="width: 49.4541%;height: 780px;vertical-align: top" rowspan="8"><p class="no-indent">Your fingertips are densely innervated and therefore sensitive to tactile discrimination. Recall your thumb has a pulse and therefore is not ideal for assessing pulsatility (e.g., pulses) of the client.</p> </td> <td style="width: 50.4367%;height: 14px;vertical-align: top"><p class="no-indent"><strong>Texture</strong> refers to the smoothness or roughness of a surface. For example, findings may include “smooth skin on anterior and posterior aspects of legs.”</p> </td> </tr> <tr style="height: 14px"><td style="width: 50.4367%;height: 14px;vertical-align: top"><p class="indent no-indent"><strong>Thickness</strong> refers to how thin or thick an object is. For example, the palmar aspects (inside) of the hands and the plantar surface (bottoms) of the feet tend to have thicker skin than the rest of the body.</p> </td> </tr> <tr style="height: 89px"><td style="width: 50.4367%;height: 89px;vertical-align: top"><p class="indent no-indent"><strong>Moisture</strong> refers to the amount of wetness/liquid on a surface. Is the skin dry or moist? For example, perspiration can be a normal finding in certain situations such as in a warm environment or after exercise. It can also be an abnormal finding at rest or when it is excessive, for example “<span class="glossary-term">diaphoresis</span> on face, arms and legs, bilaterally.”</p> </td> </tr> <tr style="height: 148px"><td style="width: 50.4367%;height: 148px;vertical-align: top"><p class="no-indent"><strong>Swelling</strong> and <strong>masses </strong>are often assessed using your fingertips. You can also use a grasping motion with the fingertips and thumb, particularly when you are assessing the size and density of a mass. For example, some findings may include “round mass two centimetres by two centimetres midline and superior to umbilicus.”</p> </td> </tr> <tr style="height: 133px"><td style="width: 50.4367%;height: 133px;vertical-align: top"><p class="no-indent"><strong>Pain/tenderness</strong> is best assessed while palpating with your fingertips in which your hand and wrist are kept parallel to the body so that the action does not involve poking or jabbing the client with your fingertips. Always assess a painful area last.</p> </td> </tr> <tr style="height: 28px"><td style="width: 50.4367%;height: 28px;vertical-align: top"><p class="no-indent">The fingertips are often used to assess the various <strong>glands</strong> of the body and the <strong>organ location, size</strong>, and <strong>density</strong>, but the specific technique often depends on the organ and gland that you are assessing. For example, the fingertips can be used to assess the thyroid, lymph nodes, liver, spleen, kidney, intestines, stomach, and bladder. Findings may include “soft abdomen in all four quadrants.”</p> </td> </tr> <tr style="height: 192px"><td style="width: 50.4367%;height: 192px;vertical-align: top"><p class="no-indent"><strong>Pulsatility</strong> refers to pulsations associated with the cardiovascular system. Most commonly, this involves placing the pads of your three fingers (starting with the index finger) over a location to assess a client’s pulse (e.g., the radial pulse or carotid pulse). You can also assess the apical impulse using the pad of your index finger. This will be discussed in more detail when you learn about the cardiac system.</p> </td> </tr> <tr style="height: 162px"><td style="width: 50.4367%;height: 162px;vertical-align: top"><p class="no-indent">One type of <strong>crepitus</strong> is when air becomes trapped in the subcutaneous tissues of the chest/neck area; this is called subcutaneous crepitus. To palpate this crepitus, place your fingers over the chest and palpate in various areas. This will be discussed in more detail when you learn about the respiratory system.</p> </td> </tr> <tr style="height: 59px"><td style="width: 49.4541%;height: 298px;vertical-align: top" rowspan="2"><p class="no-indent">Cupping of hand or grasping with fingers and thumbs will allow you to gain coverage of an anatomical area while feeling for abnormalities.</p> </td> <td style="width: 50.4367%;height: 59px;vertical-align: top"><p class="no-indent"><strong>Bones</strong> and <strong>muscles</strong> (and associated deformities) as well as the <strong>trachea</strong> and <strong>testicles</strong> are often assessed using a gentle grasping motion of the fingers and thumbs.</p> </td> </tr> <tr style="height: 239px"><td style="width: 50.4367%;height: 239px;vertical-align: top"><p class="no-indent">Another type of <strong>crepitation</strong> is an abnormal grating or crunching sound or sensation felt and heard over joints at the location where bones meet. It occurs when the articular surface of bones grinds together. It is different than the sounds that are made when a person cracks their fingers or joints (which are caused by the slipping of tendons/ligaments over bony surfaces). Listen and place your hand on (i.e., cup your hand over) the joint, or grasp the joint with your fingers and thumb, while asking the client to move their joints through a range of motion. This will be discussed in more detail when you learn about the musculoskeletal system.</p> </td> </tr> <tr style="height: 149px"><td style="width: 49.4541%;height: 313px;vertical-align: top" rowspan="2"><p class="no-indent">The metacarpophalangeal joints (base of fingers on the palmar surface) (<strong>Figure 1.9</strong>) or ulnar surface of hands/fingers (<strong>Figure 1.10</strong>) are the most sensitive to movement discrimination (vibration and pulsatility).</p> </td> <td style="width: 50.4367%;height: 149px;vertical-align: top"><p class="no-indent"><strong>Vibration</strong> is a subtle oscillating movement that resembles a quivering or shaking motion. It may be comparable to the sensation of an off-balanced washing machine, standing on a platform when the train is entering, or the sensation from a mild earthquake. Vibrations may be felt over the lungs, termed tactile fremitus; this will be discussed in more detail when you learn about the respiratory system.</p> </td> </tr> <tr style="height: 164px"><td style="width: 50.4367%;height: 164px;vertical-align: top"><p class="no-indent"><strong>Pulsatility</strong>, also referred to as abnormal pulsations felt over the heart, can be assessed with the ulnar surface of your hands or the palmar surface of your metacarpophalangeal joints. These abnormal pulsations are referred to as “thrills” and will be discussed in more detail when you learn about the cardiovascular system. For example, findings may include “a thrill was palpated over second intercostal space left sternal border.”</p> </td> </tr> </tbody> </table> <p><img src="http://pressbooks.library.ryerson.ca/ippa/wp-content/uploads/sites/114/2020/11/IMG_20201101_0835299-01-1024x768.jpeg" alt="" width="1024" height="768" class="alignnone size-large wp-image-312" srcset="https://pressbooks.library.torontomu.ca/ippa/wp-content/uploads/sites/114/2020/11/IMG_20201101_0835299-01-1024x768.jpeg 1024w, https://pressbooks.library.torontomu.ca/ippa/wp-content/uploads/sites/114/2020/11/IMG_20201101_0835299-01-300x225.jpeg 300w, https://pressbooks.library.torontomu.ca/ippa/wp-content/uploads/sites/114/2020/11/IMG_20201101_0835299-01-768x576.jpeg 768w, https://pressbooks.library.torontomu.ca/ippa/wp-content/uploads/sites/114/2020/11/IMG_20201101_0835299-01-1536x1152.jpeg 1536w, https://pressbooks.library.torontomu.ca/ippa/wp-content/uploads/sites/114/2020/11/IMG_20201101_0835299-01-2048x1536.jpeg 2048w, https://pressbooks.library.torontomu.ca/ippa/wp-content/uploads/sites/114/2020/11/IMG_20201101_0835299-01-65x49.jpeg 65w, https://pressbooks.library.torontomu.ca/ippa/wp-content/uploads/sites/114/2020/11/IMG_20201101_0835299-01-225x169.jpeg 225w, https://pressbooks.library.torontomu.ca/ippa/wp-content/uploads/sites/114/2020/11/IMG_20201101_0835299-01-350x263.jpeg 350w" title="" /></p> <p><strong>Figure 1.8</strong>: Palpating for temperature with dorsa of hands</p> <p><img src="http://pressbooks.library.ryerson.ca/ippa/wp-content/uploads/sites/114/2020/11/IMG_20201101_0841300-01-768x1024.jpeg" alt="" width="768" height="1024" class="alignnone size-large wp-image-313" srcset="https://pressbooks.library.torontomu.ca/ippa/wp-content/uploads/sites/114/2020/11/IMG_20201101_0841300-01-768x1024.jpeg 768w, https://pressbooks.library.torontomu.ca/ippa/wp-content/uploads/sites/114/2020/11/IMG_20201101_0841300-01-225x300.jpeg 225w, https://pressbooks.library.torontomu.ca/ippa/wp-content/uploads/sites/114/2020/11/IMG_20201101_0841300-01-1152x1536.jpeg 1152w, https://pressbooks.library.torontomu.ca/ippa/wp-content/uploads/sites/114/2020/11/IMG_20201101_0841300-01-1536x2048.jpeg 1536w, https://pressbooks.library.torontomu.ca/ippa/wp-content/uploads/sites/114/2020/11/IMG_20201101_0841300-01-65x87.jpeg 65w, https://pressbooks.library.torontomu.ca/ippa/wp-content/uploads/sites/114/2020/11/IMG_20201101_0841300-01-350x467.jpeg 350w, https://pressbooks.library.torontomu.ca/ippa/wp-content/uploads/sites/114/2020/11/IMG_20201101_0841300-01-scaled.jpeg 1920w" title="" /></p> <p><strong>Figure 1.9</strong>: Palpating with metacarpophalangeal joints</p> <p><img src="http://pressbooks.library.ryerson.ca/ippa/wp-content/uploads/sites/114/2020/11/IMG_20201101_0842576-01-768x1024.jpeg" alt="" width="768" height="1024" class="alignnone size-large wp-image-314" srcset="https://pressbooks.library.torontomu.ca/ippa/wp-content/uploads/sites/114/2020/11/IMG_20201101_0842576-01-768x1024.jpeg 768w, https://pressbooks.library.torontomu.ca/ippa/wp-content/uploads/sites/114/2020/11/IMG_20201101_0842576-01-225x300.jpeg 225w, https://pressbooks.library.torontomu.ca/ippa/wp-content/uploads/sites/114/2020/11/IMG_20201101_0842576-01-1152x1536.jpeg 1152w, https://pressbooks.library.torontomu.ca/ippa/wp-content/uploads/sites/114/2020/11/IMG_20201101_0842576-01-1536x2048.jpeg 1536w, https://pressbooks.library.torontomu.ca/ippa/wp-content/uploads/sites/114/2020/11/IMG_20201101_0842576-01-65x87.jpeg 65w, https://pressbooks.library.torontomu.ca/ippa/wp-content/uploads/sites/114/2020/11/IMG_20201101_0842576-01-350x467.jpeg 350w, https://pressbooks.library.torontomu.ca/ippa/wp-content/uploads/sites/114/2020/11/IMG_20201101_0842576-01-scaled.jpeg 1920w" title="" /></p> <p><strong>Figure 1.10</strong>: Palpating with ulnar surfaces</p> <div class="textbox textbox--exercises"><div class="textbox__header"><p class="textbox__title" style="text-align: center"><strong>Voices of Experience </strong></p> </div> <div class="textbox__content"><p>Distinguishing normal and abnormal findings comes with practice. It helps to familiarize yourself with common anatomy. Lab time is a unique opportunity to practice your skills and get a feel for human anatomy.</p> <p>Palpation is not just an assessment technique, it is a means of communicating with your patient through touch. Consider what message you are trying to convey through touch. With young children, try to incorporate play and involve the care partner when possible. You can incorporate a child’s toy or teddy bear into the assessment. If a child is ticklish, you can engage them by placing their hand on top of yours and ask them to move your hand to various positions to palpate.</p> <p>For all clients – children, adolescents, and adults – assess their readiness to touch. For example, you may begin by palpating non-invasive areas such as the hands first, and always explain what you will be doing. It is important to observe facial expression as an indicator of how the client is responding and also whether they are in pain.</p> </div> </div> <div class="postbox h5p-sidebar"><div class="h5p-action-bar-settings h5p-panel"><h2>Activity: Check Your Understanding</h2> <div class="textbox interactive-content"><span class="interactive-content__icon"></span> <p>An interactive H5P element has been excluded from this version of the text. You can view it online here:<br /> <a href="https://pressbooks.library.torontomu.ca/ippa/?p=32#h5p-8" title="IPPA - Palpation" data-url="https://pressbooks.library.torontomu.ca/ippa/?p=32#h5p-8">https://pressbooks.library.torontomu.ca/ippa/?p=32#h5p-8</a> </p> </div> </div> </div> <div class="postbox h5p-sidebar"></div> <div class="postbox h5p-sidebar"><div class="h5p-action-bar-settings h5p-panel"></div> </div> 
	</div>


	</div>
<div class="chapter standard " id="chapter-percussion" title="Percussion">
	<div class="chapter-title-wrap">
		<p class="chapter-number">8</p>
		<h1 class="chapter-title">Percussion</h1>
								</div>
	<div class="ugc chapter-ugc">
				 <p>Percussion involves <strong>tapping the body to elicit sounds</strong> and determining whether the sounds are appropriate for a particular organ or area of the body. Try tapping different surfaces with your fingertips and compare the sounds: a firm hard surface like a wood desk or table, a thick textbook, a window, or even a drum. As you tap these surfaces, you can hear that each surface elicits a different sound based on the object’s consistency. This concept also applies to the body.</p> <p>Each body part that you percuss provides information about the consistency as well as the size and borders of the underlying structure. For example, the percussion sounds can tell you if the organ is:</p> <ul><li><strong>Air filled</strong> (e.g., lungs)</li> <li><strong>Fluid filled</strong> (e.g., bladder and stomach)</li> <li><strong>Dense</strong> (e.g., liver)</li> </ul> <p>Percussion can also help reveal the presence of <strong>masses</strong>, particularly if they are close to the surface of the body.</p> <p>There are three approaches to percussion, but the most widely used is <strong>indirect percussion,</strong> which is the application of a mediated force using parts of both of your hands. See <strong>Figure 1.8 </strong>demonstrating the technique of indirect percussion.</p> <p><img src="http://pressbooks.library.ryerson.ca/ippa/wp-content/uploads/sites/114/2020/12/IMG_8500-768x1024.jpg" alt="" width="768" height="1024" class="alignnone size-large wp-image-323" srcset="https://pressbooks.library.torontomu.ca/ippa/wp-content/uploads/sites/114/2020/12/IMG_8500-768x1024.jpg 768w, https://pressbooks.library.torontomu.ca/ippa/wp-content/uploads/sites/114/2020/12/IMG_8500-225x300.jpg 225w, https://pressbooks.library.torontomu.ca/ippa/wp-content/uploads/sites/114/2020/12/IMG_8500-1152x1536.jpg 1152w, https://pressbooks.library.torontomu.ca/ippa/wp-content/uploads/sites/114/2020/12/IMG_8500-1536x2048.jpg 1536w, https://pressbooks.library.torontomu.ca/ippa/wp-content/uploads/sites/114/2020/12/IMG_8500-65x87.jpg 65w, https://pressbooks.library.torontomu.ca/ippa/wp-content/uploads/sites/114/2020/12/IMG_8500-350x467.jpg 350w, https://pressbooks.library.torontomu.ca/ippa/wp-content/uploads/sites/114/2020/12/IMG_8500-scaled.jpg 1920w" title="" /></p> <p><span style="color: #000000"><strong>Figure 1.8</strong>: Indirect percussion technique</span></p> <p>&nbsp;</p> <p>Indirect percussion is often used to assess the lungs and the abdomen (e.g., bowels, bladder, liver). The steps of this technique are as follows:</p> <ol><li><strong>Non-dominant hand</strong>: With your hand parallel to the body, place the distal interphalangeal joint of the pleximeter (middle) finger of your non-dominant hand firmly on the body region to percuss. Ensure that only your interphalangeal joint is touching the body (and not the rest of the hand) and that the finger is fully extended.</li> <li><strong>Dominant hand</strong>: Flex (bend) the pleximeter finger of your dominant hand and with the tip of your finger, tap twice on the distal interphalangeal joint of your non dominant hand. The pleximeter finger of your dominant hand should be at a 90-degree angle to the surface of the body. The motion should be firm and quick with a very short duration. To optimize this motion, the wrist of your non-dominant hand should be relaxed and loose with your forearm parallel to the person’s body. This skill requires lots of practice, so start by practicing the technique on a table or your own leg.</li> </ol> <p>As a nurse, you need to become familiar with the expected percussion sounds so that you can identify what is normal and what is abnormal. See <strong>Figure 1.9</strong> for the expected location of percussion sounds and <strong>Table 1.2</strong>&nbsp;for an explanation of the types of percussion sounds heard including resonance, hyperresonance, tympany, dullness, and flatness.</p> <p><img src="http://pressbooks.library.ryerson.ca/ippa/wp-content/uploads/sites/114/2020/08/3-1024x576.png" alt="" class="alignnone size-large wp-image-147" width="1024" height="576" srcset="https://pressbooks.library.torontomu.ca/ippa/wp-content/uploads/sites/114/2020/08/3-1024x576.png 1024w, https://pressbooks.library.torontomu.ca/ippa/wp-content/uploads/sites/114/2020/08/3-300x169.png 300w, https://pressbooks.library.torontomu.ca/ippa/wp-content/uploads/sites/114/2020/08/3-768x432.png 768w, https://pressbooks.library.torontomu.ca/ippa/wp-content/uploads/sites/114/2020/08/3-1536x864.png 1536w, https://pressbooks.library.torontomu.ca/ippa/wp-content/uploads/sites/114/2020/08/3-65x37.png 65w, https://pressbooks.library.torontomu.ca/ippa/wp-content/uploads/sites/114/2020/08/3-225x127.png 225w, https://pressbooks.library.torontomu.ca/ippa/wp-content/uploads/sites/114/2020/08/3-350x197.png 350w, https://pressbooks.library.torontomu.ca/ippa/wp-content/uploads/sites/114/2020/08/3.png 1920w" title="" /></p> <p><strong>Figure 1.9</strong>: Expected location of percussion sounds</p> <p>&nbsp;</p> <p><strong>Table 1.2</strong>: Percussion sounds</p> <table class="lines" style="border-collapse: collapse;width: 100%;height: 471px"><tbody><tr style="height: 14px"><td class="shaded" style="width: 50%;height: 14px;vertical-align: top"><p class="no-indent"><strong>Sound</strong></p> </td> <td class="shaded" style="width: 49.8908%;height: 14px;vertical-align: top"><p class="no-indent"><strong>Body locations</strong></p> </td> </tr> <tr style="height: 103px"><td style="width: 50%;height: 103px;vertical-align: top"><p class="no-indent"><strong>Resonance</strong> is a low-pitched sound that is hollow in terms of sound quality with a moderate duration.</p> </td> <td style="width: 49.8908%;height: 103px;vertical-align: top"><p class="no-indent">Resonance is the normal sound heard when percussing the lungs because they are filled with air rather than dense tissue. However, it may be more of a dull or flat sound if a client has adipose tissue or a muscular chest, because this increased density modifies the sound. For example, findings may include “resonance anteriorly in all lobes of the lungs.”</p> </td> </tr> <tr style="height: 163px"><td style="width: 50%;height: 163px;vertical-align: top"><p class="no-indent"><strong>Hyperresonance</strong> is also low-pitched but is more of a booming sound in terms of sound quality and has a longer duration than resonance.</p> </td> <td style="width: 49.8908%;height: 163px;vertical-align: top"><p class="no-indent">Hyperresonance can be a normal lung sound in small children or children with thin chest walls when percussing because of the round anatomical shape of their thorax. However, hyperresonance in older children and adults can be a cue that should alert you to the possible hyperinflation of lungs that occurs with many conditions (e.g., emphysema, pneumothorax). In this case, hyperresonance occurs because trapped air hyper-inflates the lungs over time and changes the anatomical shape of the thorax. For example, findings may include “resonance in lungs equal bilaterally” or “resonance in right lung and hyperresonance in left lung.”</p> </td> </tr> <tr style="height: 163px"><td style="width: 50%;height: 163px;vertical-align: top"><p class="no-indent"><strong>Tympany</strong> is high-pitched and sounds like a drum in terms of quality with longer duration than resonance and hyperresonance.</p> </td> <td style="width: 49.8908%;height: 163px;vertical-align: top"><p class="no-indent">When performing percussion, tympany is normally heard over fluid-filled organs such as the stomach, bladder, and bowels. The combination of air and fluid creates a drum-like sound. However, the sound may be more dull or flat if a client has adipose tissue or muscles over the abdomen, because of the increased density. This can also occur if the bowels are full of stool or in the presence of <span class="glossary-term">ascites</span> . For example, findings may include “tympany with scattered dullness through all quadrants of the abdomen with dullness in upper portion of right upper quadrant.”</p> </td> </tr> <tr style="height: 14px"><td style="width: 50%;height: 14px;vertical-align: top"><p class="no-indent"><strong>Dullness</strong> is a quiet thud in terms of quality with a high pitch and short duration.</p> </td> <td style="width: 49.8908%;height: 14px;vertical-align: top"><p class="no-indent">Dullness is the normal sound heard when percussing tissues that are dense in consistency, such as the liver. Dullness is typically considered an abnormal sound if elicited with percussion over the lungs or the intestines, stomach, or bladder. In this case, it could represent intestines that are filled with stool, indicating constipation, a bowel obstruction, or some sort of mass. For example, findings may include “dullness in left lower quadrant.”</p> </td> </tr> <tr style="height: 14px"><td style="width: 50%;height: 14px;vertical-align: top"><p class="no-indent"><strong>Flatness</strong> is even more quiet than dullness with an even shorter duration and a high pitch.</p> </td> <td style="width: 49.8908%;height: 14px;vertical-align: top"><p class="no-indent">Flatness is elicited when percussing muscle and bone because they are very dense tissues and often close to the body’s surface, but these areas are usually not percussed because this does not generally provide relevant data. Hearing flatness over an area that typically elicits resonance or tympany should be a cue for you to engage in more careful examination. Although it may suggest adipose or muscular tissue, it can also indicate a mass.</p> </td> </tr> </tbody> </table> <p>&nbsp;</p> <p>Another form of <strong>indirect percussion</strong> is used to assess the kidneys; this technique will be discussed in more detail when you learn about abdominal assessment.</p> <p><strong>Direct percussion</strong> involves an unmediated approach with the use of only one of your hands; it is used to assess pain/tenderness associated with the sinuses or assessing the newborn/infant’s lungs. The steps of this technique involve flexing the index and pleximeter fingers of your dominant hand, and directly tapping the body’s surface with the tips of these fingers at a 90-degree angle.</p> <p>A third approach, <strong>tool-facilitated percussion</strong>, involves using an instrument to tap the body (e.g., a reflex hammer); this technique will be discussed in more detail when you learn about neurological assessment.</p> <p>&nbsp;</p> <div class="textbox textbox--examples"><div class="textbox__header"><p class="textbox__title" style="text-align: center"><strong>Clinical Tip</strong></p> </div> <div class="textbox__content"><p>You must keep your nails trimmed short to perform indirect and direct percussion so that you can perform the technique accurately and elicit a useful sound. It takes practice to perfect the technique. Keep in mind the phrase “don’t be a woodpecker” – when percussing, just use two taps on the pleximeter finger in each location, and focus on listening for sounds. With children, it is important to engage the client and incorporate play when appropriate.</p> </div> </div> <p>&nbsp;</p> <div class="textbox textbox--exercises"><div class="textbox__header"><p class="textbox__title" style="text-align: center"><strong>Voices of Experience </strong></p> </div> <div class="textbox__content"><p>Percussion is one of the least used of all physical assessment techniques. It is a technique that is better confirmed using more accurate tests such as an X-ray. However, when such diagnostic tests are not readily available, such as in rural, remote or underdeveloped regions, percussion is an important non-invasive technique. Additionally, percussion is not effective when the client has a significant amount of adipose tissue or is very muscular, as these types of tissues modify the sounds you expect to hear.</p> </div> </div> <div class="postbox h5p-sidebar"><h2>Activity: Check Your Understanding</h2> <div class="h5p-action-bar-settings h5p-panel"><div class="textbox interactive-content"><span class="interactive-content__icon"></span> <p>An interactive H5P element has been excluded from this version of the text. You can view it online here:<br /> <a href="https://pressbooks.library.torontomu.ca/ippa/?p=34#h5p-9" title="IPPA - Percussion 1" data-url="https://pressbooks.library.torontomu.ca/ippa/?p=34#h5p-9">https://pressbooks.library.torontomu.ca/ippa/?p=34#h5p-9</a> </p> </div> </div> </div> <div class="postbox h5p-sidebar"><div class="postbox h5p-sidebar"><div></div> <div class="h5p-action-bar-settings h5p-panel"><div class="textbox interactive-content"><span class="interactive-content__icon"></span> <p>An interactive H5P element has been excluded from this version of the text. You can view it online here:<br /> <a href="https://pressbooks.library.torontomu.ca/ippa/?p=34#h5p-10" title="IPPA - Percussion 2" data-url="https://pressbooks.library.torontomu.ca/ippa/?p=34#h5p-10">https://pressbooks.library.torontomu.ca/ippa/?p=34#h5p-10</a> </p> </div> </div> </div> <div class="postbox h5p-sidebar"></div> </div> <div></div> 
	</div>


	</div>
<div class="chapter standard " id="chapter-auscultation" title="Auscultation">
	<div class="chapter-title-wrap">
		<p class="chapter-number">9</p>
		<h1 class="chapter-title">Auscultation</h1>
								</div>
	<div class="ugc chapter-ugc">
				 <p>The assessment technique of <strong>auscultation</strong> involves <strong>listening</strong> to the body. Although this is typically performed with a <strong>stethoscope</strong>, you can sometimes hear sounds from the body using just your ear. For example, you have probably heard your own or another person’s stomach growling; another example is heavy breathing after exercise.</p> <p>You can perform auscultation on the body to hear several sounds including:</p> <ul><li><strong><span class="glossary-term">High-pitched sounds</span></strong> like lung sounds, bowel sounds, and some heart sounds.</li> <li><strong><span class="glossary-term">Low-pitched sounds</span></strong> like some heart sounds, as well as sounds associated with abnormal vascular sounds of the carotid arteries and the aorta.</li> </ul> <p>To perform auscultation, you need a high-quality stethoscope. See <strong>Figure 1.10</strong> for an <strong>acoustic stethoscope</strong> with a separate diaphragm on one side and a bell on the other side. The <strong>diaphragm</strong> is used for auscultating high-pitched sounds, while the <strong>bell</strong> is used for auscultating low-pitched sounds. Another option is an acoustic stethoscope in which the diaphragm and bell are manufactured as one piece: using this type of stethoscope, you can alternate pressure to auscultate for high- or low-pitched sounds, using light pressure to accentuate low-pitched sounds and firmer pressure to accentuate high-pitched sounds. There are also electronic stethoscopes to help amplify sounds for people with hearing loss. Some advanced stethoscopes facilitate better ambient noise reduction, sound amplification, and capability to record sounds (Leng et al., 2015). Unlike electronic stethoscopes, an acoustic stethoscope does not amplify the body’s sounds; it simply reduces interference from extraneous noises around you.</p> <p><img src="http://pressbooks.library.ryerson.ca/ippa/wp-content/uploads/sites/114/2020/09/IMG_8265-768x1024.jpg" alt="" class="alignnone size-large wp-image-233" width="768" height="1024" srcset="https://pressbooks.library.torontomu.ca/ippa/wp-content/uploads/sites/114/2020/09/IMG_8265-768x1024.jpg 768w, https://pressbooks.library.torontomu.ca/ippa/wp-content/uploads/sites/114/2020/09/IMG_8265-225x300.jpg 225w, https://pressbooks.library.torontomu.ca/ippa/wp-content/uploads/sites/114/2020/09/IMG_8265-1152x1536.jpg 1152w, https://pressbooks.library.torontomu.ca/ippa/wp-content/uploads/sites/114/2020/09/IMG_8265-1536x2048.jpg 1536w, https://pressbooks.library.torontomu.ca/ippa/wp-content/uploads/sites/114/2020/09/IMG_8265-65x87.jpg 65w, https://pressbooks.library.torontomu.ca/ippa/wp-content/uploads/sites/114/2020/09/IMG_8265-350x467.jpg 350w, https://pressbooks.library.torontomu.ca/ippa/wp-content/uploads/sites/114/2020/09/IMG_8265-scaled.jpg 1920w" title="" /></p> <p><span style="color: #000000"><strong>Figure</strong> <strong>1.10</strong>: Stethoscope with a separate diaphragm and bell</span></p> <h2><strong>Use of the stethoscope</strong></h2> <p>Proper use of a stethoscope involves several steps.</p> <ol><li>Begin by <strong>explaining the procedure</strong> and asking <strong>permission to touch</strong>.</li> <li>Next, create a <strong>quiet environment</strong>. Turn off or mute the sound on cell phones, radios, or televisions. Ask the client to not speak or move while you are listening. Also, many clinical environments have ambient noise that you cannot control, particularly in hospitals, when beds are close together, or in an open concept unit such as an emergency room. You will need to focus your hearing; it may help to close your eyes when listening.</li> <li>Third, <strong>cleanse the stethoscope</strong>. The stethoscope is a potential vector of transmission that can carry pathogenic bacteria (Horiuchi et al., 2018; Tschopp et al., 2016). Clean the entire stethoscope using an alcohol pad on the earpieces and the end piece <strong>immediately prior to use</strong>. Always clean the stethoscope from cleanest to dirtiest areas, therefore earpieces first and bell/diaphragm last.</li> <li>Next, place the <strong>earpieces</strong> in your ears so that they are <strong>pointing toward your nose</strong> as per <strong>Figure 1.11</strong>. This positioning aligns with the angle of your ear canal and enhances your capacity to hear. You may need to wiggle them into place so that they are comfortable and angling down your ear canal.</li> <li>Last, <strong>open or close the diaphragm or bell</strong> depending on which end piece you want to use. It is important to tap on the diaphragm to ensure sounds are heard if using the diaphragm or not heard if using the bell. See <strong>Film Clip X</strong> on how to open and close the diaphragm and bell.</li> </ol> <p>&nbsp;</p> <p><img src="http://pressbooks.library.ryerson.ca/ippa/wp-content/uploads/sites/114/2020/06/Stethoscope-Correct-1024x740-1.jpg" alt="" class="alignnone size-full wp-image-48" width="1024" height="740" srcset="https://pressbooks.library.torontomu.ca/ippa/wp-content/uploads/sites/114/2020/06/Stethoscope-Correct-1024x740-1.jpg 1024w, https://pressbooks.library.torontomu.ca/ippa/wp-content/uploads/sites/114/2020/06/Stethoscope-Correct-1024x740-1-300x217.jpg 300w, https://pressbooks.library.torontomu.ca/ippa/wp-content/uploads/sites/114/2020/06/Stethoscope-Correct-1024x740-1-768x555.jpg 768w, https://pressbooks.library.torontomu.ca/ippa/wp-content/uploads/sites/114/2020/06/Stethoscope-Correct-1024x740-1-65x47.jpg 65w, https://pressbooks.library.torontomu.ca/ippa/wp-content/uploads/sites/114/2020/06/Stethoscope-Correct-1024x740-1-225x163.jpg 225w, https://pressbooks.library.torontomu.ca/ippa/wp-content/uploads/sites/114/2020/06/Stethoscope-Correct-1024x740-1-350x253.jpg 350w" title="" /></p> <p><span style="color: #000000"><strong>Figure</strong> <strong>1.11</strong>: Positioning in the ears</span></p> <p>&nbsp;</p> <p>&nbsp;</p> <p></p> <div class="textbox interactive-content interactive-content--video"><span class="interactive-content__icon"></span> <p>One or more interactive elements has been excluded from this version of the text. You can view them online here: <a href="https://pressbooks.library.torontomu.ca/ippa/?p=36#video-36-1" title="Auscultation">https://pressbooks.library.torontomu.ca/ippa/?p=36#video-36-1</a> </p> </div> <p><strong>Film clip X</strong>: Opening and closing the stethoscope</p> <p>&nbsp;</p> <p>Make note of your findings when performing auscultation. For example, findings may include “clear air entry bilaterally in all lobes” or “high-pitched gurgling bowel sounds present in all four quadrants.”</p> <p>&nbsp;</p> <div class="textbox textbox--examples"><div class="textbox__header"><p class="textbox__title" style="text-align: center"><strong>Clinical Tip</strong></p> </div> <div class="textbox__content"><p><strong>How best to listen</strong></p> <p>The best practice, supported by evidence, is to conduct assessments on bare skin. Always place the end piece of the stethoscope on bare skin, and never listen over the client’s gown or clothing as this can modify the sounds that you are hearing. In the clinical setting, you will witness many healthcare providers listening over clothing, but this is not the correct way to auscultate sounds. <span style="text-align: initial;font-size: 1em">Substantial amounts of hair (e.g., on the chest, back or abdomen) can also create extraneous noise, making it difficult to hear the expected sounds. </span></p> <p><span style="text-align: initial;font-size: 1em">For infants, the best time to auscultate is while the infant is sleeping or quiet; if they start crying, encourage the care partner to console the infant by repositioning, breastfeeding/bottle, or soother (if permitted). If you are trying to auscultate the lungs of a young child, you could ask the child to take a big breath and pretend they are blowing bubbles or blowing out candles on a birthday cake.</span></p> </div> </div> <p>&nbsp;</p> <div class="textbox textbox--exercises"><div class="textbox__header"><p class="textbox__title" style="text-align: center"><strong>Voices of Experience</strong></p> </div> <div class="textbox__content"><p>It is important to know the expected normal sounds and the abnormal sounds. You should trust what you are hearing. If you are struggling to identify the sounds you are hearing, try closing your eyes and focusing. If a sound is not normal, act on this and/or ask for a second opinion from your clinical instructor or preceptor. It is always good practice to listen to body sounds in partnership with an expert nurse.</p> </div> </div> <h2>Activity: Check Your Understanding</h2> <div class="postbox h5p-sidebar"><div class="h5p-action-bar-settings h5p-panel"><div class="textbox interactive-content"><span class="interactive-content__icon"></span> <p>An interactive H5P element has been excluded from this version of the text. You can view it online here:<br /> <a href="https://pressbooks.library.torontomu.ca/ippa/?p=36#h5p-11" title="IPPA - Auscultation" data-url="https://pressbooks.library.torontomu.ca/ippa/?p=36#h5p-11">https://pressbooks.library.torontomu.ca/ippa/?p=36#h5p-11</a> </p> </div> </div> </div> 
	</div>


	</div>
<div class="chapter standard " id="chapter-closing-of-the-objective-assessment" title="Closing of the Objective Assessment">
	<div class="chapter-title-wrap">
		<p class="chapter-number">10</p>
		<h1 class="chapter-title">Closing of the Objective Assessment</h1>
								</div>
	<div class="ugc chapter-ugc">
				 <p>You should <strong>notify the client</strong> when you have completed the physical assessment and the collection of your objective data. You can provide a <strong>brief summary</strong> of your findings and the <strong>next steps</strong> based on these findings. You should also <strong>inquire </strong>whether there is anything you might not have seen or assessed that the client thinks might be of note.</p> <p>Here are some examples of what you might say:</p> <ul><li>“The physical assessment is coming to a close. There were no abnormal findings, but you will have your blood taken next. Before I finish, is there anything else that you would like to share with me or have me look at?”</li> <li>“The physical assessment is coming to a close. I am going to notify the physician of the mole on your back that you and I were talking about. Because of the changes in the mole colour and size, it is important that the physician looks at it to see if further assessment is required. Before I finish, do you have any concerns that I have not addressed or any questions?”</li> </ul> <p>At the end of the assessment, ensure that you <strong>lower the bed</strong> and place the <strong>call bell</strong> in reach if the client is on an inpatient unit. Otherwise, you can notify the client that you will step out of the room and they can get dressed; you should also tell them where to place their gown.</p> <p>Always finish by asking if the client has any questions, and of course, perform hand hygiene.</p> 
	</div>


	</div>
<div class="chapter standard " id="chapter-key-takeaways" title="Key Takeaways">
	<div class="chapter-title-wrap">
		<p class="chapter-number">11</p>
		<h1 class="chapter-title">Key Takeaways</h1>
								</div>
	<div class="ugc chapter-ugc">
				 <div class="textbox textbox--key-takeaways"><div class="textbox__header"><p class="textbox__title no-indent" style="text-align: center"><strong>Key Takeaways</strong></p> </div> <div class="textbox__content"><ul><li><p class="no-indent">Use a trauma-informed approach and treat clients with respect and compassion as they may feel vulnerable and afraid during a physical assessment.</p> </li> <li><p class="no-indent">Always compare findings bilaterally.</p> </li> <li><p class="no-indent">Ensure you clean equipment before you use it.</p> </li> <li><p class="no-indent">Perform hand hygiene before and after each physical assessment.</p> </li> </ul> </div> </div> <p>&nbsp;</p> 
	</div>


	</div>
<div class="chapter standard " id="chapter-references" title="References">
	<div class="chapter-title-wrap">
		<p class="chapter-number">12</p>
		<h1 class="chapter-title">References</h1>
								</div>
	<div class="ugc chapter-ugc">
				 <p>Horiuchi, Y., Wettersten, N., Vasudevan, R., Barnett, O., &amp; Maisel, A. (2018). Stethoscope as a vector for infectious disease. <em>Current Emergency and Hospital Medicine Reports</em>, 6, 120-125. <a href="https://doi.org/10.1007/s40138-018-0167-4" data-url="https://doi.org/10.1007/s40138-018-0167-4">https://doi.org/10.1007/s40138-018-0167-4</a></p> <p>IPAC (2018). <em>IPAC Canada practice recommendations: Cleaning and disinfection of non-critical multi-use equipment and devices in community settings</em>. <a href="https://ipac-canada.org/photos/custom/Members/pdf/18Jan_Cleaning_NonCrit_Equip_Comm_Practice_Recomm_final.pdf" data-url="https://ipac-canada.org/photos/custom/Members/pdf/18Jan_Cleaning_NonCrit_Equip_Comm_Practice_Recomm_final.pdf">https://ipac-canada.org/photos/custom/Members/pdf/18Jan_Cleaning_NonCrit_Equip_Comm_Practice_Recomm_final.pdf</a></p> <p>Leng, S., Tan, R., Chai, K., Wang, C., Ghista, D., &amp; Zhong, L. (2015). The electronic stethoscope. <em>Biomedical Engineering Online</em>, <em>14</em>(66), 1-37. http://doi.org/10.1186/s12938-015-0056-y</p> <p>National Council of State Boards of Nursing (2018). Measuring the right things: NCSBN’s Next Generation NCLEX: Endeavors to go beyond the leading edge. <em>In Focus: A Publication of the National Council of State Boards of Nursing</em>. <a href="https://www.ncsbn.org/InFocus_Winter_2018.pdf" data-url="https://www.ncsbn.org/InFocus_Winter_2018.pdf">https://www.ncsbn.org/InFocus_Winter_2018.pdf</a></p> <p>Public Health Agency of Canada (2012). <em>Hand hygiene practices in healthcare settings</em>. Ottawa. <a href="http://publications.gc.ca/collections/collection_2012/aspc-phac/HP40-74-2012-eng.pdf" data-url="http://publications.gc.ca/collections/collection_2012/aspc-phac/HP40-74-2012-eng.pdf">http://publications.gc.ca/collections/collection_2012/aspc-phac/HP40-74-2012-eng.pdf</a></p> <p>Public Health Ontario (2018). <em>Best practices for environmental cleaning for prevention and control of infections in all health care settings</em> (3rd edition). Queen’s Printer for Ontario. <a href="https://www.publichealthontario.ca/-/media/documents/bp-environmental-cleaning.pdf?la=en" data-url="https://www.publichealthontario.ca/-/media/documents/bp-environmental-cleaning.pdf?la=en">https://www.publichealthontario.ca/-/media/documents/bp-environmental-cleaning.pdf?la=en</a></p> <p>Public Health Ontario (2014). <em>Best practices for hand hygiene in all health care settings</em> (4th edition). Queen’s Printer for Ontario. <a href="https://www.publichealthontario.ca/-/media/documents/bp-hand-hygiene.pdf?la=en" data-url="https://www.publichealthontario.ca/-/media/documents/bp-hand-hygiene.pdf?la=en">https://www.publichealthontario.ca/-/media/documents/bp-hand-hygiene.pdf?la=en</a></p> <p>Tschopp, C., Schneider, A., Longtin, Y., Renzi, G., Schrenzel, J., &amp; Pittet, D. (2016). Predictors of heavy stethoscope contamination following a physical examination. <em>Infection Control &amp; Hospital Epidemiology</em>, <em>37</em>(6), 673-679. http://doi.org/10.1017/ice.2016.40</p> 
	</div>


	</div>

</div>
<div class="back-matter glossary " id="back-matter-glossary" title="Glossary">
	<div class="back-matter-title-wrap">
		<p class="back-matter-number">1</p>
		<h1 class="back-matter-title">Glossary</h1>
								</div>
	<div class="ugc back-matter-ugc">
				 <dl data-type="glossary"><dt data-type="glossterm"><dfn id="dfn-strongclient-safetystrong"><strong>client safety</strong></dfn></dt> <dd data-type="glossdef"><p>Client safety is the reduction and mitigation of preventable unsafe acts and practices during the process of healthcare.</p> </dd> <dt data-type="glossterm"><dfn id="dfn-strongolder-adultstrongstrongsstrong"><strong>older adult</strong><strong>s</strong></dfn></dt> <dd data-type="glossdef"><p>The definition of older adult varies, but is typically 65 and older.</p> </dd> <dt data-type="glossterm"><dfn id="dfn-adolescent">adolescent</dfn></dt> <dd data-type="glossdef"><p>Adolescents are ages 12 to 17.</p> </dd> <dt data-type="glossterm"><dfn id="dfn-ascites">ascites</dfn></dt> <dd data-type="glossdef"><p>Interstitial fluid in the abdomen</p> </dd> <dt data-type="glossterm"><dfn id="dfn-care-partner">care partner</dfn></dt> <dd data-type="glossdef"><p>Care partners are family and friends who are involved in helping to care for the client.</p> </dd> <dt data-type="glossterm"><dfn id="dfn-children">children</dfn></dt> <dd data-type="glossdef"><p>Although legally anyone 17 and under is considered a child, the term is usually reserved for ages 1-11; thus, it includes toddlers, preschoolers and middle childhood.</p> </dd> <dt data-type="glossterm"><dfn id="dfn-client-safety">client safety</dfn></dt> <dd data-type="glossdef"><p>Client safety is the reduction and mitigation of preventable unsafe acts and practices during the process of healthcare.</p> </dd> <dt data-type="glossterm"><dfn id="dfn-crepitation">crepitation</dfn></dt> <dd data-type="glossdef"><p>The abnormal grating or crunching sound over moving joints.</p> </dd> <dt data-type="glossterm"><dfn id="dfn-diaphoresis">diaphoresis</dfn></dt> <dd data-type="glossdef"><p>Excessive perspiration.</p> </dd> <dt data-type="glossterm"><dfn id="dfn-drape">drape</dfn></dt> <dd data-type="glossdef"><p>A small sheet that is used to cover a person.</p> </dd> <dt data-type="glossterm"><dfn id="dfn-gait">gait</dfn></dt> <dd data-type="glossdef"><p>A person’s pattern of walking including movement of limbs.</p> </dd> <dt data-type="glossterm"><dfn id="dfn-high-pitched-sounds">High-pitched sounds</dfn></dt> <dd data-type="glossdef"><p>High-pitched sounds are sounds with a high frequency that resemble a shrill or a piercing, sharp scream.</p> </dd> <dt data-type="glossterm"><dfn id="dfn-infants">infants</dfn></dt> <dd data-type="glossdef"><p>Infants are 0 -1 year old.</p> </dd> <dt data-type="glossterm"><dfn id="dfn-lesions">lesions</dfn></dt> <dd data-type="glossdef"><p>A general term referring to an abnormal appearance or growth.</p> </dd> <dt data-type="glossterm"><dfn id="dfn-low-pitched-sounds">Low-pitched sounds</dfn></dt> <dd data-type="glossdef"><p>Low-pitched sounds are sounds with a low frequency that resemble a booming drum or a person with a deep, low voice.</p> </dd> <dt data-type="glossterm"><dfn id="dfn-pulsatility">pulsatility</dfn></dt> <dd data-type="glossdef"><p>The quality of pulsations, such as the pulse.</p> </dd> <dt data-type="glossterm"><dfn id="dfn-radiocarpal-joint">radiocarpal joint</dfn></dt> <dd data-type="glossdef"><p>Is where the radius bone meets the carpal bones.</p> </dd> <dt data-type="glossterm"><dfn id="dfn-staccato-touch">staccato touch</dfn></dt> <dd data-type="glossdef"><p>Quick, short taps.</p> </dd> <dt data-type="glossterm"><dfn id="dfn-subjective-data">subjective data&nbsp;</dfn></dt> <dd data-type="glossdef"><p>Information that the client shares with you.</p> </dd> <dt data-type="glossterm"><dfn id="dfn-trauma">trauma</dfn></dt> <dd data-type="glossdef"><p>Trauma is the response or outcome of a distressing experience or event that affects a person’s sense of self and overwhelms a person and their ability to function and cope (e.g., violence, accident, natural disaster).</p> </dd> <dt data-type="glossterm"><dfn id="dfn-vocal-intonation">vocal intonation</dfn></dt> <dd data-type="glossdef"><p>Rise and fall of voice.</p> </dd> </dl> 
	</div>


	</div>

</body>
</html>