
Chapter 15 – Neurological system assessment
CN II – Optic Nerves
The optic nerves (CN II) can be tested in several ways. Nurses often assess for visual acuity using the Snellen eye chart, and peripheral vision using the confrontational visual field exam.
Visual Acuity Testing
Steps for evaluating visual acuity and the functioning of the CN II include:
- In a well-lit environment, have the client stand 20 feet away from the Snellen eye chart (see Figure 7). The chart should be placed on the wall at about 5 to 6 feet from the floor (at eye level). The client should keep their glasses on or their contact lenses in if they are used for distance. Snellen eye charts are also available in 10 feet formats; in this case, the client stands 10 feet away from the chart.
- Ask the client to cover one eye with the palm of their hand.
- Ask the client to read as many lines as they can, without squinting, beginning with the top line and reading one line at a time. Typically, you will stand to the side of the chart, and if necessary, you may point to the line.
- When the client has read as far as they can, ask them to try to read the next line.
- If they make an error on a line, ask them to repeat the line. They can make a maximum of two errors on a line in order for their visual acuity to be identified on that line. If they make more than two errors, then their visual acuity is noted as the line above.
- Note the client’s visual acuity using a fraction: the numerator (top number) is the distance the client is standing from the chart and the denominator (bottom number) is the distance at which a person with normal vision can read that line, as noted on the Snellen eye chart (Canadian Association of Optometrists, 2023; Porter, 2022). Normal vision is 20/20 on the Snellen eye chart. The denominator should be reported as the last line the client could read, even if they made two errors on the line (e.g., they couldn’t read two of the letters or they made an error with two of the letters). Report the eye (i.e., left or right), how many letters they missed, and whether they were wearing glasses or contact lenses (see Clinical Tip textbox for more information).
- Repeat steps 2 to 6 for the other eye.
- Normal visual acuity is 20/20, which means that the client can read at 20 feet what a person with normal/good vision can read at 20 feet (Porter, 2022).
- Abnormal visual acuity can involve situations where the denominator is bigger, and sometimes where the numerator is smaller. For example, 20/60 means that the client can read at 20 feet what a person with normal/good vision can read at 60 feet. Sometimes a client cannot read any of the letters at 20 feet. If so, they should move closer to the chart (e.g., 10 feet) and attempt to read the chart. In this case, the numerator would be 10. As an example, you may report vision as 10/80, meaning that the client can read at 10 feet what a person with normal/good vision can read at 80 feet.
- Note the findings:
- Normal findings might be documented as: “CNII exam: visual acuity 20/20 -1 in both eyes with contact lenses.” (NOTE: -1 represents the number of letters they missed with each eye).
- Abnormal findings might be documented as: “CNII exam: 20/20 -2 in left eye, 20/200 in right eye with no glasses/contact lenses.” (This reflects abnormal findings in the right eye).
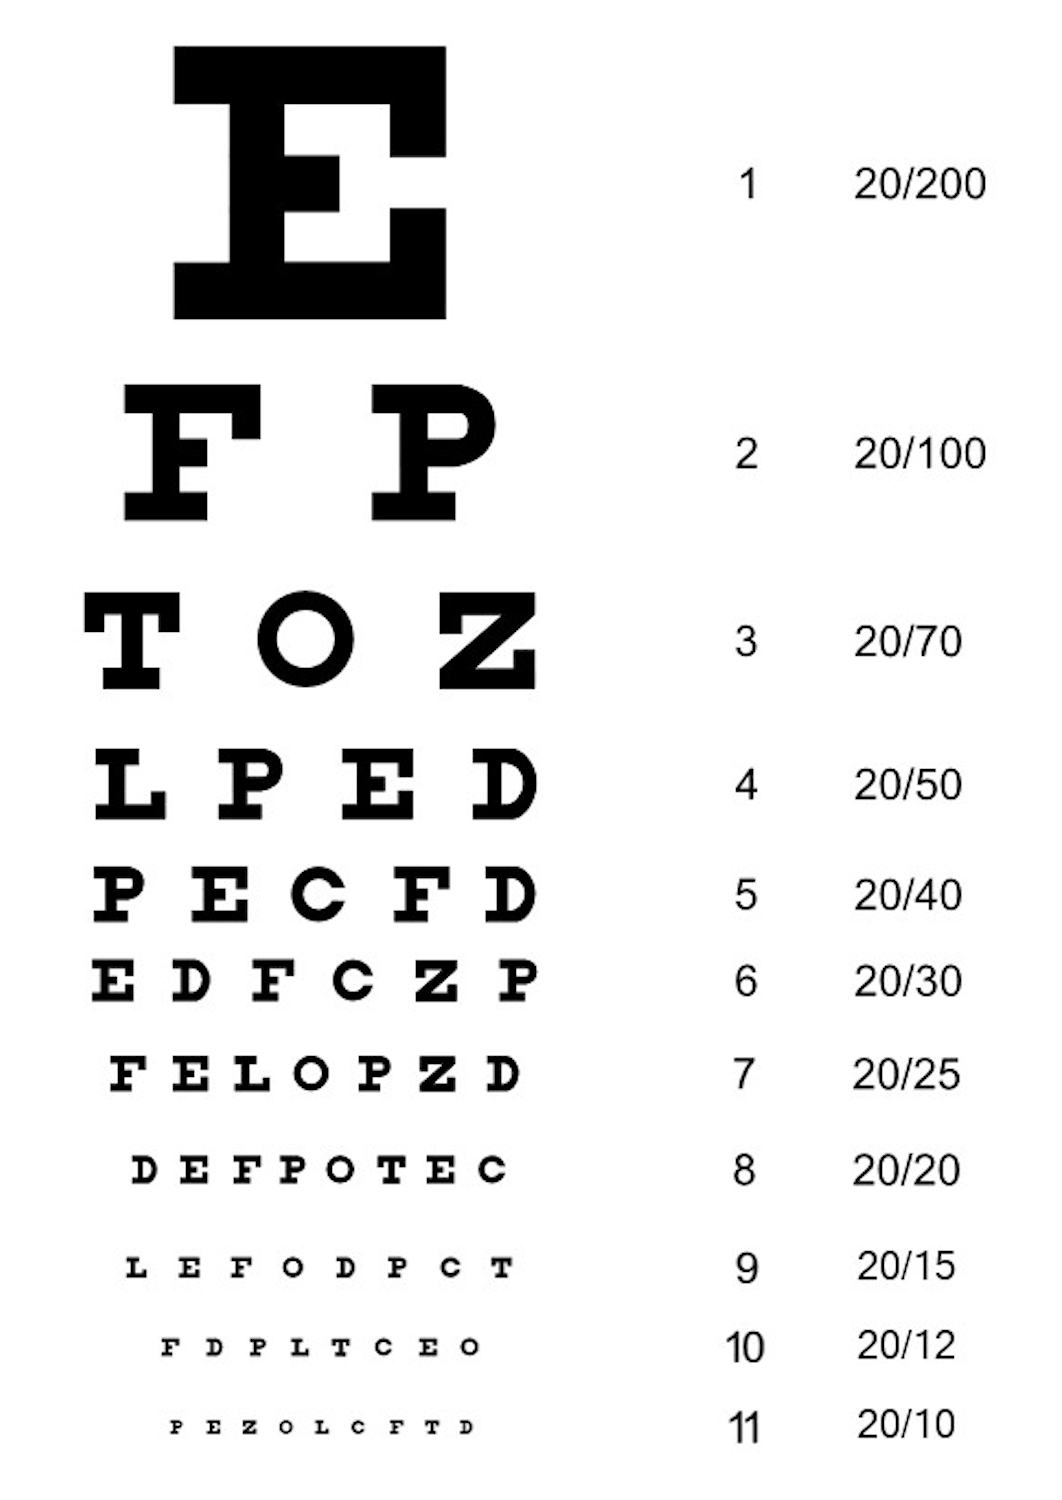
Figure 7: Snellen eye chart (By Khex14 – Own work, CC BY-SA 3.0, https://commons.wikimedia.org/w/index.php?curid=31308551)
Clinical Tip
Visual acuity is noted on the line where the client can read all of the letters with a maximum of two errors.
Example 1: If the client incorrectly identifies two of the five letters on the 20/40 line, this means they were unable to correctly read all of the letters on this line except two. Thus, their visual acuity is noted as 20/40 – 2. Recall, they can make a maximum of two errors on a line.
Example 2: If the client can accurately read all of the letters on the 20/30 line and only 3 of the 7 letters on the next line (20/25 line), this means they made more than two errors on the 20/25 line. Thus, their visual acuity is noted as 20/30 +3.
Contextualizing Inclusivity
Some clients may be unable to stand due to muscle weakness, fatigue, balance problems, or being in wheelchair. If so, lower the Snellen eye chart so that it is located on the wall at about their eye level.
Several alternatives are available for young children or individuals who are unable to read letters, including the Tumbling E chart or a chart with pictures.
Confrontational Visual Field Exam
Peripheral vision can be evaluated using the confrontational visual field exam. The exam can be conducted in several ways including client peripheral vision compared to examiner, wiggle finger method, and counting finger method. For each of these tests, you move your arm/hand into three peripheral vision fields as per Figure 8: superior, eye level, inferior.

Figure 8: Peripheral vision fields
This exam should take place in a well-lit environment in which the client’s eye level is at the same level as your eyes. Both you and the client can stand as long as eye levels match or you can stand and raise or lower the exam table so that the client’s eye level matches your eye level. Position yourself about three to four feet away from the client.
Ask the client to remove anything that could interfere with peripheral vision such as a hat with a rim, and then to look at your face: ask if they can clearly see your face with no difficulties and no blurring.
The next set of steps are as follows:
- Client peripheral vision compared to examiner: Stand about one foot away from the client. Cover your own right eye and ask the client to cover their left eye with the palm of their hand and stare directly at your open eye; you will also stare at their open eye. Stretch your left arm/hand out laterally as far as you can in the superior field, at the client’s eye level, midway between you and the client. Begin to move your arm/hand inward. Ask the client to state “now” when they first see your hand: they should see it at the same time you see it. Repeat this by stretching your arm/hand into the inferior field and moving your arm/hand inward. Then, repeat a third time with your arm/hand stretched out laterally at the client’s eye level, but this time closer to them as opposed to midway between you. Then, repeat the same three steps on the opposite eye. The validity of this exam is based on the assumption that the examiner has normal peripheral vision, which is about 90 degrees.
- Wiggle finger method: Now position yourself about three to four feet away from the client. Ask the client to fixate (focus) on your nose. Stretch both of your arms out to the side, pointed diagonally into the superior quadrants. Wiggle/flex the index finger on one of your hands and ask the client to point to the side that they see your finger moving. Then repeat with your other hand. Repeat the same steps with your arms stretched out to the side laterally at eye level and then out to the side pointed diagonally into the inferior quadrants. The client should be able to identify the correct hand that is moving each time (see Video 3).
Video 3: Wiggle finger method.
- Counting finger method: Remain about three to four feet away from the client. To test the client’s right eye: Close or cover your own right eye and ask the client to cover their left eye with the palm of their hand and stare directly at your open eye; you should do the same. Now, stretch your left arm/hand out pointed diagonally into the superior quadrant, then laterally out at the eye level, and then diagonally down into the inferior quadrant. In each of these fields, hold up 1–5 fingers (use a different number each time) and ask the client how many fingers they see. Your hand should be midway (equidistant) between you and the client (i.e., not closer to you, nor closer to them) with the palm of your hand facing the client, so they can tell how many fingers you are holding up. Repeat the same steps to test the client’s other eye; this time asking them to cover their right eye, and use your right arm/hand (see Video 4 as an example of testing the right eye).
Video 4: Counting finger method for testing the right eye.
- Note the findings:
- Normal findings might be documented as: “Confrontational visual field exam: client able to identify correct numbers and hand wiggling in all three peripheral positions on left and right sides. Client’s peripheral vision intact (equal to the examiner’s).”
- Abnormal findings might be documented as: “Confrontational visual field exam: client unable to see correct numbers displayed by examiner’s fingers and examiner’s hands wiggling in superior and inferior fields bilaterally. Client’s peripheral vision less than the examiner’s.”
Priorities of Care
Clients who have decreased visual acuity or decreased peripheral vision should be encouraged to see an eye doctor. However, new onset and sudden loss of vision such as blurred vision, a dark spot or shadow, or double vision requires emergency care as these symptoms could be related to a stroke or . In these cases, stay with the client, notify the physician or nurse practitioner STAT, take the client’s blood pressure, and perform a primary survey.
References
Campbell, W., & Barohn, R. (2020). DeJong’s The Neurological Examination. Wolters Kluwer.
Canadian Association of Optometrists (2023). 20/20 vision: What it’s really telling you. https://opto.ca/eye-health-library/2020-vision-what-its-really-telling-you
Porter, D. (2022). Visual acuity. https://www.aao.org/eye-health/tips-prevention/visual-acuity-3
is an emergency situation when the retinal tissue pulls away from the back of the eye (without immediate treatment it can result in permanent loss of vision).
