
Chapter 15 – Neurological system assessment
Sensory Function Testing
Sensory function testing is another component of the neurological evaluation. This may involve assessing components including:
- Pain sensation.
- Light touch sensation
- Vibration sensation.
- Kinesthetic and position sensation.
- Fine tactile discriminative sensation.
- Temperature sensation (these are rarely assessed by nurses and are therefore not discussed in this chapter).
Testing of pain and light touch sensation is done by applying a stimulus to the body’s dermatomes: areas of the skin that are innervated by the nerves (see Figure 17). Typically, a full evaluation (where all dermatomes are tested) is performed only when the client has reported altered sensations, sensory loss, hyposensitivity, or hypersensitivity. A screening evaluation may be completed for other neurological signs and symptoms; when screening, touch the forearm, upper arm, upper chest, thigh, lower leg, and foot.
Knowledge Bites
Sensory function tests help evaluate the neural pathways through the spinothalamic tract (pain, light touch) and the posterior column tract (vibrations, kinesthetic and position, fine tactile discriminative touch) via the spinal cord to the brain (Campbell & Barohn, 2020). If all testing is normal except those associated with tactile discriminative sensations, then the potential of neurological dysfunction of the parietal lobes is suspected (Campbell & Barohn, 2020).
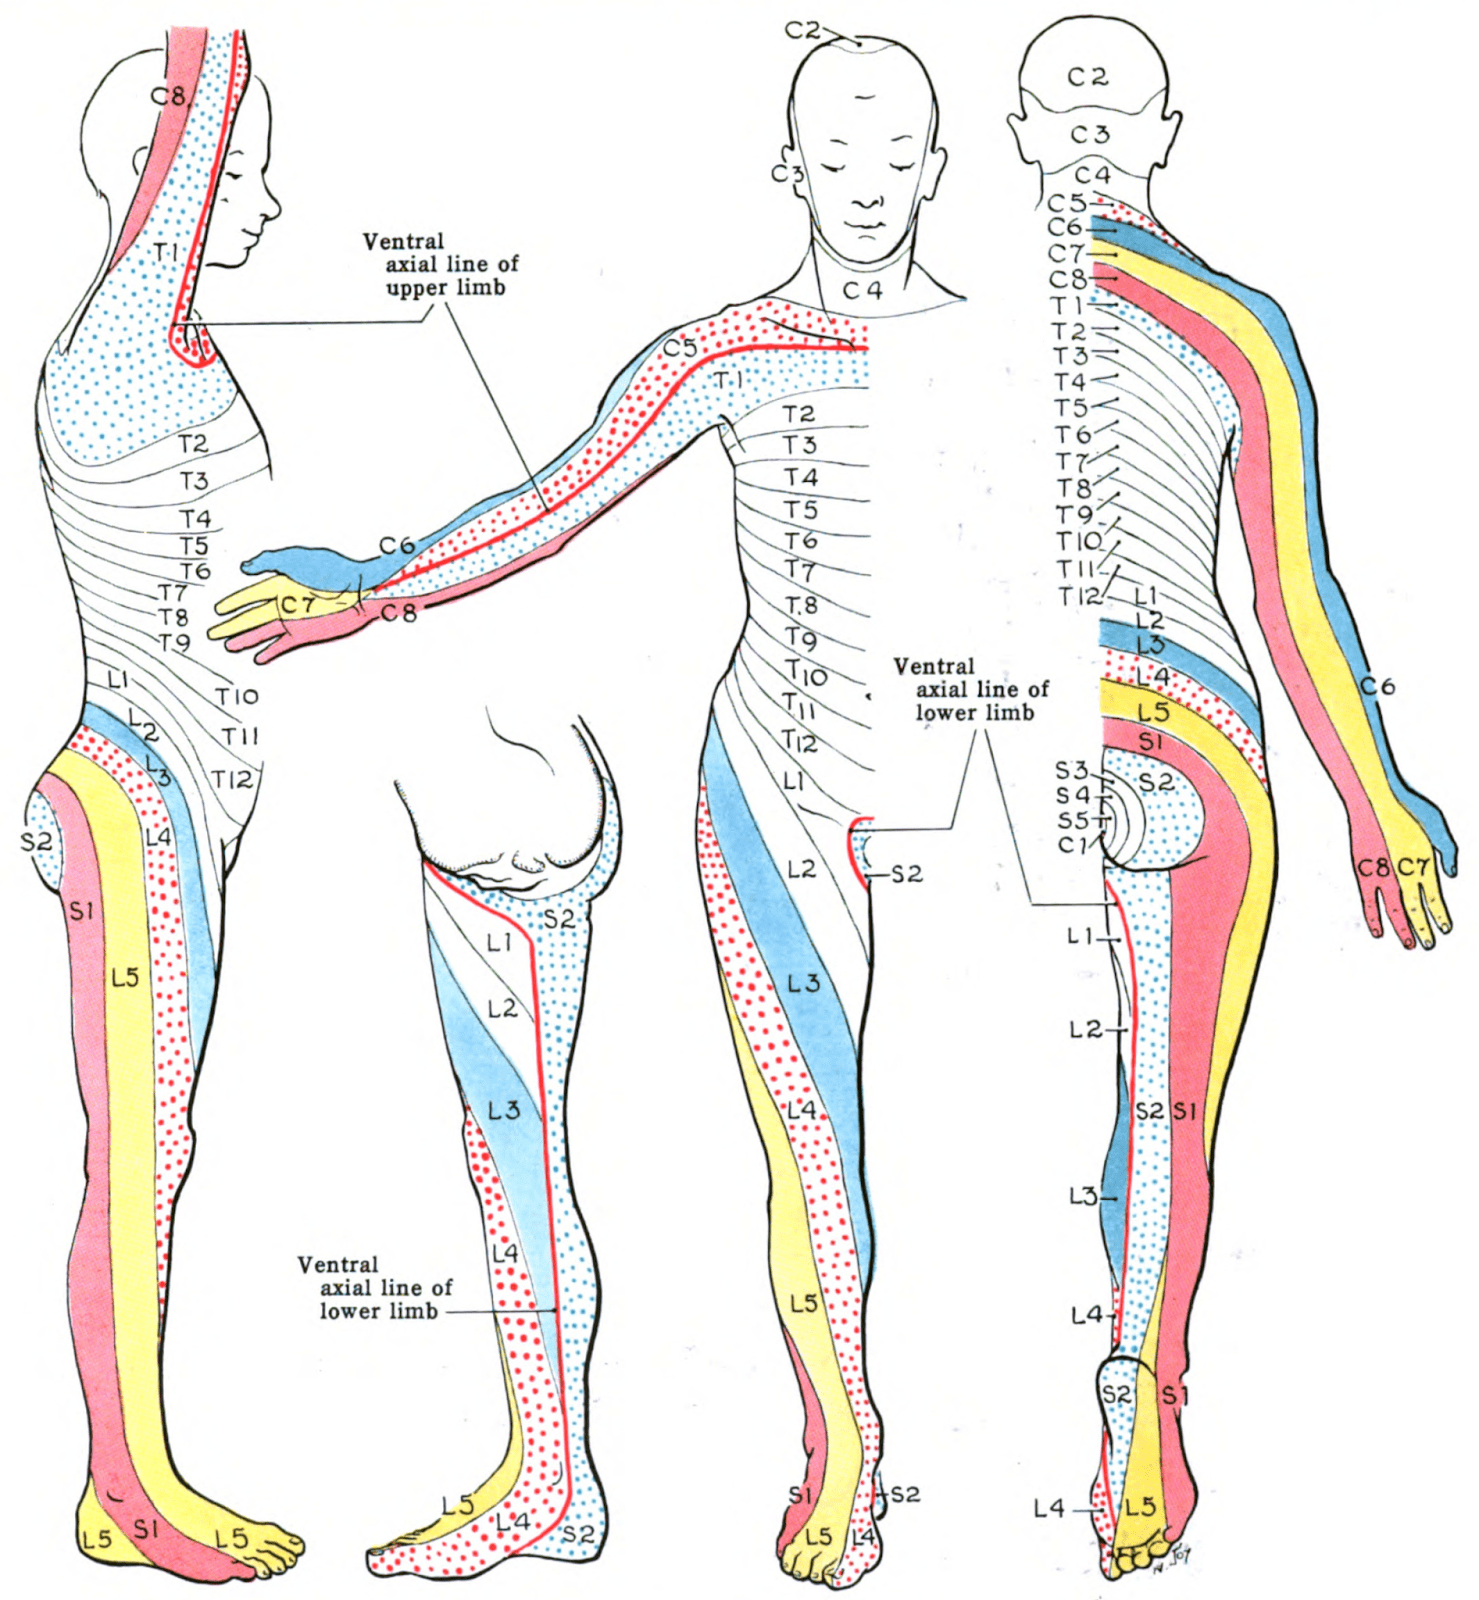
Figure 17: Dermatomes.
(By Grant, John Charles Boileau – An atlas of anatomy, / by regions 1962, Public Domain,
https://commons.wikimedia.org/w/index.php?curid=30017222)
This sensory testing is best done with the client in a supine position with a pillow supporting their head. For comfort, the head of the bed may be raised at about 30 degrees. Always follow these important principles:
- To avoid , each stimulus should be separated by at least 2 seconds.
- The intervals between the stimulus should be varied to avoid the client automatically responding to a constant rhythm.
- Use a random order, but ensure a systematic approach.
Pain Sensation
- Break a tongue depressor in half down the centre lengthwise so that there is a “sharp” edge and a “smooth” edge. Alternate approaches are to use a safety pin with the smooth clasp and the pin end or a paper clip. With the client’s eyes open, demonstrate on their arm what the sharp and smooth edge feels like.
- Let the client know that you are going to touch several areas on their body including their arms, legs, and chest and that each time they should indicate whether it is “sharp” or “smooth.”
- Then, ask the client to close their eyes and apply the various stimuli. See Video 21 for screening.
- Normal findings include being able to identify when the stimulus is sharp and when it is smooth.
- Abnormal findings include unable to discriminate between the sharp and smooth edge or absent sensations.
Video 21: Pain sensation test.
Light Touch Sensation
- The stimulus can be applied with a cotton ball or a tissue (Kleenex) or even using a light touch with your index finger. If using a cotton ball, stretch it out so that you can apply a wisp to the areas.
- Let the client know that you are going to touch several areas on their body including their arms, legs, and chest and that each time they feel something they should say “now.”
- Ask the client to close their eyes.
- Apply the stimuli. This test is a similar way to that shown in Video 21 for screening, except it is done with a different stimulus and the client is asked to say “now.”
- Normal findings include being able to identify when they are touched by the stimulus and equal sensation bilaterally.
- Abnormal findings include decreased or absent sensation and unequal sensations bilaterally.
Vibration Sensation
- Use a tuning fork (see Figure 18).
- Place your thumb and index finger as close to the end of the stem as possible and strike the tines of the tuning fork against the ball or heel of your hand to create an oscillation/vibration.
- First, demonstrate what it should feel like by placing the end of the tuning fork stem on a bony prominence such as the clavicle bone.
- Notify the client that you are going to apply it to the feet and the hands and they should report when they feel the vibration and when it disappears (with their eyes closed).
- Ask the client to close their eyes.
- Apply the end of the tuning fork stem gently to the bony prominence of the distal bony prominence of the thumb and then repeat the process on the other hand. Repeat on the distal bony prominence of the great/big toe and then on the other foot (see Figure 19).
- Normal findings include being able to feel vibratory sensations equal bilaterally.
- Abnormal findings might include unequal sensations bilaterally, unable to feel the vibration or decreased vibratory sensation. If these findings are reported, a full evaluation is needed. For this, you will continue the process moving proximally: for upper limbs, move to the distal bony prominences of the fingers, the radial styloid bone, the olecranon process and so on; for lower limbs, move to the metatarsophalangeal joints, the malleoli, and the knee.
See Video 22 demonstrating the technique assessing vibration sensation.
Video 22: Vibration sensation.
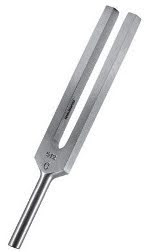
Figure 18: Tuning fork.
(By Rahulshedge555 – Own work, CC BY-SA 4.0,
https://commons.wikimedia.org/w/index.php?curid=89721253)
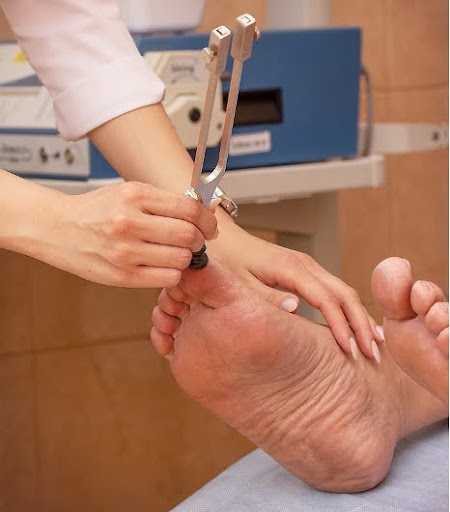
Figure 19: Tuning fork on bony prominence.
By Ермолаева Александра – Own work, this file is licensed under the Creative Commons Attribution 4.0 International license.
https://commons.wikimedia.org/w/index.php?curid=79382930
Kinesthetic and Position Sensations
Kinesthetic refers to motion along with awareness of moving a body part. Testing typically involves passive movement of digits (fingers and toes) and sometimes a limb: in addition to identifying movement, the client is asked to identify the position/movement type (up or down).
The steps in evaluation include:
- First demonstrate the expectation by grasping the client’s digit on the sides with your thumb and index finger (begin with the fingers) and move it up and down explaining that the client should be able to identify the movement when their eyes are closed. Avoid grasping the anterior and posterior (top and bottom of the finger), as the pressure you apply acts as a sensation to whether you are moving the finger up or down.
- Ask the client to close their eyes.
- Individually move one digit at a time up or down (randomizing the movement) and ask the client to identify the movement direction and repeat on all digits on both hands and then, repeat on the toes (see Video 23 for an example involving hands).
- Normal findings are that the client can identify the movement direction in all 10 digits of the hands and all 10 digits of the toes.
- Abnormal findings are that the client is unable to identify the movement direction in one or more of the digits of the hands and feet. If this occurs, repeat the process on proximal joints in the upper extremities (wrists, elbows, shoulders) and lower extremities (ankles, knees, hips).
Video 23: Kinesthetic and position sensation test: an example involving hands.
Fine Tactile Discriminative Sensations
Fine tactile discriminative sensation involves the client’s ability to recognize and identify a specific sensation, which requires that they perceive and localize the sensation. These sensations are tested with what is called stereognosis and graphesthesia. Stereognosis is the ability to perceive and identify a three-dimensional object by touching it in one’s hand, whereas inability to do so is astereognosis. Graphesthesia is the ability to perceive and identify a letter or number written on the skin (hands or feet), whereas inability to do so is agraphesthesia.
Steps in evaluating these sensations include:
- Explain what you are going to do.
- Ask the client to close their eyes.
- Place an object that is familiar in one of the client’s hands and ask them to feel it and identify it. Repeat on the other hand with a different object. Always use familiar objects such as a key, coin, comb, safety pin, or paper cup (see Figure 20).
- Use your fingertip or narrow end of an instrument such as a pen to draw a letter or number on the palm of the client’s hand and have them identify it. Repeat on the other hand with a different letter or number, and repeat on the dorsum of both feet (see Figure 21).
- Normal findings include being able to identify the object bilaterally and being able to identify the letter/number on hands and feet bilaterally.
- Abnormal findings include the unilateral inability to identify the object and the unilateral inability to identify the letter/number on hands and feet bilaterally.
 Figure 20: Stereognosis test.
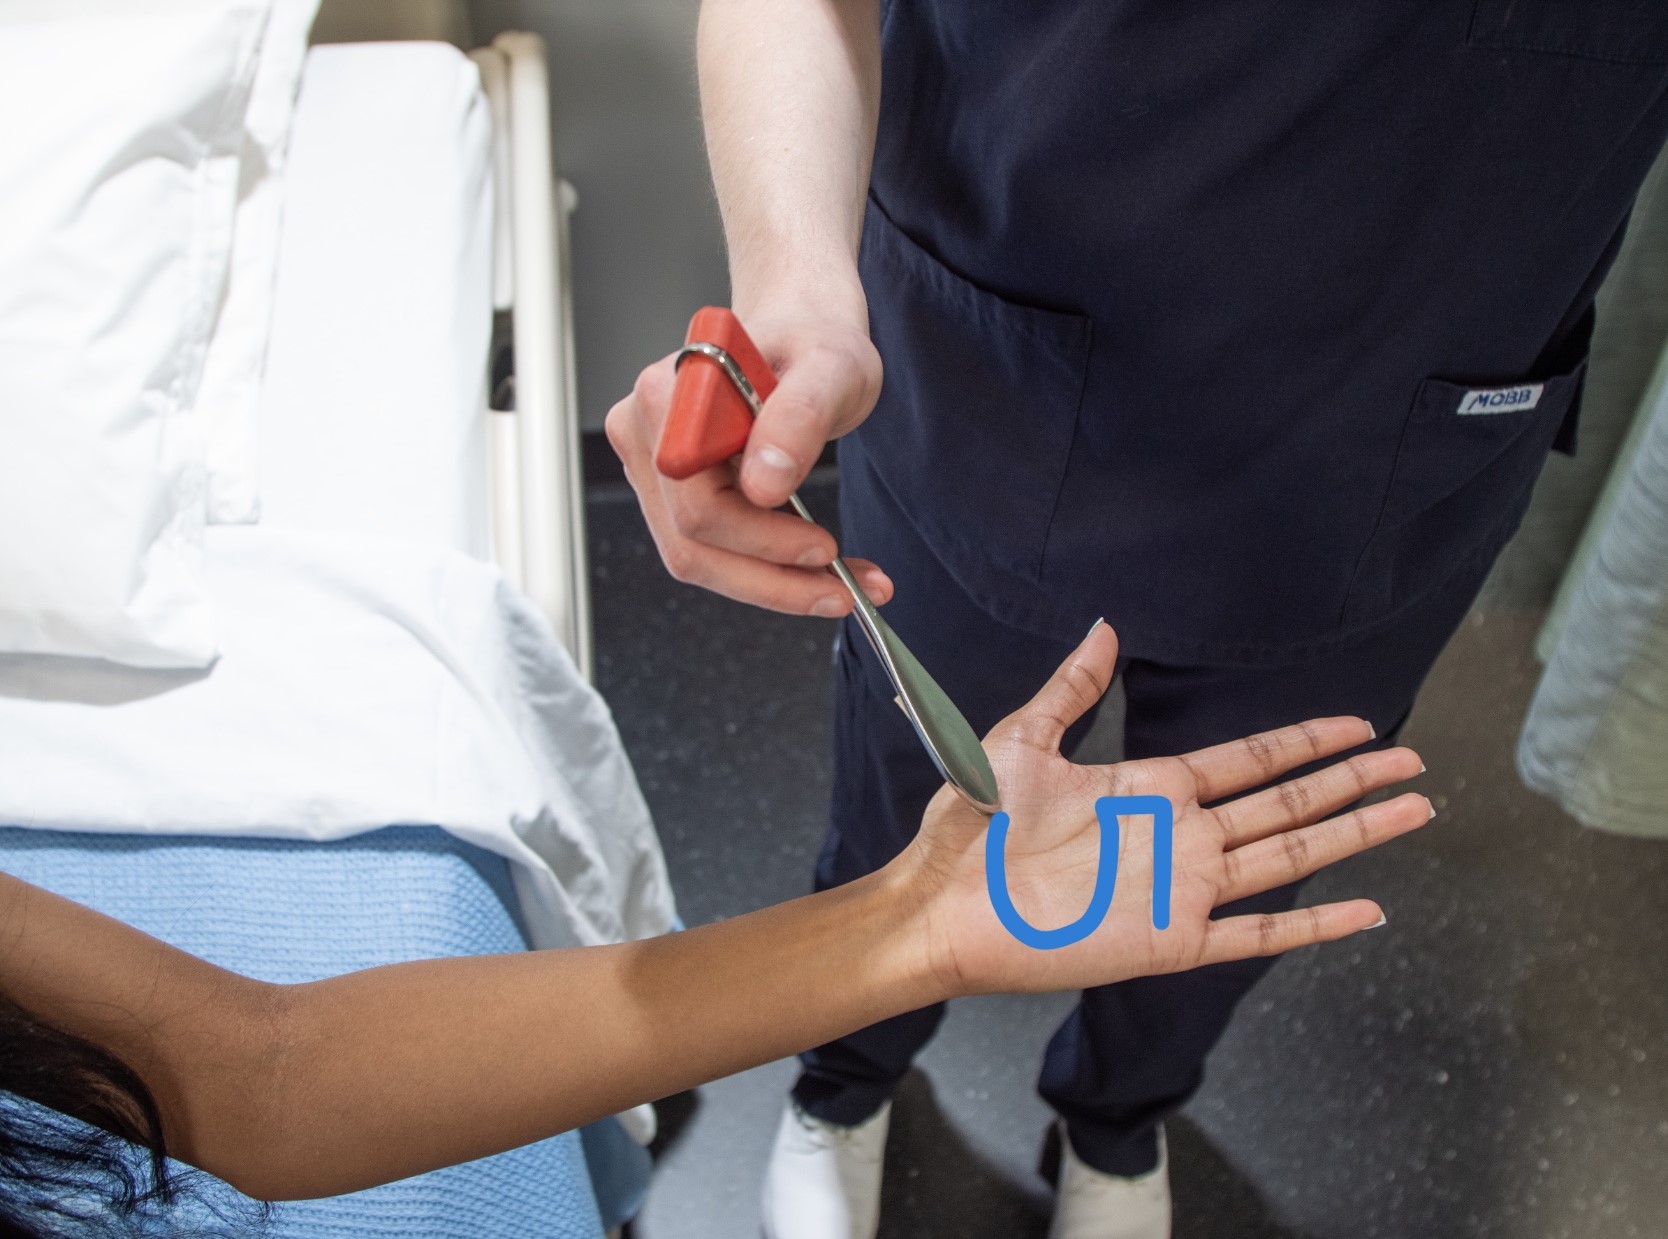
Figure 21 : Graphesthesia test.
Contextualizing Inclusivity
Choice of familiar object should be dependent on the client because what is considered “familiar” may vary based on age and other cultural factors and experiences. Additionally, non-English speaking clients may not be familiar with the English alphabet and numbers.
Activity: Check Your Understanding
References
Campbell, W., & Barohn, R. (2020). DeJong’s The Neurological Examination. Wolters Kluwer.
is when frequent stimuli are perceived as one stimulus.
