
Main Body
Chapter 1 • Photoshop
Richard Adams and Mathias Galus
1. Basic Menu
These menus hide the main features of Photoshop, such as File-open and save, presets, options for color correction, filters, and much more. Some of the most important functions from these menus are described in this guide.

Tools
This palette holds important tools, such as the drawing brush, selection, fill, copy, and text tools. By clicking on the maximize symbol, the tool palette can be switched from a single column to a double column layout.
Options Menu
Depending on the selected tool, detailed options for each tool can be set here.
Palettes
The pallettes on the right side offer a variety of editing and adjustment options. Multiple pallets can be arranged as tabs, stacked, or floated in the workspace.
1.1 Presets
Photoshop offers the user a variety of settings. The presets are the last item in the Edit menu and are organized into different subtopics. The default settings are usually correct for most users.

1.2. Color Space Settings and Color Profiles
![]()
While the presets need to be edited only in exceptional cases, it is always good to check the color space settings when setting up a new workstation.
The color space and the associated color profile first allow a color interpretation of image data. Therefore, the setting of meaningful color spaces for a professional work with images is essential. An image without a color profile can at best be called “colorful”.
Depending on the later purpose of the images different color profile settings are useful. As an example, the settings for the European pre-press are presented here.
The currently used profiles can be found in the latest version for free download at the European Color Initiative (ECI) at www.eci.org.

RGB working color space
For working with images that are intended for the Internet, sRGB is certainly the color space of choice, as it has naturalized itself for this purpose as a quasi-standard through the back door. For historical reasons, AppleRGB and AdobeRGB have established themselves as the color space in prepress, especially in the Apple segment, whereby both color spaces are based on a fictitious monitor, which is no longer available. A problem, however, is that the working color space should not emulate a special monitor, but should be a media-neutral color space as possible. The adaptation of the representation on the monitor can be regulated by a profile stored in the operating system. When working with Photoshop, you should use the most media-neutral RGB color profile, so that the image can be displayed equally well on all output devices. In addition to sRGB for the Internet, the ECI-RGB color space has excelled here for printing, especially because it is based on a color temperature of 5000K.
CMYK working color space
Here, the choice is not quite so clear, because depending on the later desired printing process and the paper used there could be set here another working color space. The problem here is that color space transformations between two different CMYK color spaces are always consistent. Different black structures can produce completely different results. Added to this is the strongly fluctuating size of the color spaces and the influence of different paper white points. For these exercises, we assume that images in sheetfed offset should be printed on coated paper. Since the newest version, Photoshop already brings along the currently correct color profile under the name “Europe ISO Coated FOGRA 27”. Other profiles e.g. for uncoated papers or other printing processes can be found at www.eci.org.
Grayscale and spot colors
In printing processes, the expansion of ink from halftone dots, known as tone value increase or dot gain, creates a non-linear relationship between the original and the finished print. A 50% tone may grow to 65% actual area coverage to yield 15% dot gain. To compensate for this increase, a correction curve can be loaded. Alternatively, a gamma curve for the grayscale can be loaded especially for the monitor display.
Color management guidelines
Here you can choose what to do with files that have missing or incorrect color profiles. In principle, all images should be transformed into the current working color space in order to maintain consistency. Only in exceptional cases, especially in CMYK color spaces, should an exception can be made. So in principle first “transform into working color space” should be done. The three option points can be selected by marking that Photoshop asks again explicitly what should happen to the colors of an image. So you always keep control and information about incoming data.
1.2.1. Rendering Intent Settings

1. Perceptual. Ideal for images, if they are to be transformed from a large source color space to a small working color space (e.g., digital photo to offset printing). The relationships between the colors are preserved, but not their absolute position in the color space, which is not necessarily relevant to most images.
2. Saturation. Increases the saturation of the color as far as possible. This setting is only recommended for business graphics and charts, as color saturation is more important than color accuracy.
3. Relative colorimetric. Perfect if images are to be transformed between two very similar color spaces, e.g. sRGB to AdobeRGB. All colors and the white point are then adapted to the new color space.
4. Absolutely colorimetric. Tries to represent all colors as accurately as possible. Colors that are not in the target color space are clipped and placed on the outermost edges of the target color space. This method makes sense only if the absolute position of the colors in the color space is critical, e.g. for logos that are created in a special color.
Black Point Compensation. The dynamic range of the source color space is replaced by the color space of the destination, i.e., dark shades of gray do not automatically turn black.
1.2.2. Monitor Calibration
Even without expensive gauges, you can set a monitor so that the colors are at least approximately color-fast.
The first step is to set the monitor to the correct color space in terms of hardware. In the on-screen menu of most monitors, there is a point to set the color temperature, usually this is set to 9300K, resulting in a very cold bluish white. Monitors set in this way can not display correct colors for printing.
For the pre-press, 5000K is the standard. Thus, the standard light D50 can be simulated on the monitor. The contrast should be turned up to maximum and the brightness should be set to mid-position (depending on the age of the monitor, the brightness may need to be increased.) If you turn it on a bit, you should consider buying a new monitor!). Once these settings have been made, the most important basic hardware requirements are met. In addition, the ambient light should be somewhat damped. Mirroring on the monitor should be avoided. Even bright colors on walls, furniture and clothes can influence the color impression on the monitor.

For a fine visual adjustment and the creation of a monitor profile there is a small application called Adobe Gamma together with Photoshop. The program is called up via the control panel (Windows Start > Control Panel). Operating the program is easy. An assistant guides you through all steps.
1.3. Toolbox

Click on one of the icons to activate the corresponding tool. If there is an arrow below the icon, you can open a submenu with additional tools by holding down the mouse button on one of these fields.
1.4. Options Menu
The options menu is located at the top of the screen directly below the basic menu. Depending on the selected tool, different properties of the tools can be set here.

Many tools use a brush for editing image parts, in addition to the drawing tools also copier stamp, eraser and more. The setting of brush size and shape are however always the same.
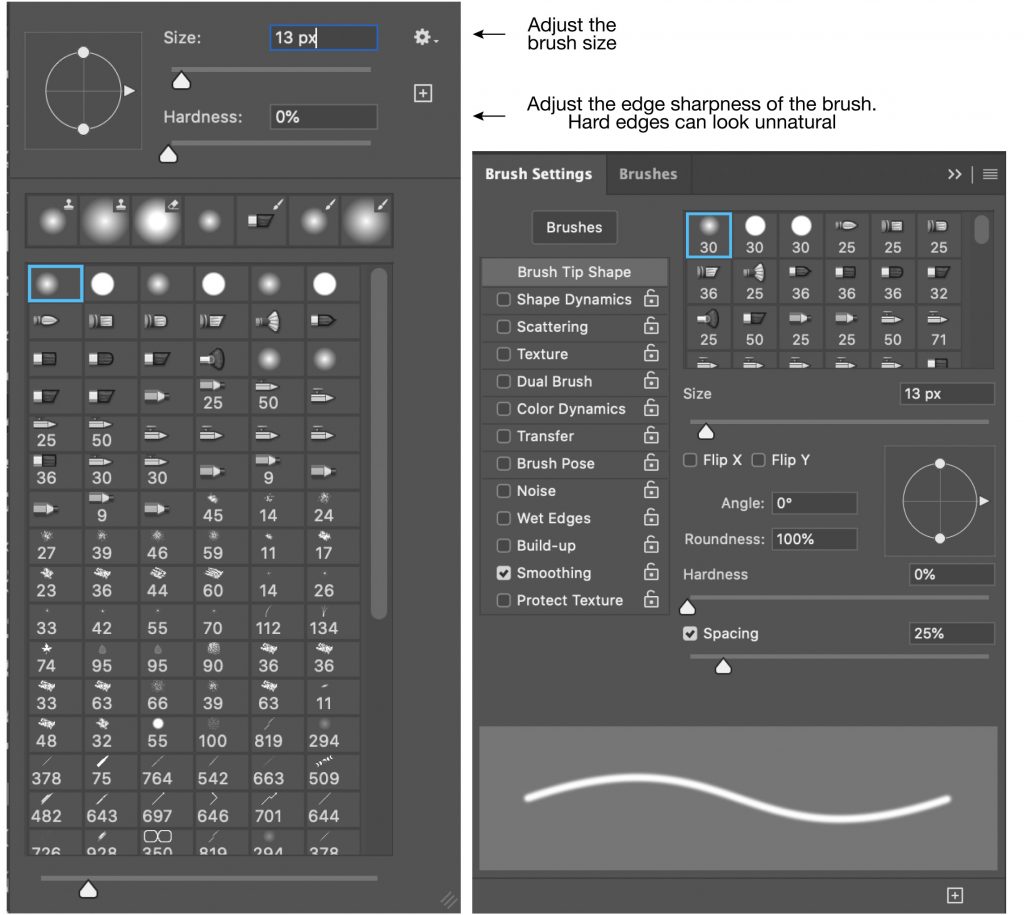
In addition to the adjustment options for the size and sharpness of the brush, the “Brush” palette in the palette area offers further, more complex setting options for special effects.
1.5. Palettes
On the right side of the screen are two rows of palettes that allow you to view various important information and control functions. Further palettes can be opened via the menu item, Windows.
Here are some of these palettes will be presented briefly for a better overview. The first column of palettes consists only of reduced icons that can be expanded by clicking on the individual icons. The second column contains some basic editing palettes.

Color Controls
With the help of the color regulator, the color of the drawing and the background color can be adjusted. Which of the two colors is edited can be decided by clicking on one of the two color fields on the left. Upper left is the drawing color and lower right is the background color. Which color is currently active, can be read off the black border of the respective field. The sliders on the right can be used to set any value for each color channel or to enter them manually in the text fields. So any color can be mixed. It should be noted, however, that Photoshop does not automatically adjust the color system of the slider to that of the opened image. This setting must always be done manually. In this illustration, the controls for RGB brightness are displayed. This is optimal if you want to set a color for the screen. If you want to select a color to be printed later, the CMYK area coverage slider must be activated.

Another way to set the character and background colors is to click on the color swatches in the Color Controls palette or toolbar.

This will open a new window, the color picker. Here, either numerically or intuitively, a color can be selected according to its effect.
Swatches
Photoshop offers a selection of standard colors that can be selected by clicking as the desired color. You can also load special color banners here via the options menu. Pantone and HKS colors, or your own colors can be defined.

Properties
Depending on the activated level, properties of the layers or the image can be read and changed here. Especially when editing text and correction layers, this palette is very useful.

History
Every change in the picture is logged. Up to 20 changes are stored here and can be undone or redone by clicking the log point in the list. By clicking on the thumbnail at the beginning of the log list, all changes in the image are undone since the file was opened, thus restoring the original state. Changes that are to be irreversibly withdrawn can be permanently deleted by dragging the log point to the trash can icon at the bottom right.

Levels

Photoshop offers the possibility of composing a multi-layered image that can be faded in and out and changed in sequence.
The order of the levels in the list determines their priority, i. the top level in the list is above all the others and conceals them, much like printed transparencies overlaid on top of each other. The order can be easily changed by clicking on the desired level. Holding down the mouse button, the layer can now be dragged up or down.
New layers are created automatically when pasting a copied element, when creating text or a vector shape, and by adding an adjustment layer.
A detailed description of how to work with layers follows in Section 2.

Via the file menu the functions “Open …” and “Open as …” can be called up. When “Open as …” the file type is not automatically determined by the file extension (.jpg, .tif, etc.), but must be determined by selecting the file type manuel. The fact that a file has a file extension that does not match the file type usually occurs when files are transferred from the MAC. There, the file type is determined by the header of the file and not by the file extension. Sometimes, files with missing or missing file extensions are added, which can not be opened with the PC. The correct file type must either be known or guessed, otherwise Photoshop will cancel the opening with an error message.
1.5. Open and Save Files

Under the menu item “Save as …”
In addition to the file name, the file format can also be determined. Depending on the selected file format, further specific options can subsequently be set, e.g. in terms of compression.
For some file formats, not all elements of the Photoshop image can be saved. Thus, e.g. Levels and transparencies supported by only a few file formats. If a file format is selected, which is the case, only one copy of the image will be saved, in which layers and transparencies will be resolved or converted.
Export > Save for Web…

If an image is to be published on the Internet, specific settings such as the file format, resolution and quality are often necessary to achieve an optimal result. This dialog allows you to convert images directly into sRGB (the default color profile for web browsers).

In addition, resolution can be set in pixels and file format. This makes it possible to generate very small files which I can load optimally.
1.5.1 File formats
Over the years, dozens of file formats have been created for storing images. The most widely used and of the greatest importance for printing and the Internet are the file formats JPEG (Joint Photographic Experts Group) and TIFF (Tagged Image File Format).
JPEG (Joint Photographic Experts Group). JPEG not only determines the file format but also the compression of the data. The compression is always lossy, i. it always loses image information. Depending on the compression level set, a very small file can be generated, but with visible image alienation, so-called compression artefacts purchased, which are useless for a high-quality output. This is especially critical when editing JPEG images when a JPEG image is opened, edited, and then saved back as a JPEG image. This increases the compression losses. Therefore, save images as JPEG only when all processing has been completed.


TIFF (Tagged Image File Format). In contrast to JPEG, the compression of the image data can be selected with the TIFF file format. Several options range from no compression to lossless LZW to lossy JPEG. In addition, the bit depth of images may vary, from 1 bit (black and white) to 8 bits (256 colors indexed) up to 32 bits per color channel. Due to this multitude of possibilities, TIFF files can be used very flexibly, but also offer the risk that not every TIFF file can be opened by every program. For example, until a few years ago compression of the image data was only “without” compression or with “LZW” (Lempel-Ziv-Welch algorithm) lossless compression of the data, e.g., common up to and including Photoshop 5.5. If TIFF files are now saved with JPEG compression, some programs will not be able to open them. But just because of its flexibility, the TIFF file format has prevailed as a quasi-standard for prepress, mostly because it is loss-free or “without” compression.
2. Basics of Image Editing with Photoshop
2.1. Changing Image Size and Resolution

Only rarely do images have both the desired spatial resolution and size appropriate to the desired output, whether print or web. Both can be adjusted in the menu “Image” under the item “Image size.”
The values set here are also adopted directly by page layout programs such as Indesign. Particularly important here, of course, the image size, where the dimensions of the image can be specified.
2.2. Cropping and Rotating Pictures

If only a certain area of an image is required, the surrounding part can simply be cut away with the “cropping tool” (shortcut: c).
With the crop tool enabled, a frame will appear on top of the picture where the outside areas of the picture are dimmed for better visualization. The frame can still be modified after mounting. By clicking and dragging on the corners, the size can be adjusted and the frame can be moved while holding down the mouse button. Rotating the frame is also possible. If you move the mouse slightly out of a corner, a curved arrow appears indicating that the frame can be turned.
Appearance of the options palette when selecting the cropping tool:

 2.3 Align
With the Align tool, images can be easily rotated or straightened. Although the crop frame can be rotated and aligned to the picture, it is sometimes not ideal. There does, however, exist the straight line align option for the cropping tool. With its help, images that have been taken slightly oblique images can be aligned without effort.
If you want to rotate or mirror an image, the easiest option is to choose one of the default options via the Image -> Image Rotation menu.

2.4. Retouching with the Clone Stamp and the Healing Stamp
Clone Stamp
 With the clone stamp, any part of the image can be copied to another position. After selecting the clone stamp tool, a source area can be selected using the “ALT” key. After releasing the “ALT” key, the circle of the tool tip will reappear. Click to create copies from the source point with the position of the tool tip.
 Healing Brush
Photoshop offers 5 tools for image corrections. However, we will only look more closely at the area repair and repair brush tools.
The Healing Brush Tool works similar to the clone stamp. Once again, a source point must first be determined with the “ALT” key and then the tool tip can be used to make repairs in the image. In contrast to the copying stamp, however, the data is not simply copied and copied, it is only compared. Deviations in the pattern of the target area are corrected, the color of the target area is hardly or not changed at all.
The Healing Brush Tool is in principle, identical to the repair brush, except that the source point is automatically selected.

2.5. Selection and Paths
Photoshop can be used to select or frame certain areas of images. These areas can be duplicated or trimmed and also be color-corrected separately from the rest of the image and edited with filters.
2.5.1. Selection Tools
 With the circle or rectangle selection, simple geometrical shapes can be selected. The selection is made simply by clicking on the desired starting point, then with the mouse button pressed, draw the desired area and release the mouse button above the end point.
Lasso Tools
Lasso. A selection is made along the movement of the mouse pointer as long as the left mouse button is pressed. When the button is released, the selection automatically closes with a straight line between the start and end points.
Polygon lasso. By clicking, individual corner points of the shape to be selected are set, which are then connected with straight lines. Once set, corner points can be deleted by pressing the “ESC” key. The selection is activated as soon as the selection is closed by clicking on the start point.
Magnetic lasso. This tool will automatically try to find the edge of an object. After setting a starting point, the lasso follows the mouse pointer and searches in its surroundings for an edge along which the selection should run. With the “ESC” key, the last interpolation points can be undone and with a mouse click, a point can be added at certain points. The selection is closed and activated by clicking on the starting point.
 Quick Selection tool. Click on the area to be selected and, while holding down the mouse button, move along the area to be selected. When the mouse is dropped and clicked elsewhere, this area is added to the existing selection.
Magic wand. Clicking the magic wand on an image point will select all areas of the same color throughout the image. In the options menu, the tolerance can be set with which the magic wand should recognize a region as being the same color.
Boolean operations. A selection can also be generated together with the aid of all the tools described here. By holding down the “SHIFT”-Button newly selected areas are added to an already existing selection and by holding down the “ALT”-Button the areas are subtracted.
2.5.2. Improve the selection
Each existing selection can be edited in the form and quality of the “Select and mask …” button.
The modified selection is confirmed with OK and can then be further used and edited.
2.5.3. Quick Mask Mode
 Masking mode is particularly popular with imaging professionals because it provides a simple and intuitive way to make a selection using the brush tool and eraser (analogous to retouching in pictures with a brush in the old days).
 With the drawing tools a mask can be drawn on the area to be marked. The fill tool can also be used for fast filling larger areas. Corrections can be made with the eraser. Soft edges can be created by choosing soft tool tips and can be varied for each area of the selection. When the selection is finished, you can switch back to normal mode, the area marked in red will automatically become a normal selection.

WARNING: The masking mode works inversely, if the red area is not marked! If this is not desired, simply reverse the selection.
2.5.4. Path Tools
In addition to the possibility to surround image areas with a selection, they can also be enclosed in a path. The big difference to an ordinary selection with e.g. the lasso tool is that the anchor points remain editable even after completion of the path. In Photoshop, paths are not just for marking but also tools for creating complex vector shapes. Working with this tool is very similar to working in Adobe Illustrator.

The created paths can be found in the Path palette, which can be found next to the Layers and Channels palette. Here you can select different paths and edit them in their communities.
2.5.7. Convert Paths to a Selection
The path palette contains a list of all existing paths in the image which can be selected by clicking. A selection can be generated from a path.
Thus, the marked area may e.g. be copied several times or edited in color.

In another scenario, the creation of a path from a selection, is also possible, e.g. to have several selections in one image ready for later use.
Create a Selection

2.6. Layers
Photoshop offers the possibility to work with several image layers. Thus, even complex arrangements and compositions of different images are made possible. The layers can be edited, moved, faded in and out separately. One layer does not usually fill the entire picture. The non-data-filled parts are transparent. The filled elements obscure the underlying parts of other layers in the layer list by the Photoshop palette order. The easiest way to create new layers is to simply copy and paste pixels. Copy with “CTRL” + “C” or cut with “CTRL” + “X” and paste again with “CTRL” + “V”. Copy and paste again works from one image to the other.

The layers can be changed by dragging with the mouse button pressed in their order. You can only edit one level at a time. The currently active level is the blue layer. If you work with several layers, you should always pay attention to which layer is currently being edited. Often this is the cause of error messages or that a tool does not do what is expected.

TIP: When a picture is finished and the layers are no longer needed, they should also be removed before finally saving as a TIFF or JPEG. In order to have a visual control of the exact image saved before saving, you should combine all levels in the menu “Layers” with the item “Reduce to Background Level …” to a new background level. Layers that were hidden or invisible disappear here without a trace. Only then should you save the image as JPEG or TIFF. For security, the image can be saved as Photoshop picture PSD before discarding the layers.
Behind the menu item “Free Transform” hides a powerful tool for transforming layers. First, the layer that is to be transformed must be selected. Then select in the menu “Free Transform”. Around the layer will appear a rectangular frame with handles on each corner. With the handles, the layer can be scaled (with Shift pressed, it is scaled proportionally). If you move the mouse pointer slightly outside of the edges, the plane can also be freely rotated at will. Once the layer has been finished, the transformation can be accepted by pressing the “ENTER” key. You can cancel by pressing the “ESC” key.
![]()
2.7. Color Correction
In the Corrections palette (right beside properties) you will find a variety of correction options. We will only discuss a few as an example. Generally, the corrections are only a so-called adjustment layer. The advantage of a color correction as a layer, is that they can be switched on and off. The order can also be changed but beyond that, they can also at any time, be modified.
 Clicking on one of the corrections creates a new property layer and switches to the Properties palette. In the properties palette, the properties of the correction can be edited, and the mask to which the correction is applied can also be edited.
The adjustment layer created this way can be faded in and out like any other layer.

2.7.1 Levels
 The main component of the levels window is the histogram, which shows the brightness distribution in the picture. Ideally, the full width of the histogram should be used. If areas are empty, as in this example, the image usually appears over- or under-exposed (too bright or too dark). Just below the histogram are three sliders that can be moved. With these knobs the new tonal range can be adjusted. The regulator on the left edge is responsible for setting the depths, everything to the left of its top is displayed as black. Similarly, the controller works on the right side. It defines the white point – everything to the right becomes white. With the regulator in the middle, the contrast of the image can be adjusted – moving the slider to the left, the contrast is lower and higher to the right. To correct it, just move the sliders to the edges of the histogram – the new position of the sliders is with the black circles. If only the left and right edge are moved, the middle slider remains always in the middle between the two controllers and the contrast remains untouched. If you go further, image information is lost that can not be restored. There are breaks, i.e areas that are flat black or white.
TIP: If the ALT/OPT key is pressed while moving the outer dials, a white or black area appears in the image window in which only the parts that would be cut off by the tonal shift are visible. This can be used to assess which loss of information is still tolerable and which are not. This procedure can also be used separately for all color channels or be determined with the eyedroppers at the bottom right via a selection in the image. This also allows light color casts to be removed.

2.7.2. Color Space Conversion
If you do not want to save an image in one of the working color spaces for RGB, CMYK or grayscale, it is not sufficient to change the color space via the “Image”, “Mode” menu. In order to convert an image into a defined color space, the function “Convert to profile” must be selected in the Photoshop, in the menu “Edit” (under the color settings).

2.7.3. Raw-Image Import
High quality digital cameras can save so-called RAW images, which capture the camera’s full megapixel size and tonal range. These files are similar to an analog negative, and the generic camera raw file format is called digital negative format (DNG). Camera data is saved with the image as metadata. As with negative film, more color and tonal range can be brought out through editing than with a JPG or TIFF file from the same camera. The disadvantage of a raw image is the large file size (about 4 times as much as a high-quality JPG). If a picture is to be processed later, however, the effort is worthwhile due to the extended possibilities.

If you select a raw file when opening the dialog in Photoshop, the Camera Raw dialog opens automatically. If several files are selected, all the pictures appear as a list with preview links. The dialog box has some tools for cropping, straightening, removing red eyes, etc. On the right are the adjustment sliders which are divided into different tabs. Here you have almost endless possibilities of color processing.
However, all changes and settings are not applied to the file. They are stored in a separate metadata file with the extension “XMP”. The image can then be opened later in Photoshop or saved as an image file along with the properties of the RAW image’s settings.
If you would like to edit a normal picture with the possibilities of the RAW import filter then you can find it via the menu under the item Filter. Pay attention as you will find all known controls here, but the limited quality of a normal image file can not achieve the same quality.
