
Main Body
Chapter 3 • InDesign
Richard Adams and Mathias Galus
The basic layout of the user interface in InDesign is similar to Photoshop: the tools on the left, the Palettes on the right, and the Basic and Option menus at the top. The functions are also largely the same.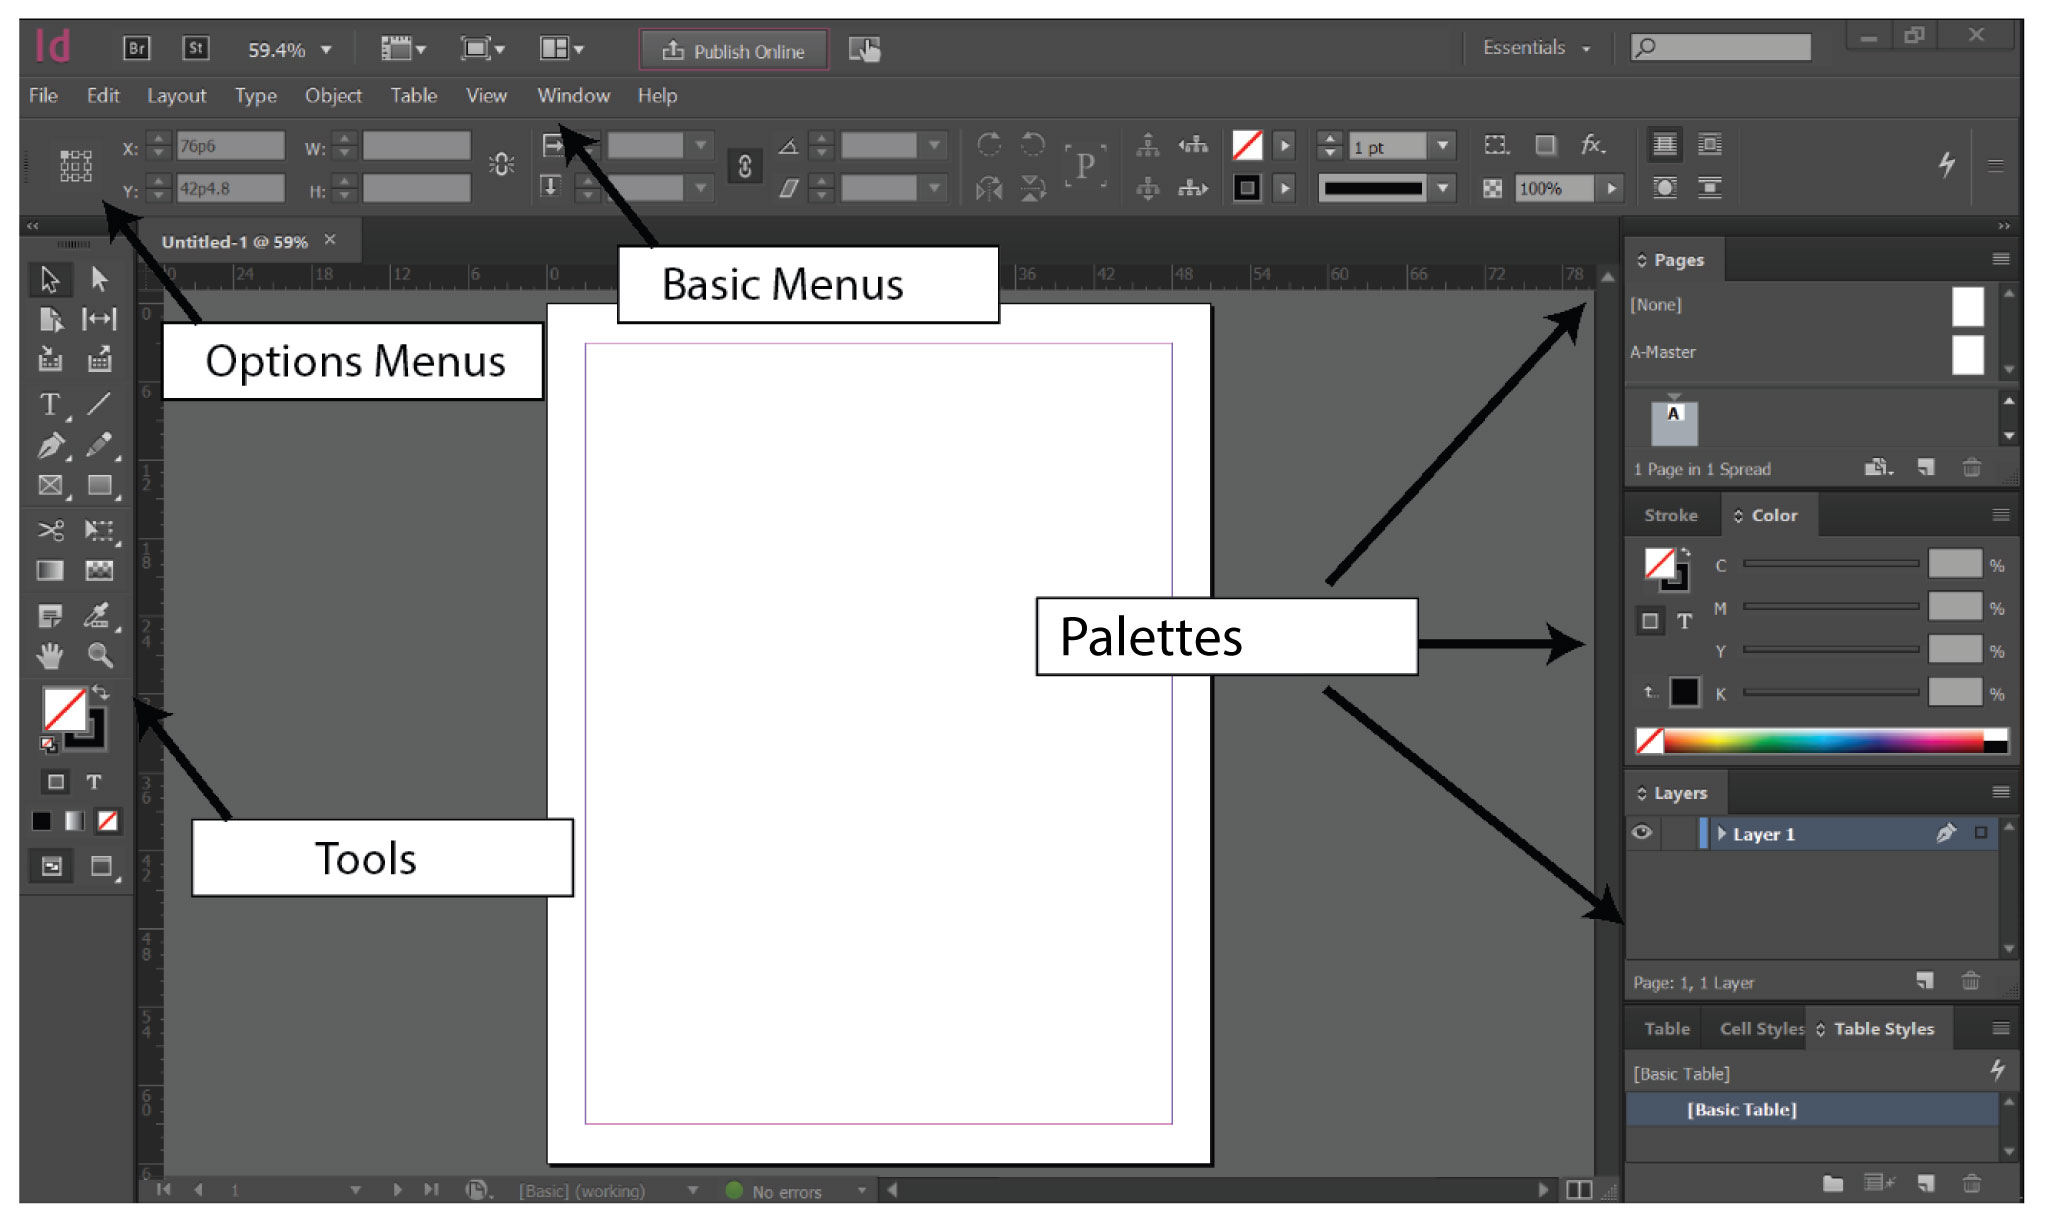
Basic
These menus hold the main features of InDesign, including opening and saving files, preferences, tables, special text options, and more.
Some of the most important functions from these menus are described in this guide.
Tools
This menu can be used to call important functions such as selection, filling, and text tools.
Options Menu
Depending on the selected tool, detailed options for each tool can be set here.
Palettes
The palettes on the right side offer a variety of editing and adjustment options. The individual palettes can be arranged freely.
5.1 Preferences
InDesign also offers the user a variety of settings that will be briefly presented here. Altered presets could cause nasty surprises while working. It is therefore advisable to go over the presets in each new workplace briefly in order to adapt them to your own habits.

The default settings are in the menu “Edit” as last item “Preferences …”
5.1.1 Color Preferences
Of course, Adobe InDesign also has to offer a way to set the working color spaces to enable a consistent workflow with color profiles.
All image and graphics files can then be converted to these color spaces during output. It works optimally if the same working color spaces are used in all programs. This can be ensured if the color settings are made in the application BRIDGE. From there, all Adobe products are synchronized.
Here color management presets can be loaded, either standard sets or defined in Adobe Bridge itself like “hdm-color-settings”.
By selecting suitable color spaces, it can be ensured that placed images and graphics can be displayed correctly and above all displayed correctly.
This sets the behavior of InDesign when placing and opening files.
To be able to work consistently, all data should be converted to the working color spaces. However, especially with CMYK documents, a distinction must be made between image and graphic elements. Therefore, each case should be decided individually.

5.2 Tools
Here can be accessed tools for performing functions, including selection, text, picture and text boxes, and others. When you click and hold on a tool with an arrowhead at the bottom right corner, another palette opens where you can select more tools.

5.3 Palettes
Almost all important formatting and options can be found in the InDesign palettes. On the right is a selection of standard palettes. The individual index cards can be freely rearranged by the user in order to arrange them efficiently for specific tasks.
In addition to these standard palettes, the “Window” menu contains a whole list of additional palettes that can be displayed. Palettes that are currently displayed are marked with a tick. Thematically related palettes are grouped in submenus.
 |
 |
5.3.1 Important Palettes
Pages
The Pages palette is divided into two sections: master pages at the top and the content pages at the bottom. Both are managed centrally here. In addition to new document pages, the “Pages” palette can also be used to create new master pages that can be applied to content pages. Working with master pages is described in Chapter 2.8.
 |
 |
Advanced options can be accessed via a hidden menu. Click on the round button with the arrowhead to get to an options menu. For each palette, further options are available.
Add new pages:
There are several ways to add new pages to a document:
1. Bottom right in the palette there is a “New Page” icon . Clicking there inserts a new page after the currently selected page.
Similarly, you can delete the currently marked page with the trash icon.
2. Drag & Drop: From the upper area, a master page can be dragged onto the document to create a new page. If you let go of an already existing page, the master page will be applied to this page.
3. In the options menu there is the option “Insert page …”. This feature provides the ability to add multiple pages to the document at the same time. You can also select the matching sample page, as well as the position at which the pages should be inserted.

Layers
Like Photoshop and Illustrator, InDesign uses layers. This can be very useful especially for very complex documents, e.g., different version to be produced. Thus, elements that are intended for a version can be collected on one level and thus be shown or hidden as needed, or simply structured for clarity.

Links
Since all images and graphics in Indesign are only saved as links in the document, it is important to be able to get an impression of the state of the links. Next to the file name, the status of the exclamation point column can be determined. A red question mark means the original is no longer on the specified place, a yellow exclamation mark means the file was changed since the link was inserted and needs to be updated.
In addition, by clicking on a file, further information about the respective file can be displayed, from color space to resolution to the file path.
 |
 |
Swatches
Each object in InDesign can be assigned a fill color and an outline color (As known from Illustrator), even for fonts (However, normally, fonts should not have a stroke).
The selection of color patches is comparably small, which is not surprising since text is usually assigned the color black. Additional color patches can be created either as a mix of CMYK or spot colors.
If a graphic is placed with a special color, this spot color is also displayed in the list of color fields.
In addition to simple color fields, gradients can also be created or stored here.
More about using the swatches in the next chapter.

Stroke
Each frame, line and character is assigned a stroke. This stroke can be edited in thickness and shape here.
The view here is after the options are shown.
Instead of a single thick line, two thin lines or a dotted line can be selected.
The position of the stroke can also be changed here. Normally the stroke lies in the middle, left, and right of the object path. You can also position them only on the left or only right of the object path.
In addition, arrowheads can be defined at the beginning and end of lines.

Color
Here, any color tones from the standard colors can be mixed together or the area coverage of individual colors (Including spot colors) can be set.
If a color is already selected, the controller will default to setting the area coverage of this color, no matter if mixed or of a special color.
If you would like to create a new color mix, use the options menu of this palette (Click on the 4 parallel lines) to call up the controls for the desired color system. The color set here can simply be saved as a new color field by clicking on the new color field button in the bottom right corner of the color patches.

Formats
Recurring formatting in a document can be saved as formats in Adobe InDesign. The exact use of these palettes will be the subject of the next chapter.
The formats are applied to the objects/elements by selecting the elements and clicking on the appropriate format.

Character Styles
Certain attributes, such as font style, color, etc. can be dropped here and applied to certain characters in the text by selecting.

Paragraph Styles
Again, this formatting refers to the text, except that a complete paragraph (until the return) is formatted here, from the font over the hyphenation to the text color.

Object Styles
Of course, the formatting of graphics and text frames can be stored and used multiple times. This allows you to save the thickness and color of the stroke or fill and other effects. The advantage of working with styles is that changing the dropped styles will affect all of the formatted elements or phrases. For example, changing the stroke’s thickness of the text frames or changing the font in a 1,000-page book must be done in one place only. With a mouse click, the changes then affect all desired elements of the entire document.

6. Create Documents with InDesign
6.1. Create a New Document
The File -> New -> Document … (CTRL + N) menu opens the dialog for creating a new document.
6.2. Creating New Elements
Most elements can be created through the object tools.
Frames can also be created without content.
Path Tool — The Path tool can be used to define arbitrary shapes with anchor points, which can then be used either as filled objects or text frames, or as paths on which text can flow. Single anchor points are simply clicked.
Text Tool — With the text tool selected, a text frame can simply be dragged onto the document while holding down the mouse button. If there is already a frame, the cursor can be put into it by simply clicking in the frame or already existing text can be marked and edited.
With the “text on path” tool, the text can run along arbitrary paths, including contours of circles and rectangles.
Pen Tool — Holding down on the mouse button, free form lines can be created.
Frame Tools — can be raised while holding down the mouse button. These frames may be filled with a color or pattern, text, or picture or graphic.

6.2.1. Creating New Pages
If more pages are needed than specified when the document was created, they can be easily created in the Page palette by clicking the Create New Page icon at the bottom of the palette.
Similarly, superfluous pages can be deleted. Either drag the page to be deleted with the mouse button pressed down on the trash can icon at the bottom right or mark the page and then delete the page by clicking on the trash can.
By moving the pages in the “Pages” palette, you can also change the order in the document.

6.3. Placing Elements
Usually in Indesign, already existing objects are placed and rearranged. Images, graphics, and text are inserted in the document this way. The dialog for placing objects can be called via the “File” menu or CTRL + D. If multiple files are selected, the file will be placed one at a time.
6.3.1. Placing Pictures
 The Place dialog is similar to the Open dialog. The desired file must be marked and then placed on the selected page with “Open” in the current document.
InDesign can read a variety of image file formats, including the proprietary Photoshop file format. To avoid problems with the output, however, only common formats such as TIFF should be used.
The image appears in the size and resolution of Photoshop and should not be resized if possible (if only then reduced).
WARNING: Images are stored in InDesign only as links! If the original images are changed, deleted or moved, the InDesign document must be updated. The “Links” palette will always show the current status of all linked files.
After clicking on Open, a miniature of the image to be placed appears in conjunction with a mouse pointer which was replaced by an image symbology. Clicking will set the upper left corner of the image, or when clicking on an existing frame, the image / graphics will be placed in it. If several elements are to be placed, the number of elements next to the pictogram appears in brackets.
The placed image can later be moved and further transformed.
WARNING: By default, the Replace Selected Item option is selected. This will not place the image in a new frame but replace the content of the currently selected frame with the image. Even text is replaced in this way.

6.3.2 Placing Text
After clicking on Open, the mouse pointer appears as this icon.

If you click on the upper left corner of a column with this symbol, a text frame is automatically generated in the size of the column and the text flows in.
If a text frame has already been created in which the text should flow, you only have to move the mouse over this frame and get this symbol. By clicking, the text now flows into this previously created frame.
If you already know that the text to be placed is longer than a column, you can activate a special function by keeping the ALT key pressed. If you now click on a column, a text frame is automatically created again and the tool remains in placement mode. So you can add more columns or text frames without having to click on the red square.
Press the SHIFT key, and now when you click on a column, as many columns and pages necessary to display the text are generated automatically. For long texts, this is the fastest method.

 After clicking on Open, the mouse pointer appears as this icon. If you click on the upper left corner of a column with this symbol, a text frame is automatically generated in the size of the column and the text flows in.
If a text frame has already been created in which the text should flow, you only have to move the mouse over this frame and get this symbol. By clicking, the text now flows into this previously created frame.
If you already know that the text to be placed is longer than a column, you can activate a special function by keeping the ALT key pressed. If you now click on a column, a text frame is automatically created again and the tool remains in placement mode. So you can add more columns or text frames without having to click on the red square.
If you press the SHIFT key, you can now click on a column, and as many columns and pages necessary are automatically generated to display the text. For long texts this is
the fastest method.
6.3.3. Overset Text
Often a piece of text is longer than a column or a single text frame and not all of the text can be displayed, this is known as overset text. This is indicated in InDesign by a red square with a plus at the bottom right corner of the text frame. The text must now either be trimmed down so that it can be fully displayed in the frame, or the frame must be enlarged. Both is often not possible and does not lead to the goal. If you click on the red square, the mouse pointer appears again as in the beginning. By clicking on another column or another text frame, the text can now continue to flow there. The frames are now linked together. So the text flow can be created over different columns and sides.

6.4. Placing Images
In Indesign, there is always the distinction between the picture frame and the actual picture. Both can be modified separately. For example, if you zoom in on the picture frame with the larger or smaller object tool, the image in it will not automatically scale. (This can only be achieved by pressing the Shift and Cmd/Ctrl keys simultaneously). In this way, the frame can show only a part of the image. The frame does not need to be square but can take any shape (when placing you can define any frame shaped as an picture frame) or you can also make frames and change their shapes with the pen tool.
If the picture is selected (Brown frame), not only can the position but also the size can be adjusted. Clicking and draging on the corners will scale the image. Pay attention as you transform the image to not accidentally disproportionate it. You can hold at the shift key at the same time so that the image is only proportionally scaled.
It is also possible to rotate images separately from the frame or rotate the frame separately from the image.
If the image and image frame do not fit together or if an image fits into an existing frame or a frame is adapted to an image, the fastest method is via the context menu (Right click on the picture). You will find the option at approximately mid-height to adjust the options for fitting pictures in frames.
| Setting | What It Does |
| Fill Frame Proportionally | The existing frame is completely filled; the image will scale proportionally until the frame fills in, but the aspect ratio of the image and frame will not match and parts of the image will be cropped. |
| Fit Content Proportionally | The image is scaled proportionally and fully displayed in the frame. If the aspect ratio of the picture and the frame do not match, parts of the frame will remain empty or show its fill color. |
| Fit Frame to Content | The image frame is set to the size of the image without the image being scaled. |
| Fit Content to Frame | The image is scaled to the size of the frame without regard to the proportions. If the aspect ratio of picture and frame is not identical, the picture will be distorted! |
| Center Content | The image is displayed in the middle of the frame with no scaling. Areas that are not filled by the image remain empty or parts of the image that do not fit into the frame are not displayed. |

6.5. Text Wrap
After placing an image, the frame becomes a separate layer above the other elements of the page. If the picture is pushed over a text frame, then the text is not wrapped, it just disappears under the picture! To fix this, the position and/or size of the text frame can be changed so that no conflict occurs or you can open the “Text Wrap” palette (ALT + CTRL + W) via the “Window” menu. For each selected object, the text displacement properties can be set here.
6.6. Formatting Text
Classically, text in InDesign can be formatted across different palettes. Simply select the text area with the text tool that should be marked and then set the font, size, etc.
6.6.1 Character Formatting
Once the text tool is activated, the most important character parameters can be set using the options palette.

6.6.2 Paragraph Formatting

The same editing options can be found a little differently arranged in the “Characters” palette which can be opened via the menu “Fixed -> Fonts & Tables”. In addition to the “character” palette, there are also other palettes that offer further possibilities for text formatting, e.g. the “paragraph” palette (CTRL + M).

6.7. Formatting Frames and Paths
If you select an object, the Transform palette appears in the options palette. Here, you can change the object’s size, rotation and much more.

Transform Objects
The selected corner remains fixed in all transformations, so if the object is changed in width, the left side remains at the original position. If the object is rotated, this point also serves as a fulcrum.
 |
 |
Stroke Adjust
In addition to the thickness of the stroke, like Illustrator, the position of the stroke (inside, outside or center) can be set as well as the appearance of this stroke (type).
Similarly, for lines, arrowheads can be added.
6.8. Working with Colors and Special Colors
Each object and text can be assigned a fill and a stroke color. Either by double-clicking on the respective area in the tool palette (a color picker will pop up) or by clicking on the relevant color field in the “Swatches” palette. For selected objects, these changes are applied immediately.
If a special spot color such as red (HKS 13) is to be printed in addition to the mixed colors of CMYK (Cyan Magenta Yellow Black), a special color field must be created for this purpose.
WARNING: The creation of a special color always means that an extra printing unit with a corresponding color must be available for this color.
The first 4 colors in the “Swatches” palette are fixed and unchangeable.
1. No Fill — Objects or strokes with this color appear transparent. Underlying objects show through.
2. Registration — Objects or strokes in this color appear in all color separations but show as black in the preview. This color is only ever used for registration marks!
3. Paper — Objects that have paper as a filling cover underlying objects in such a way that the white of the paper comes to light.
4. Black — Objects or contours with this color appear only in the black separation.
 At the top right of the palette is the Hue box. This field allows the strength of the filling, i.e. control the area coverage in the print of the selected color. Define gray or light red areas or lines, select the base color and then adjust the area coverage.
New color patches are created by adding onto an existing swatch, e.g. the black swatch is marked and then first duplicated with the “New Swatch” button at the bottom of the palette. This “new” color field can now be edited by double-clicking.
Any color of the basic CMYK colors can be mixed here.
The color is then mixed in print from all 4 colors.
WARNING: This works only with 4-color printing! Such a composite color can not be issued as a separate printing plate!
The resulting color can vary greatly depending on the output device and coverage area as not one of the color locations are defined.
However, if one chooses the color mode, e.g. a HKS or Pantone color fan, you can choose a suitable color. This hue is automatically added as another ink. All elements created with this color appear only in this color separation, e.g. as HKS 23 Red. The color effect of this tone in the print depends on the color in the printing unit of the press.
Alternatively, you can mix a color yourself and give it a new name and change the color type from “process” to “spot”. Already you have defined a new color. However, one should also talk to the printer, so that he also fills the right color in the printing unit.

6.9. Formats – Paragraph, Character and Object Formats
In addition to the normal options over the options and other palettes, there is another way to format text and objects in InDesign
1. Paragraph Styles — Formats the entire paragraph, up until the paragraph marker (¶).
2. Character Styles — Only the selected characters are formatted (also applies to a single letter in a word).
3. Object Formats — Any frame, whether text, picture or graphical frame, and lines, can be specified with these formats in their properties.
Why use paragraph, character and object formats? Aside from a better text structure, e.g., in the body text, headline, etc. it will also be easier to achieve a consistent layout of a larger document. If a format is changed, this change will automatically be applied to the elements in the document which are formatted with the corresponding format. This makes corrections easier. For example, if the font changes, you will only need to make a change in one place, which will then automatically apply to the entire document.
By default, the palettes for formats are located at the bottom of the right-hand palette bar or in the Window menu under the Styles item, where you will also find palettes for formatting tables.
6.9.1. Settings for Paragraph Formats

To list all formatting possibilities here would go beyond the scope of this booklet. Therefore, only a brief reference to the most important options will be made.

Basic Character Formats:
Includes font, font style, size, leading, kerning, tracking, case, and position, along with options for underline, ligatures, no break, and strikethrough.
Alignment at the Baseline Grid
Below each document lies invisibly the so-called baseline grid (ALT + CTRL + ‘ to make visible). If you enable the text to be aligned with the baseline grid, this grid will work as a kind of line paper on which all lines lie. That is if 12pt is specified as the distance between two baselines, the text can now occupy only a line spacing of 12pt or whole multiples of it.
The baseline grid can either be set in the preferences for each document (menu Edit-> Preferences-> Grid) or by defining a baseline grid specific to certain text frames using an object format. (See Object Formats.)
Tabs:
Used to set tab stops in a text box.
Drop Caps
The beginning of a paragraph can be formatted separately here.
Row indicates how many lines high the beginning portion of the paragraph should be (for example, 2 lines high). Character indicates how many characters should be affected at the beginning. Character Style enables a special character style to be selected for further formatting.
Here’s an example: lines = 2 and characters = 1. A character format was still Drop Capped and color adapted.
6.9.2. Character Format Settings:
Basic Character Formats — Basically, you should only change what you want to change in the paragraph format when creating character formats. All other fields should be left blank as the value of the paragraph format is automatically used. This allows a character format to be used more universally and changes to the paragraph format can be used automatically.
6.9.3. Settings for Object Formats:
When setting object styles, not only are the base attributes available that describe the appearance of the object itself, including various options for text frames from baseline grids to creating multiple columns, but also the ability to associate specific effects such as shadows and transparencies. This can be assigned separately to the entire object, its stroke, fill and the text, so only the text in this frame can get a shadow or the whole text frame or only the outline of the frame.
Unfortunately, not all possibilities can be discussed here, we will focus here mainly on the possibilities of formatting text frames.
Fill, Stroke and Stroke Options
General Options for Text Frames
In addition to the distance of the text to the border of the frame, text frames with several text columns can be defined here. However, it is usually clear to create the frame individually. Especially if a text frame has a stroke, it is recommended that the text has a certain distance to the frame.
Baseline Options for Text Frames
To ensure that all text lines are always at the same heights for several columns and on several pages, they should be aligned with the baseline grid. Here you can define a single baseline grid for your text frames, matching the line spacing of your basic font.
Text Options Section
With the help of this option, the first and last characters in a line can be pushed out of the text area to create an optically more uniform impression.
Effects
For each element, a variety of effects can be set.
How the application affects the different parts of an element can be seen here as an example of drop shadows.
6.10. Master Pages
If certain elements in a document appear on every page, they must be defined on the master page. The master page is accessed by double-clicking on the template icon in the Pages palette.
If a document is created with double-sided pages, there is of course also a right and a left template page, on each of which separate objects can be placed and created.
Changes in the master page are automatically applied to all pages of the document!
When the master page is finished, please do not forget to leave the master page by double-clicking on a normal content page.
You can create multiple master pages for a document that will be applied to different pages, e.g. for each chapter. The master pages can inherit certain elements from each other or be completely rebuilt.
6.10.1 Automatic Pagination
Creating an automatic page number can be done in InDesign using the master page. Select the master page and draw a text frame at the position where the page number should appear. From the menu “Type -> Insert special character -> Markers -> Current page number” to insert the page number placeholder in the text box. A large “A” will appear, which can now be formatted like any other text. Instead of the “A”, the page number appears in the default formatting on the normal pages.
7. PDF Files
7.1 Creating PDF Files
To create a PDF file in Photoshop and Illustrator you can simply select the “Save as…” option. To create a PDF file in Indesign you have to go via the Export function. Make sure the file format “PDF (Print)” is selected. Even if the dialogue is slightly different in each case the same settings can be made. Here, the export dialogue of Indesign is discussed in the first place, but the settings can be easily applied to Photoshop and Illustrator.
7.2 Keyboard Shortcuts
7.2.1 Photoshop Shortcuts
|
Ctrl + C |
Copies a selected area to the clipboard |
|
Ctrl + X |
Cuts a selected area out of the image and places it on the clipboard. |
|
Ctrl + V |
Inserts the contents of the clipboard into an image as a new layer. |
|
Ctrl + N |
Opens the dialog for creating a new empty image. |
|
Ctrl + O |
Opens the dialog for opening an image file. |
|
Ctrl + S |
Saves the current picture. WARNING: the original file will be saved over! |
|
Ctrl + Shift + S |
Opens the dialog “Save as” |
|
Ctrl + Z |
Undos the last action. |
|
Ctrl + A |
Select all. |
|
Ctrl + D |
Cancels the existing selection. |
|
Alt + Ctrl + D |
Soft selection edge (semi-transparent natural edges) |
|
Ctrl + Shift + I |
Inverses the selection. |
|
Ctrl + + |
Zoom into the picture. |
|
Ctrl + – |
Zoom out of the picture. |
|
Ctrl + 0 |
Shows the full picture. |
|
Alt Gr + 0 |
Displays the picture 1: 1 (100% zoom) |
|
Spacebar |
Switches from the currently selected tool to the hand tool. This allows moving the visible image section without changing the tool or releasing the mouse button. |
|
Alt |
Holding down the Alt key removes the new selection from the existing one. |
|
Shift |
Holding down the Shift key will add the new selection of existing ones |
|
Shift Lock |
(Caps Lock) Toggles the tool brush from its default shape (circle or icon) and displays a crosshair instead. |
7.1.2 Illustrator Shortcuts
|
Ctrl + C |
Copies a selected object to the clipboard |
|
Ctrl + X |
Cuts a selected object and places it on the clipboard. |
|
Ctrl + V |
Inserts the contents of the clipboard into a document. |
|
Ctrl + N |
Dialog for creating a new empty document. |
|
Ctrl + O |
Dialog for opening a document |
|
Ctrl + S |
Saves the current document. |
|
Ctrl + Shift + S |
Opens the dialog “Save as” |
|
Ctrl + Z |
Undoes the last action. (Can be used almost any number of times) |
|
Ctrl + A |
Selects all objects of a page or the entire text of a text frame including the overset and linked text frames. |
|
Ctrl + = |
Zoom into the document |
|
Ctrl + – |
Zoom out of the picture. |
|
Ctrl + 0 |
Shows the full picture. |
|
Ctrl + T |
Opens the Text Options palette |
|
Shift + Ctrl + F9 |
Opens the Pathfinder Palette |
|
Ctrl + R |
Show rulers on the edge of the board. |
|
Ctrl + Y |
Toggles between the path layer and the character preview. Only the paths are visible in the path view, no fills or stroke thicknesses. |
|
Spacebar |
Spacebar + pressed mouse key enable moving the visible image section with the hand tool without having to change the current tool. |
|
Alt |
Pressing the Alt key selects the center of the object as the starting point instead of the upper left edge using the Oval and Rectangle tools. |
|
Shift |
Holding down the Shift key always creates circles and squares using the Oval and Rectangle tool. Using the Transform tool transforms only proportionally. |
7.1.3. Indesign Shortcuts
|
Ctrl + C |
Copies a selected object to the clipboard |
|
Ctrl + X |
Cuts a selected object and places it on the clipboard. |
|
Ctrl + V |
Inserts the contents of the clipboard into a document. |
|
Ctrl + N |
Dialog for creating a new empty document. |
|
Ctrl + O |
Dialog for opening a document. |
|
Ctrl + S |
Saves the current document. |
|
Ctrl + Shift + S |
Opens the dialog “Save as” |
|
Ctrl + Z |
Undoes the last action. (Can be used almost any number of times) |
|
Ctrl + A |
Selects all objects of a page or the entire text of a text frame including the overset and linked text frames. |
|
Ctrl + + |
Zoom into the document |
|
Ctrl + – |
Zooms out of the picture. |
|
Ctrl + 0 |
Shows the full picture. |
|
Ctrl + D |
Opens the dialog for placing elements |
|
Alt+ Ctrl + I |
Opens the Pathfinder Palette |
|
Ctrl + R |
Shows all hidden characters (Enter, space, etc.) |
|
Spacebar |
Switches from the currently selected tool to the hand tool. This allows moving the visible section of the document without changing the tool or releasing the mouse button. |
