VR Projects
Working With The Unity VR Template Project
The Unity VR Template project can be downloaded in the resources link provided, and has everything you need to get started working with VR projects in Unity. The project contains the assets from the blender tutorial, along with additional royalty free 3D models. It also contains the necessary plugins to run VR interactions for SteamVR, and the required plugins to make the project compatible with the Immersion Studio. You can either work with the assets available in the assets folder, or you can upload your own assets by dragging them into the open Unity project. There are two important interactions needed in order to achieve an engaging VR experience. These two interactions will be outlined below.
VR Navigation & Interactions
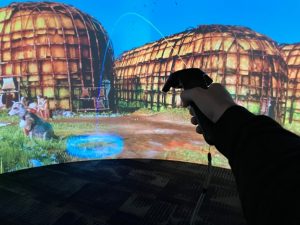
In order to navigate through a 3D scene, you will need to have some form of navigation that enables locomotion. In traditional VR and in the Immersion Studio, it is important to note that traditional omnidirectional movement using the arrow keys and mouse is not the ideal way of locomotion. This is because omnidirectional movement has a tendency to cause motion sickness in most forms of VR. Instead, the main navigation system in VR through teleportation, as in pointing the VR controller in a direction and warping to that location in VR. The result looks like the screenshot below.
By default the template VR Unity project that is provided will have VR navigation and interactions already enabled. You can place your 3D object onto the navigation floor of the 3D scene to enable navigation for your own project without the need to add additional movement components to your scene. If you are importing a separate project and you want to enable VR navigation and interaction, you can follow the steps below to do so.
VR Navigation
- Select the 3D object in your scene that you would like to enable as an object used for navigation (ex. floor)
- Duplicate that object by copying and pasting it in the same location
- Select the cloned object from step 2 and in your inspector panel, click on the “Add Component” button\
- Search for the “Box Collider” component and add it to your object
- Next, search for the “Teleport Area” script and add the script to your object
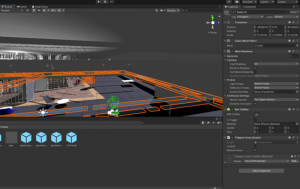
- The object should not have teleport navigation enabled. If done correctly, the inspector panel for your object should look similar to the inspector panel on the right in the image below.
VR Grab Interaction
- Select the object you want to be interacted with
- In the inspector panel, click the “Add Component” button
- Add the Rigidbody component
- Once the Rigidbody component is added, check the “Use Gravity” box
- Next, add the Box Collider component
- After the Rigidbody component and the Box Collider component have been added, you can add the “Interactable” script and the “Throwable” script to the object
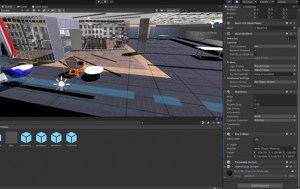
- If done correctly, the object should now be grabbable and throwable in your scene. The inspector panel for your object should look similar to the inspector panel on the right in the image below.
Immersion Studio Unity Plugin
In order for a Unity project to work in the Immersion Studio, we need to import the IglooUnityToolkit asset package on the TMU Library website found in the link above. When the package is imported to an existing project and the IglooManager prefab has been added to an open scene, the project should be compatible with Unity via the Igloo Warper program. Please also note that The Unity plugin was tested and working for Unity 2020.3.0f1 and below. It is not guaranteed that this plugin will work for versions of Unity beyond the year of 2020.
Resources:
Unity Igloo Plugin Documentation
The steps to importing and setting up a unity project are as follows:
- Download the Unity Plugin from the Immersion Studio Resources link above
- In your open Unity project, click on Assets in the navigation bar at the top
- Hover over Import Package and select Custom Package
- Find the Unity Plugin folder that was downloaded in step 1 and select IglooUnityToolkit-Dev-v1.2.1-1.unitypackage
- Select “Import” from the pop up window in Unity
- In the project window in the Unity editor, you should now see a folder called “IglooTools”
- In the IglooTools folder, find the IglooManager prefab by navigating to Resources – Prefabs
- Drag the IglooManager prefab into your open Unity scene
- Your project should now be compatible with the Immersion Studio
Running Unity In The Immersion Studio
1. Open your Unity project
2. Once the Unity scene is running, open the Igloo Warper UI window and select Layers – External Application Inputs, then check the Igloo Unity box and make sure it is Enabled. Your Warper UI window should look like the image below
3. The Unity scene should now be running in the Immersion Studio, and you can navigate around the 3D scene by holding up on the circular touchpad on either controller
Troubleshooting In Unity
- If the Unity scene does not display in the Immersion Studio after following the above instructions, close the Igloo Warper app and repeat steps 4 – 5
- The Igloo Warper app has a known issue where the inputs of the projectors will not properly refresh when going between Unity and Unreal. As a result, you may see the last visual of Unreal if it was previously open, or vice versa if Unity was previously open before Unreal.
- If the VR controllers are on but not displaying in the Immersion Studio
- Double check that SteamVR is open and running
- Make sure the green light is on for both controllers
- If the above statements are true, restart the SteamVR app and play the Unity Scene again. If necessary, close Unity and restart the application


