
Main Body
Tutorial 7 • Master Manipulator: Advanced Photoshop Tips and Tricks
Overview
In this tutorial we will explore some of the more advanced things we can do in Photoshop to manipulate images.
Objectives
- To demonstrate how to effectively use the Puppet Warp feature in Photoshop.
- To learn how to effectively crop out people with curly or fly-away hair.
- To use advanced techniques to add a rain effect to an image.
- Used advanced techniques to turn a daytime scene into a nighttime scene.
Manipulating an image using Puppet Warp
The Puppet Warp feature in Photoshop is a very powerful tool that lets us distort images in almost endless ways. Puppet warp is very useful for making artwork conform to a complex shape, as well as to modify the look of existing images.
Let’s begin:
- Open the file named GCM738_Tutorial_07_Swan.psd.
- Save the Image to the Working Photoshop Files folder with the name GCM738_Tutorial_07_Swan_Initials_v1.psd, where “initials” are your initials (e.g. GCM738_Tutorial_07_Swan_JL_v1.psd).
- Rename the Swan layer to Swan Original.
- Duplicate the Swan Original layer and name the duplicated layer Swan Puppet Warp. Hide the visibility of the Swan Original layer.
- Go to Edit Puppet Warp. You will see a mesh that appears that covers the entire contents of the layer. This mesh is what we will manipulate to change the image. TIP: If you do not see a mesh, make sure the Show Mesh is checked in the options bar.
- Before we manipulate the image, we will want to add some pins to the mesh. The areas we add the pins to will remain unaffected by the warp, and will be locked in place. Use the image below as a guide as to where to set the pins.
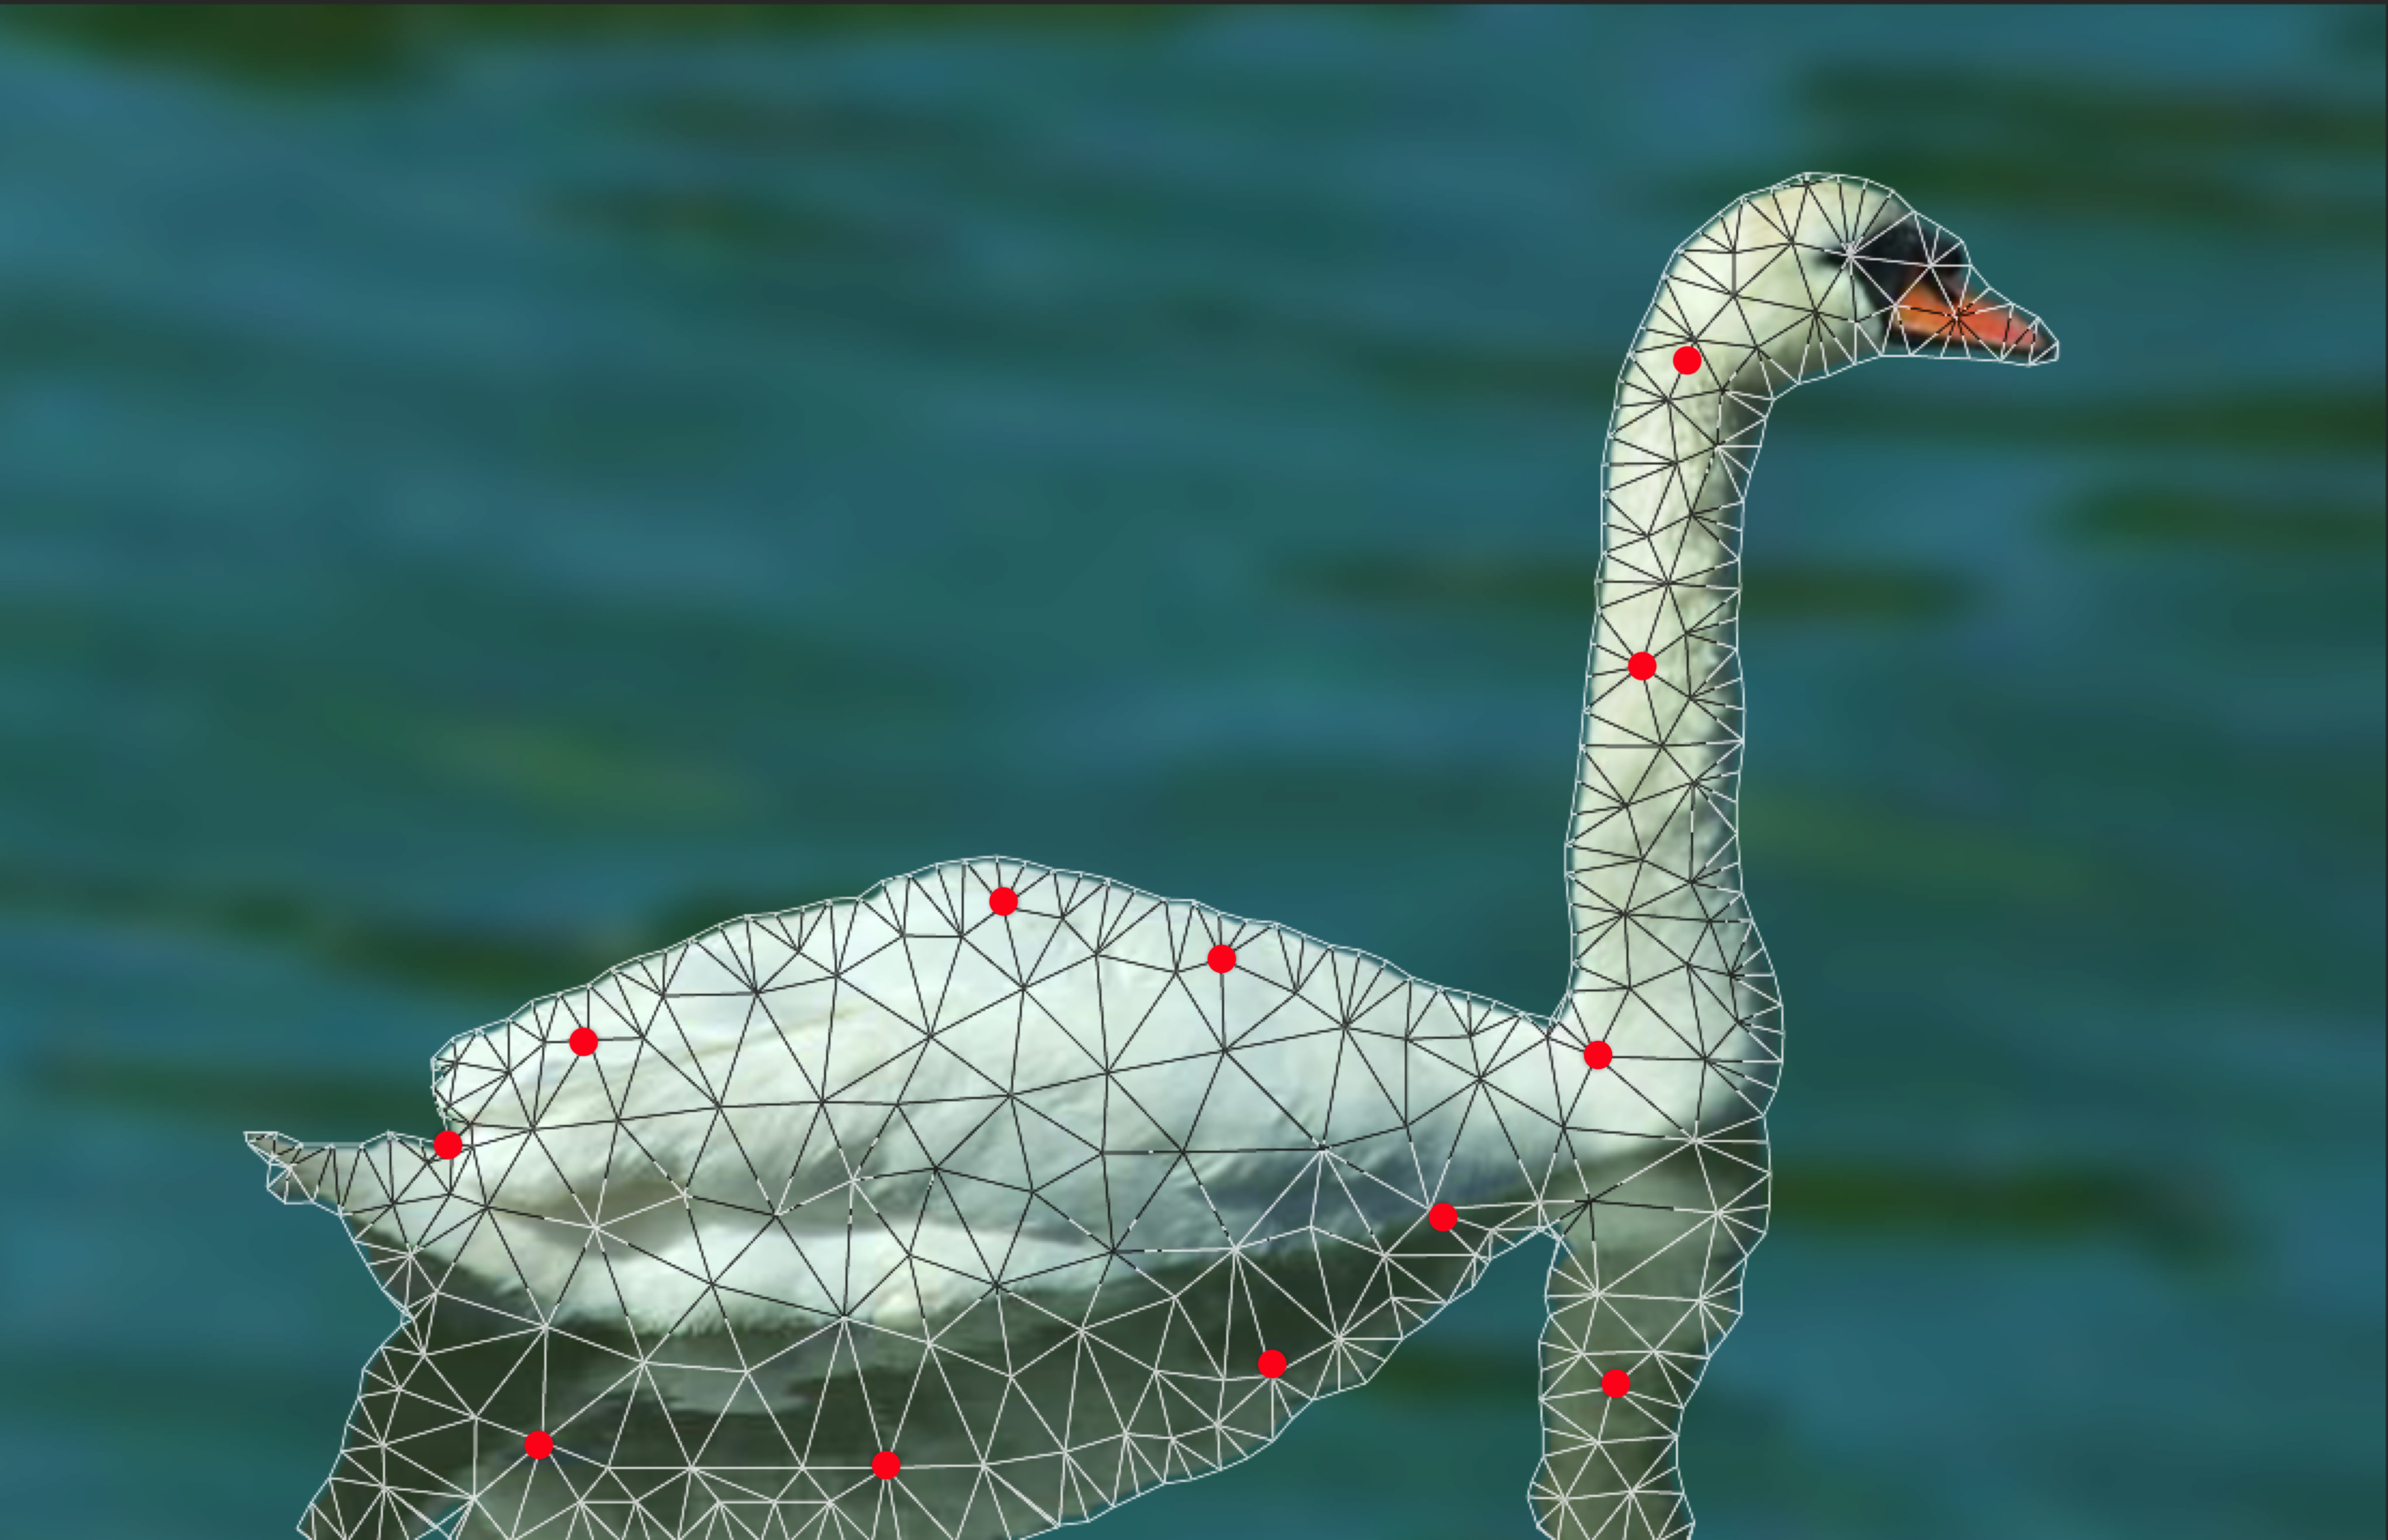
- Click on the pin at the base of the head, and float the cursor over the pin until you see the cursor change from a pin to a cursor, the click and drag to move the head to the right, so that it looks like the image below.
- Next click the pin in the middle of the neck, and use it to move the neck to the left slightly
- Add a pin between the two pins you just manipulated, and then adjust all three until you get a natural looking curve similar to the image below. TIP: You can toggle the mesh off and on to get a better look at your work
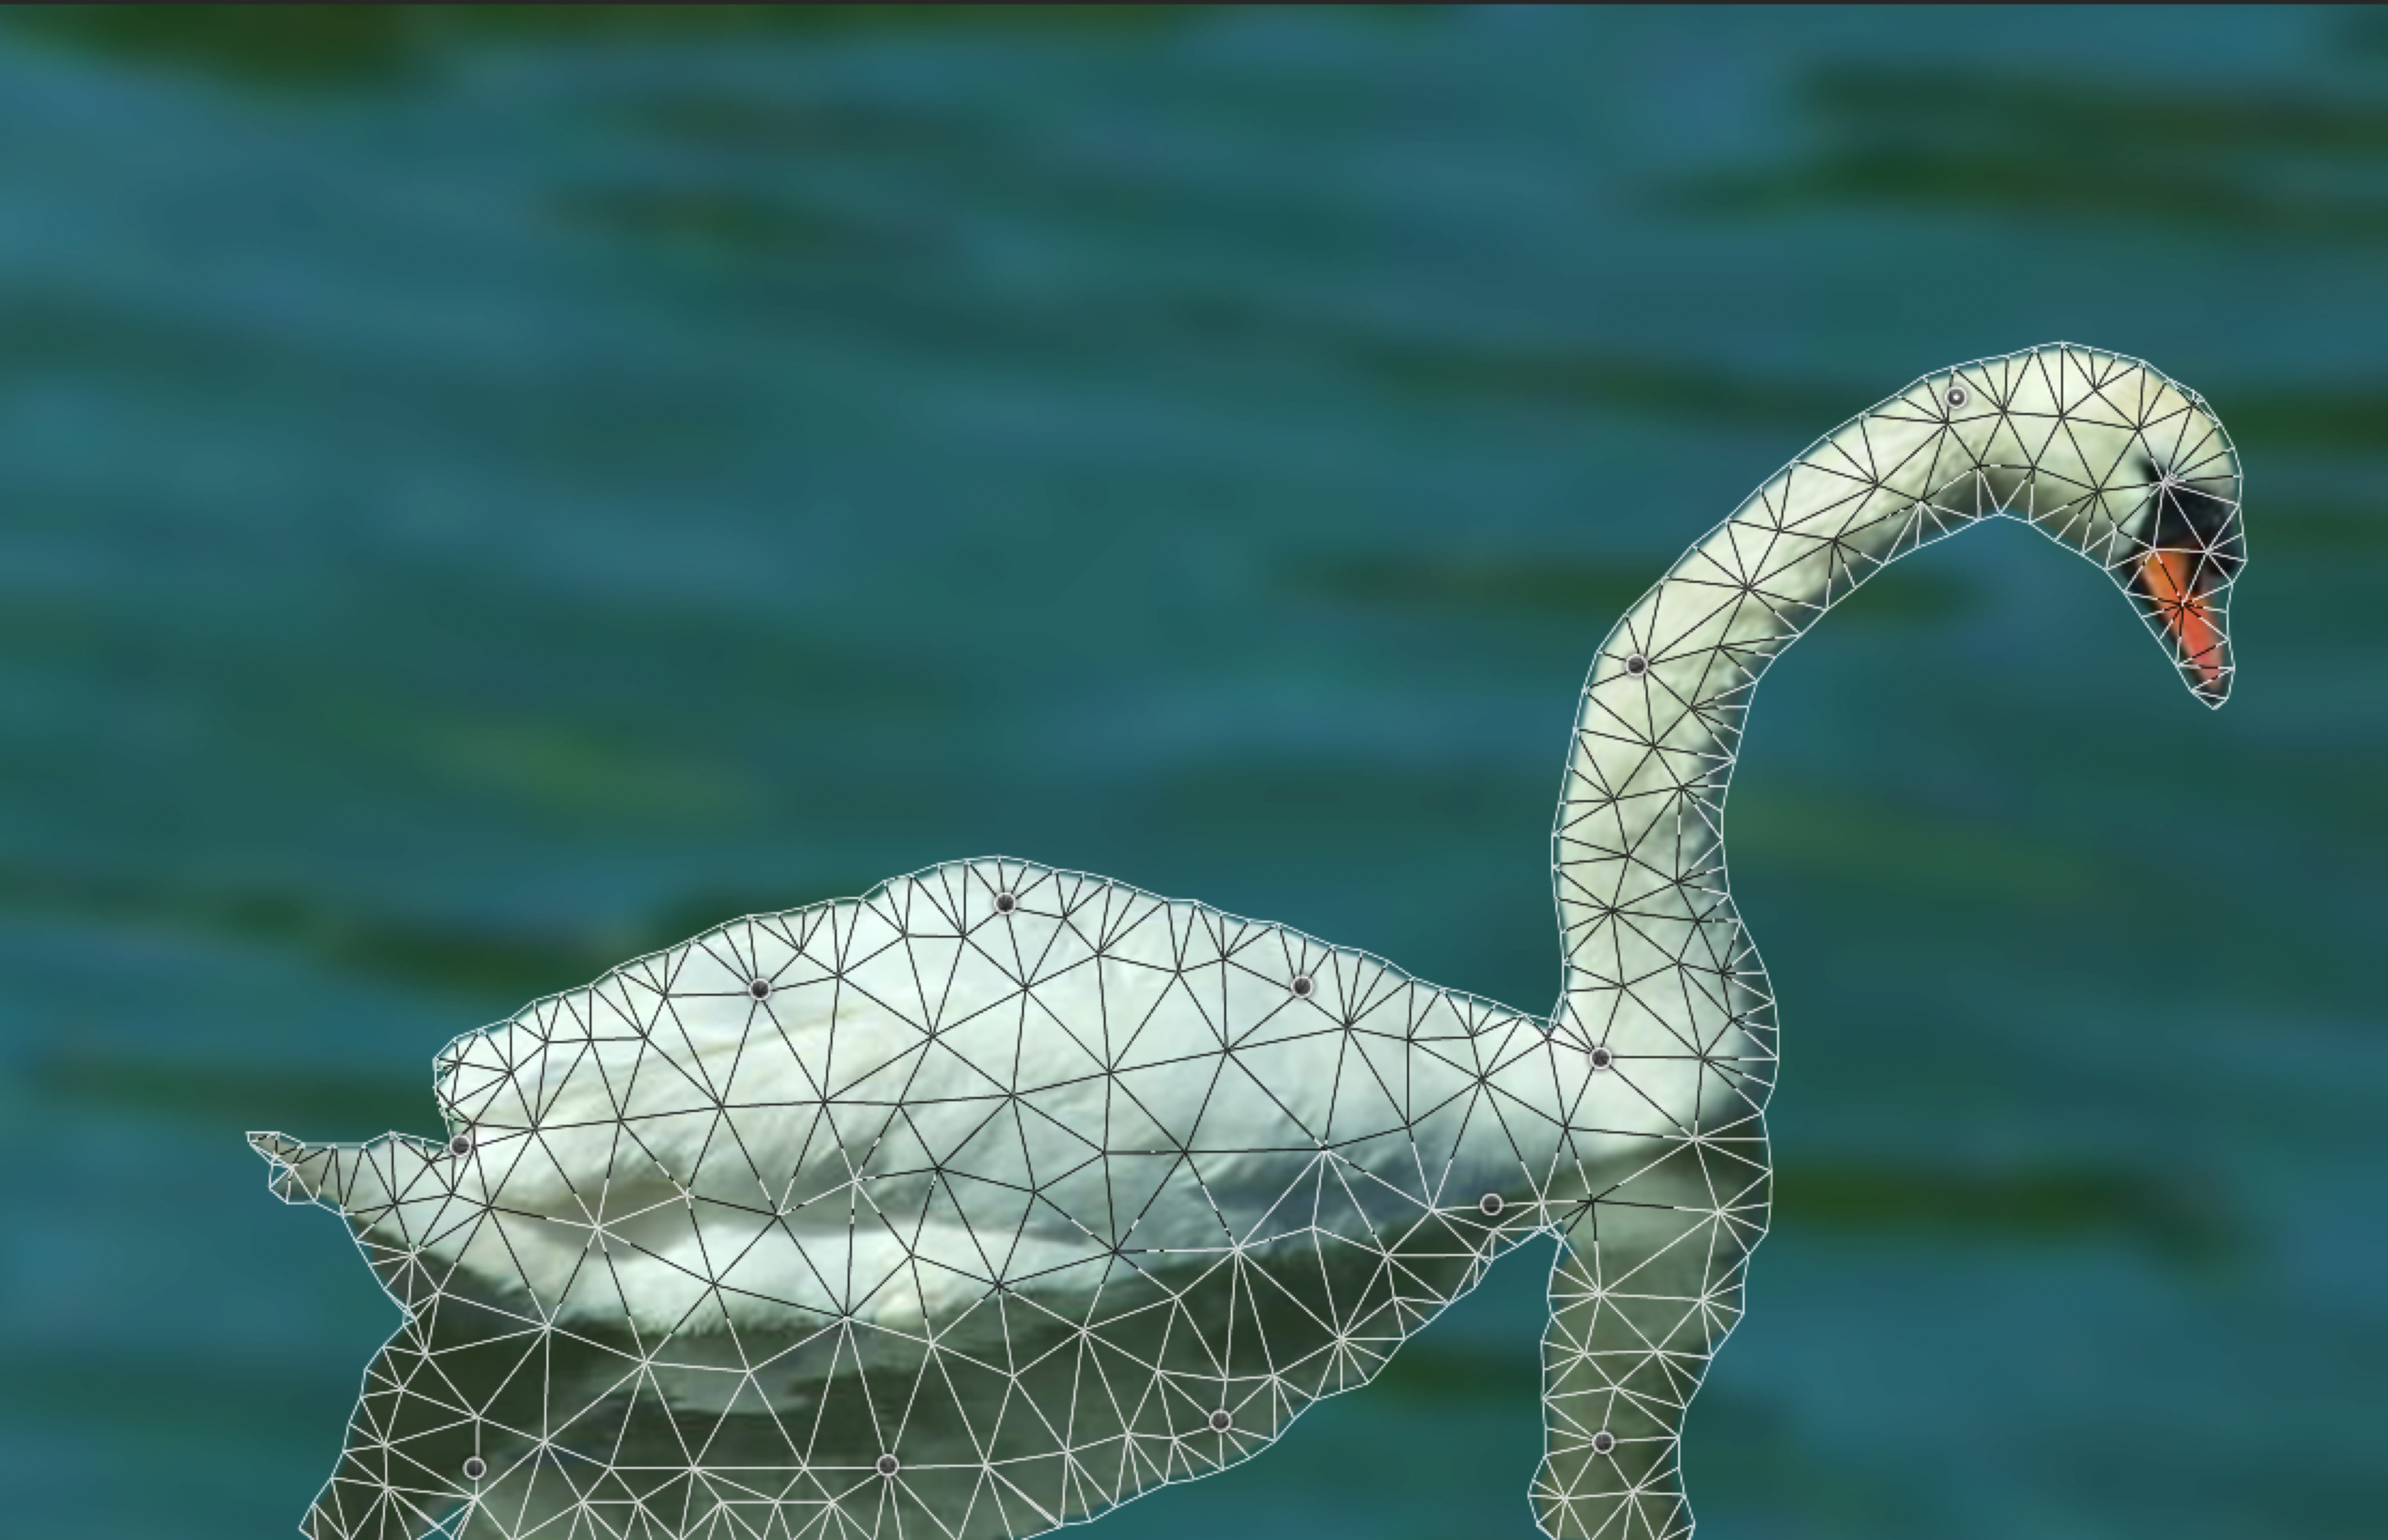
- When you are happy with how the neck looks, manipulate the pin on the neck reflection to mimic the changes you made
- When you are happy with your work, press return to commit to the warp
- Save the file
Close Cropping Curly and Fly-Away Hair
Cropping curly and fly-away hair so that it looks natural can be a challenge. In this portion of the tutorial we will look at one way we can do this the gives us great results!
Let’s begin:
- Open the file named GCM 738_Tutorial_07_Hair_Background.psd.
- Save the Image to the Working Photoshop Files folder with the name GCM738_Tutorial_07_Hair_Merged_Initials_v1.psd, where “initials” are your initials (e.g. GCM738_Tutorial_07_Hair_Merged_JL_v1.psd).
- Now open the file named GCM738_Tutorial_07_Hair_Model.psd.
- Save the Image to the Working Photoshop Files folder with the name GCM738_Tutorial_07_Hair_Model_Initials_v1.psd, where “initials” are your initials (e.g. GCM738_Tutorial_07_Hair_Model_JL_v1.psd).
- With the Model layer selected, and the Quick Selection Tool selected, in the Options Bar, click on Select Subject.
- Click on Select and Mask…
- Using the Refine Edge Brush Tool, set your brush size to about 90px
- Ensure that in the Properties Panel, view mode is set to Overlay and Real-time Refinement is selected. Opacity can stay at 50%.
- Ensure that the refine mode is set to Color Aware and not Object Aware. All other settings are set to 0.
- With the Refine Edge Brush Tool, paint over the areas where there is blue in her hair from the background. You could also select Refine Hair in the options bar. This will remove the blue background from her hair.
- Use the same brush to get rid of the blue background between her waist and arm.
- When you are satisfied, select OK.
- Choose Layer → Layer Mask → Reveal Selection.
- Click on Select and Mask…
- The model is now cropped, but you will notice that there is a lot of blue fringing from the reflection of the blue background. This is called spill, and we need to correct this. Let’s fix the spill:
- Create a new layer under the Model layer, and name it Temp Background. Fill this layer with black. This will help us to see the colour correction better.
- Create a new layer, and clip it to the Model layer. Name this layer Spill Correction. Change the Blend Mode to Color
- Select a brush with a nice big radius, and make sure the Hardness is set to 0. Hold down the option key and select an area of the hair that is close to the color you want to use, then begin painting over the blue areas. TIP: Sample different colours in the hair as you go to make it look natural. If you are unable to sample colours, click on the Eyedropper tool and ensure that “All Layers” is sampled from the drop down menu in the Options Bar.
- Reduce the size of the brush and continue this process for the rest of the model, including the face, arms and shoes
- Hide the Temp Background Layer, so only the Spill Correction and Model layers are visible. Select both layers and press shift, command, option + E to make a merged layer from those two layers. Name the new layer Model Finished
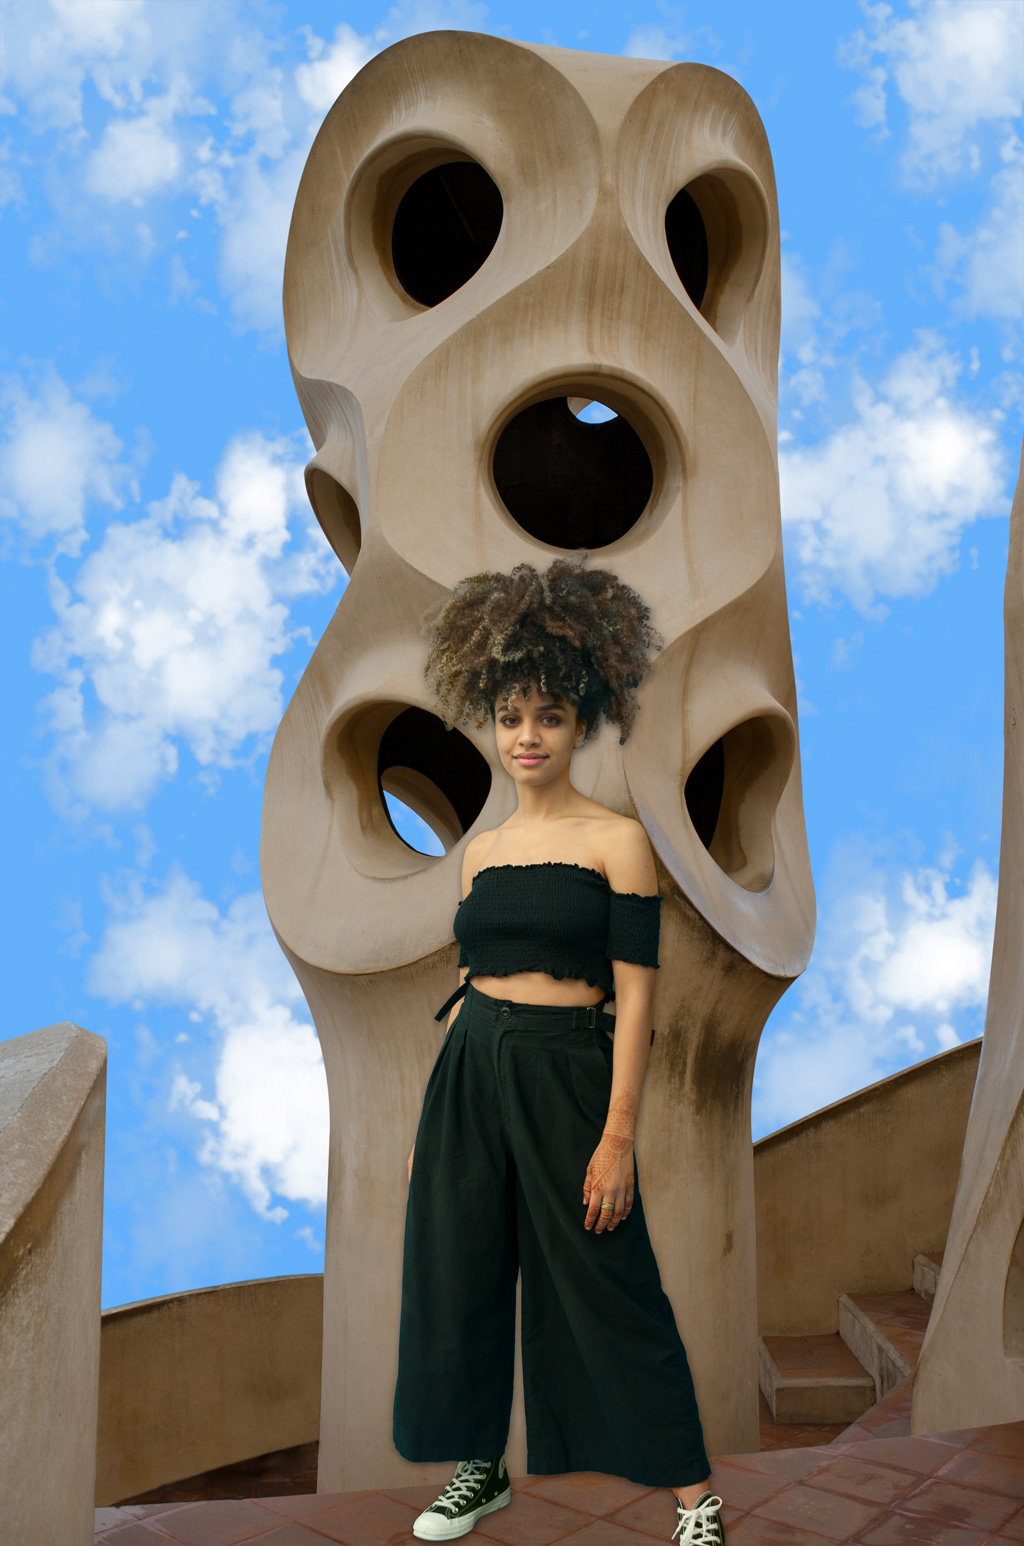
Now we need to place our model in the background image:
- Choose Layer → Duplicate Layer. Under destination, choose the Hair Merged file. Save the model file and close it.
- Go to the Hair Merged File. Choose Edit → Transform → Scale, and scale both the width and height to 80%. Position the model so she is standing in front of the pillar
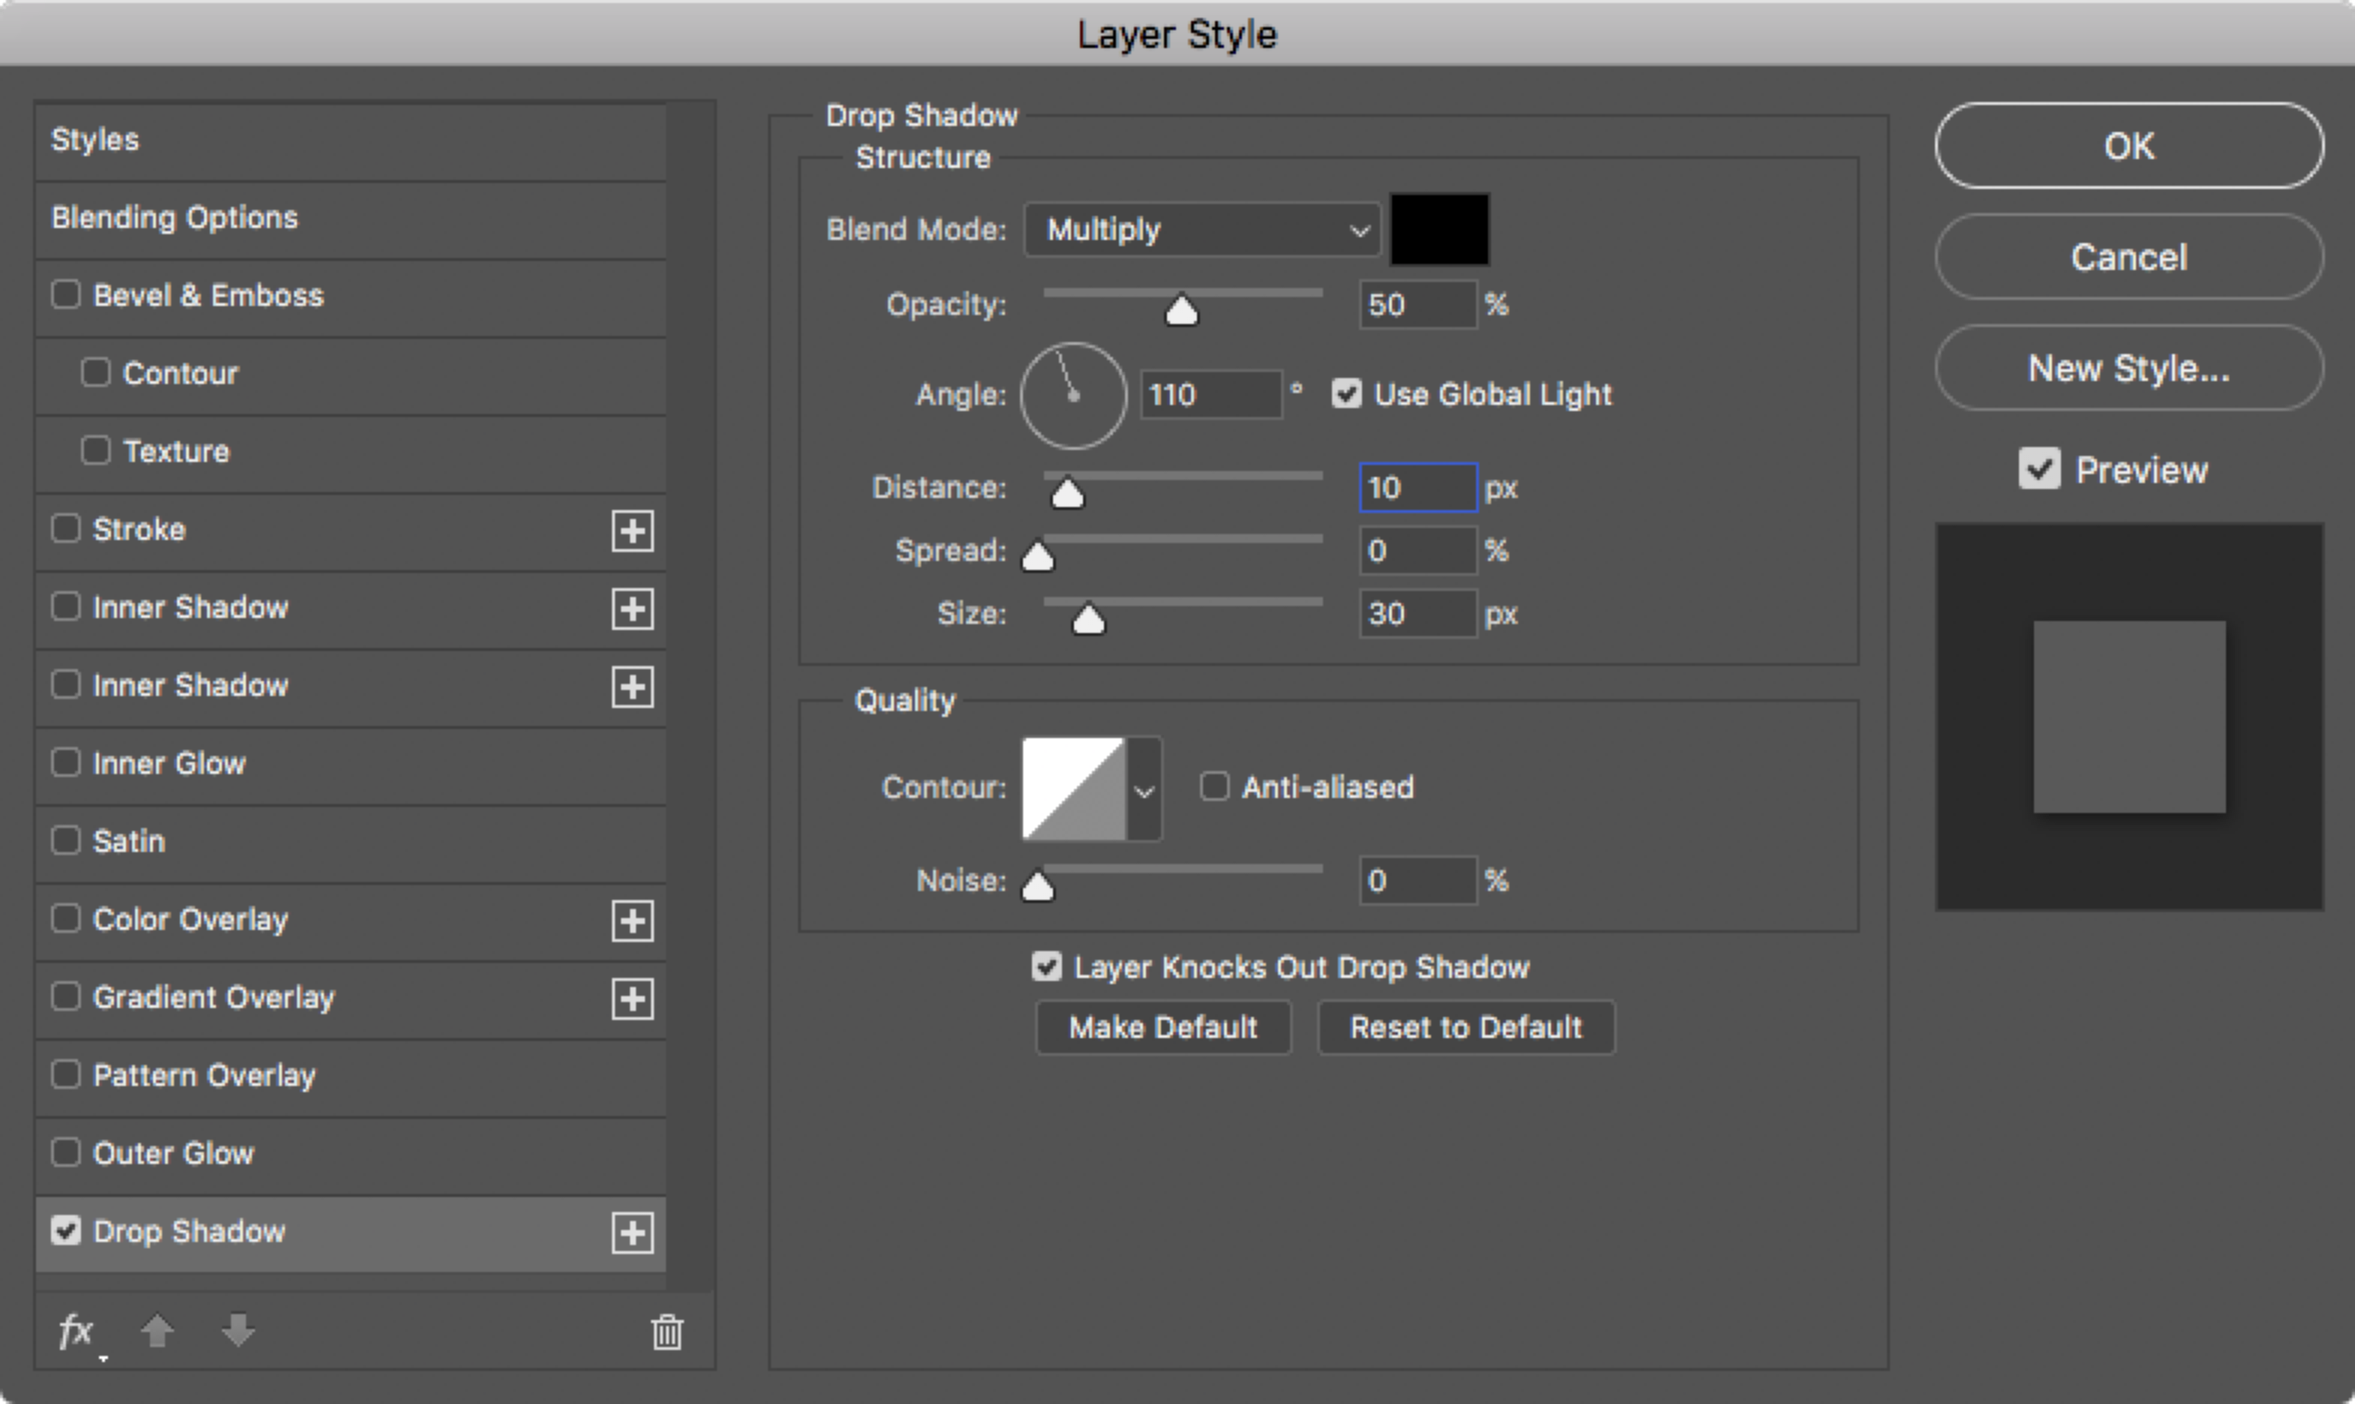
- Now let’s add a drop shadow to make it look a little more natural. Choose Layer → Layer Style → Drop Shadow, and create a shadow as per the settings below:
- Save the file and close it.
Note: This video uses a different method than above to crop the curly hair. This method in the video below can be useful to select other irregular shapes. The method outlined above is a newer feature created by Adobe to make cropping hair more natural, efficient and it takes less time.
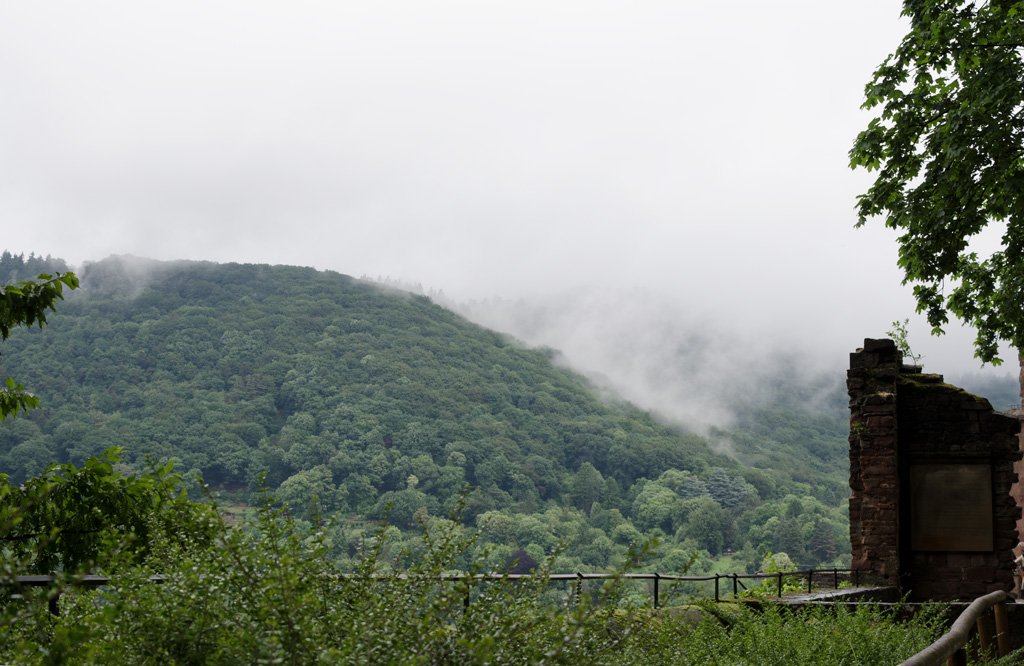
Making a Rainy Day
 |
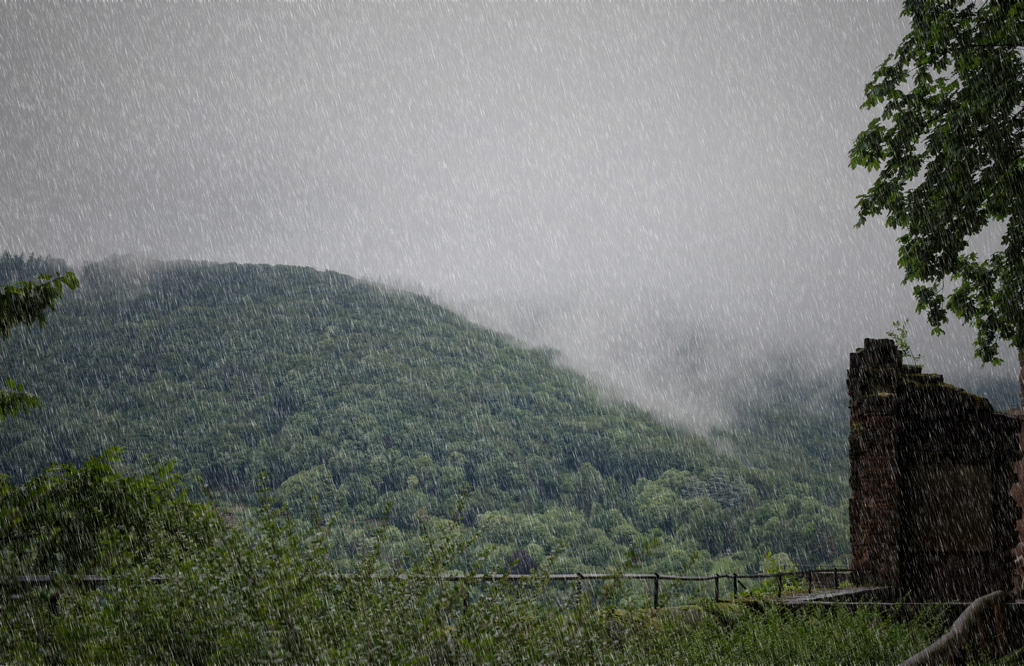 |
Using the power of Photoshop, we can change the weather! In this part of the tutorial, we will make an ordinary overcast day into a stormy rainy day.
Let’s begin:
- Open the file named GCM738_Tutorial_07_Rain.psd.
- Save the Image to the Working Photoshop Files folder with the name GCM738_Tutorial_07_Rain_Initials_v1.psd, where “initials” are your initials (e.g. GCM738_Tutorial_07_Rain_JL_v1.psd).
- The first thing we need to do is prep the image to look even more gloomy. We will start by adding a new Exposure Adjustment Layer that we will name Darken. Adjust the exposure to -0.60.
- Go to Layer New Fill Layer Gradient. Name this adjustment layer Vignette. Choose a Radial gradient and make sure both colour stops are black. Click reverse, and set the scale to 250%. Click OK, and then change the layer opacity to 50%.
- Now let’s make the rain. Create a new layer above the Vignette layer and name it Rain. Fill the layer with black.
- Choose Filter Noise Add Noise. Set the Amount to 60, Distribution to Gaussian, and check Monochromatic. Click OK.
- Choose Filter Blur Blur More.
- Choose Image Adjustments Levels. Under Input Levels, make the value of the left box 50 and the value of the right box 95. Click OK.
- Choose Filter Blur Motion Blur. Set the Angle to -75 and the Distance to 30. Click OK.
- Choose Image Adjustments Levels again. Under Input Levels, make the value of the left box 50 and the value of the middle box 0.5. Click OK. Change the layer blend mode to Screen.
- To make the rain even more pronounced, duplicate the Rain Layer and name the new layer Rain 2. Change the opacity of the layer to 50%.
- Save the file.
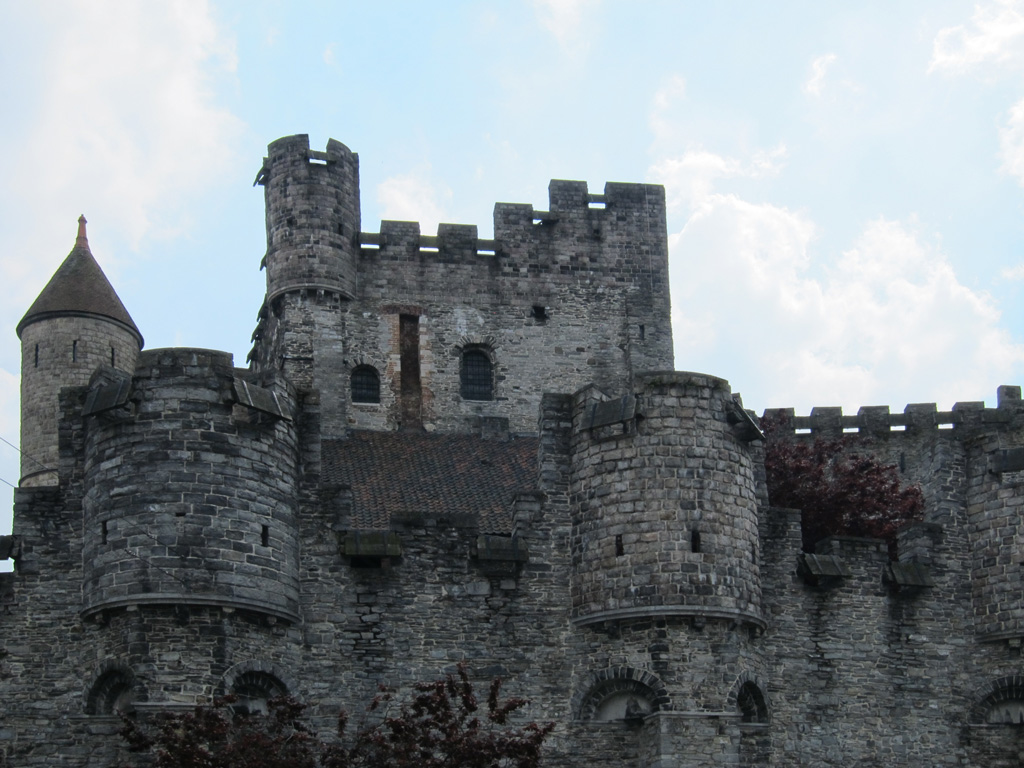
Turning Day Into Night
 |
 |
Using the power of Photoshop, we can also time travel! In this part of the tutorial, we will take a day scene and turn it into a night scene.
Let’s begin:
- Open the file named GCM738_Tutorial_07_Nightime.psd.
- Save the Image to the Working Photoshop Files folder with the name GCM738_Tutorial_07_Nightime_Initials_v1.psd, where “initials” are your initials (e.g. GCM738_Tutorial_07_Nightime_JL_v1.psd).
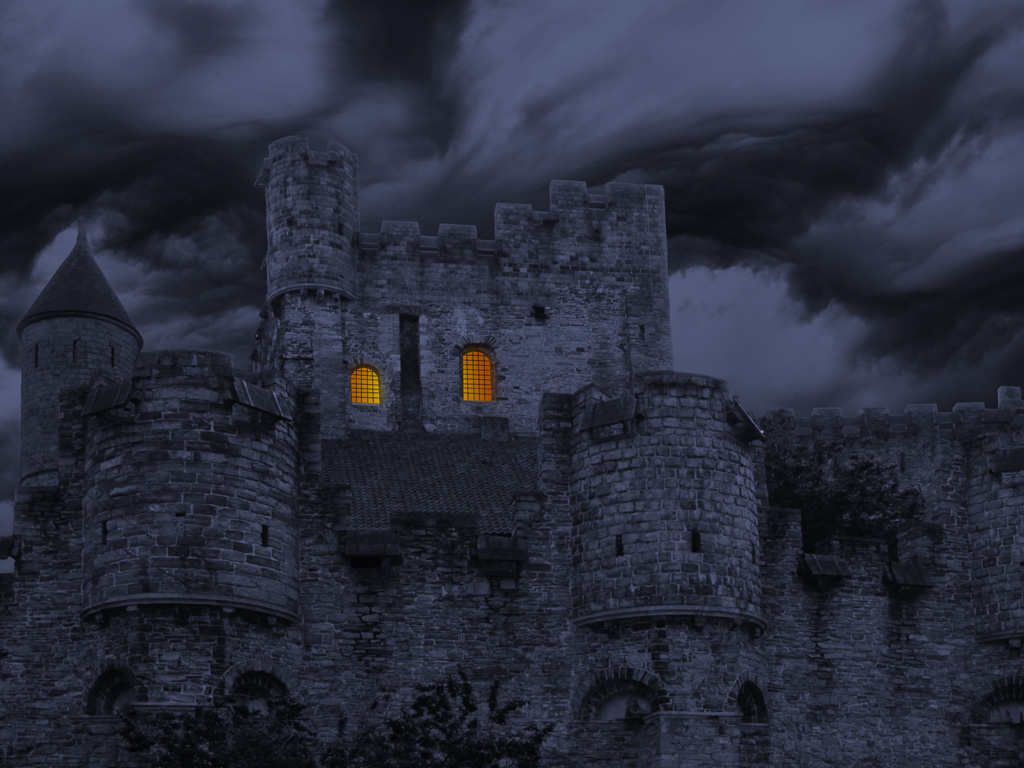
- Before we do too much to this file, we are going to save some selections for the windows, that we will use later to create the effect that there are lights on in the castle.
- Zoom in to 200%. Use the pen tool to create a path for the outline of the two main windows. When done, save the path as Window Shape. TIP: When using the pen tool, click hold and drag to create a curved line, and option click on the last point to reset the curve.
- Select the Window Shape Path and turn it into a selection. Save this selection as Windows.
- Go to the Channels Panel and make the Windows channel visible along with the RGB channels. You should see a red mask over everything but the windows.
- Select the Windows channel, and then choose a soft round brush that is 3 pixels in radius with 0 hardness. Make sure the foreground colour is set to black. Use the brush to draw in the horizontal and vertical grates in the windows. TIP: To make straight lines, click once at the start of the line, then shift-click at the end.
- Hide the visibility of the Windows channel and make sure the RGB composite channel is selected. Go to the Layers Panel and double-click on the Background Layer and rename it Original Image.
- We are going to want to crop out the sky so we can replace it with a nighttime sky. Let’s start by duplicating the Original Image layer and name the new layer Sky Mask. Hide the visibility of the Original Image Layer.
- With the Sky Mask Layer Selected, go to Select Color Range. Select should be set to Sampled Colors, uncheck Localized Color Cluster, Set Fuzziness to 60, uncheck invert selection, and set Selection Preview to Grayscale. Shift-click on the areas of the sky until the sky is completely white, and the castle is almost entirely black. Click OK.
- With the selection still active, expand the selection by 3 pixels, and feather it by 0.5 pixels.
- Choose Layer Layer Mask Hide selection. Option-click on the mask icon to see the mask contents, and use the brush tool .(hardness set to 100) with white as the foreground colour to remove any black areas from the castle. Option-click on the mask icon again to see the castle.
- Create a new layer under the Sky Mask layer and name it Temp Sky. Fill the layer with black.
- Create a new Hue/Saturation Adjustment Layer above the Sky Mask layer. Name this layer Castle Colourized. Click the Colorize button, then set the Hue to 230, Saturation to 20, and Lightness to -30. This gives our castle a nice eerie blue cast and darkens it.
- The tower on the left needs to be in shadow. Create a new layer above the Sky Mask layer and name it Left Tower Shadow.
- Using the Polygon Lasso Tool, draw a selection around the tower. TIP: You can do a quick and rough selection here and clean it up with the Brush Tool where needed after the mask is made. Feather the selection by 0.5 pixels, then choose Layer Layer Mask Reveal Selection.
- Fill the layer (not the mask) with black, change the layer Blend Mode to Darken, and reduce the opacity to 30%.
Now let’s turn some lights on in the castle:
- Create a new layer above the Castle Colourized layer, and name in Window Lights.
- Change the foreground colour to R 240, G 250, B 0, and the background colour to R 160 G 75 B 0.
- Load the Windows selection.
- Choose the Gradient Tool. Select the foreground to background gradient and choose a Radial Gradient Style. Pick a point between the two windows and draw a line diagonally to create the window lights. Adjust the gradient until you are happy with it.
- The windows would create a glow or cast on the brick outside. To make this, duplicate the Window Lights layer and name the new layer Window Glow.
- Choose Filter Blur Gaussian Blur, and set the Radius to 20 pixels. Click OK.
- Choose Layer Layer Mask Reveal all. Use the brush tool to mask away the blur from the windows, leaving just the glowing edges. Also use the brush tool to remove the glow from the left side and bottom of both windows.
Now we have to finish the sky:
- Open the file GCM738_Tutorial_07_Storm_Clouds.jpg. Select all and copy.
- Go to the nighttime image. Select the Temp Sky Layer and then paste the cloud image. Name the new layer that is created Storm Clouds. TIP: Selecting the Temp Sky layer first ensured the cloud image would be pasted in the correct layer order.
- Scale the clouds to 87% and then position them appropriately.
- Create a new Hue/Saturation layer above the Storm Clouds layer. Name it Darken Clouds. Lower the Lightness to -40.
- Delete the Temp Sky layer.
- Save the file.
Conclusion
This lab tutorial demonstrated more advanced tips and tricks that can be used to enhance photographs beyond simple retouching. Using a combination of tools and techniques, including creating our own interest areas, such as rain, can dramatically change the appearance of an image.