
Main Body
Tutorial 5 • We the people: Retouching Humans
Overview
This lab tutorial will focus on Photoshop tools and techniques that can be used to retouch and alter people. While these tools and techniques can be used in some cases to work on non-human subjects, they tend to be particularly well-suited to working with the human form.
Objectives
- To introduce layers, layer groups, layer styles, and layer masks
- To work with cloning tools (clone, Healing, Spot Healing)
- To introduce colour correcting and replacing colour
- To introduce the Warp feature
- To work with the facial recognition features for the Liquefy Filter
- To reinforce the principles of non-destructive editing
Procedure
Retouching Eyes
Eyes are a very common thing to retouch when working on an image of a person’s face.
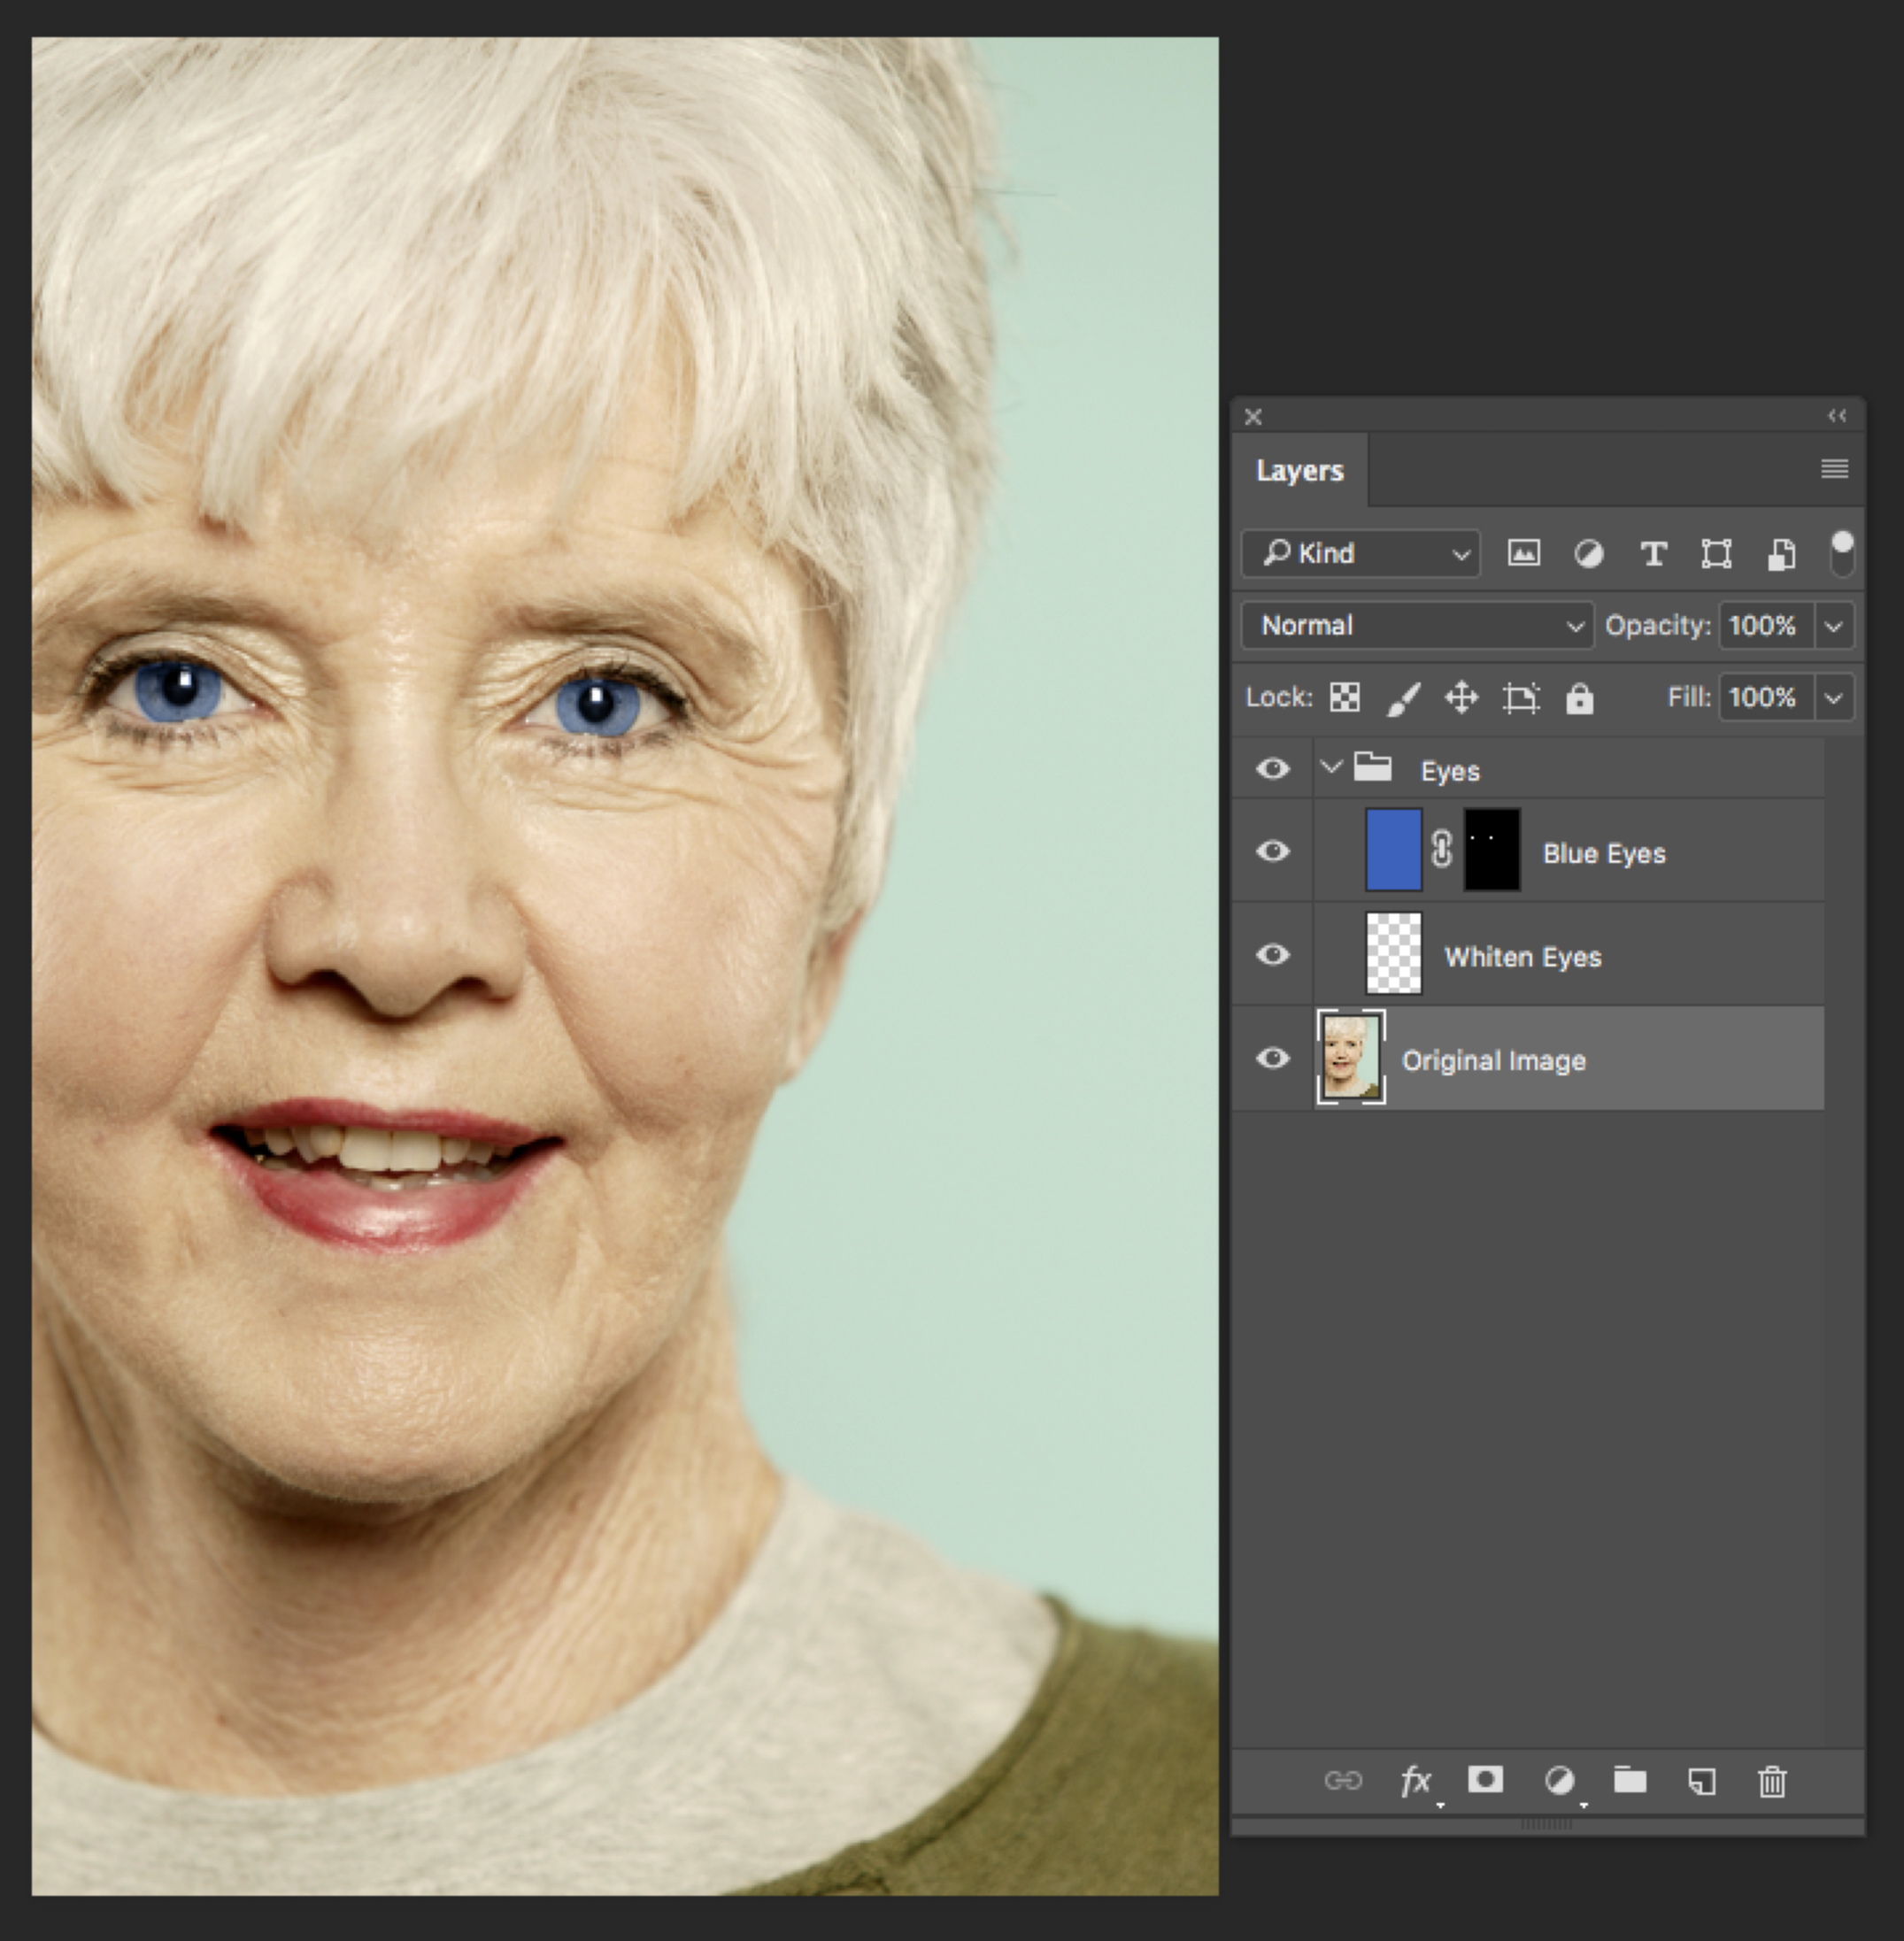
Let’s start by making the whites of the eyes whiter:
- Open the tutorial file named GCM738_Tutorial_04_Lady.psd.
- Save the Image to the Working Photoshop Files folder with the name GCM738_Tutorial_04_Lady _Initials_v1.psd, where “initials” are your initials (e.g. GCM738_Tutorial_04_Lady_JL_v1.psd).
- Double-click on the Background Layer. Rename it Original Image.
- Create a new layer above the Original Image layer and name it Whiten Eyes.
- Zoom to 300% and position the image so the eyes are prominent.
- Select the brush tool, and choose a brush that has 0% hardness and is a size that will be appropriate for the task.
- Make sure the foreground colour is white.
- Make sure you are on the Whiten Eyes layer, and begin painting the whites of the eyes – don’t worry about being too “clean” as we will clean this up later.
- Reduce the opacity of the layer until it looks natural — approximately 30%.
- Use the eraser tool with a soft brush to clean up the edges of the eye whites.
- Zoom out to 100%, and review the results by toggling the layer visibility.
Now let’s change the colour of her eyes to blue:
- Create a new layer above the Whiten Eyes layer, and name it Blue Eyes.
- Zoom to 200%.
- Use the elliptical selection tool to draw a selection around the left iris. Save this selection as Left Eye.
- Use the elliptical selection tool to draw a selection around the right iris. Now Load selection, choose Left Eye as the channel, and choose the “add to selection” option. Now both irises should be selected.
- Choose Select Modify Feather, and feather the selection 0.5 pixels.
- With the Blue Eyes layer selected, Choose Layer Layer Mask Reveal Selection. Note that the layer mask hides everything except the two iris selections.
- Make sure the image, not the layer mask is selected, then choose Edit Fill.
- Choose “Color” and pick a blue that is R 20, G 100, B 200 and click ok twice to get back to the image.
- Change the Blend Mode of the Blue Eyes layer to “Hue.”
- Now select the layer mask and use the brush tool to clean up the mask.
- Zoom out to 100% and check your work by toggling the layer off and on.
Finally, let’s create a layer group to keep our work organized:
- Click on the layer group icon (
 ) on the layers palette.
 - Call this group Eyes.
- Select both the Whiten Eyes layer and the Blue Eyes layer and drag them into the Eyes group.
- Your results so far should look like this:
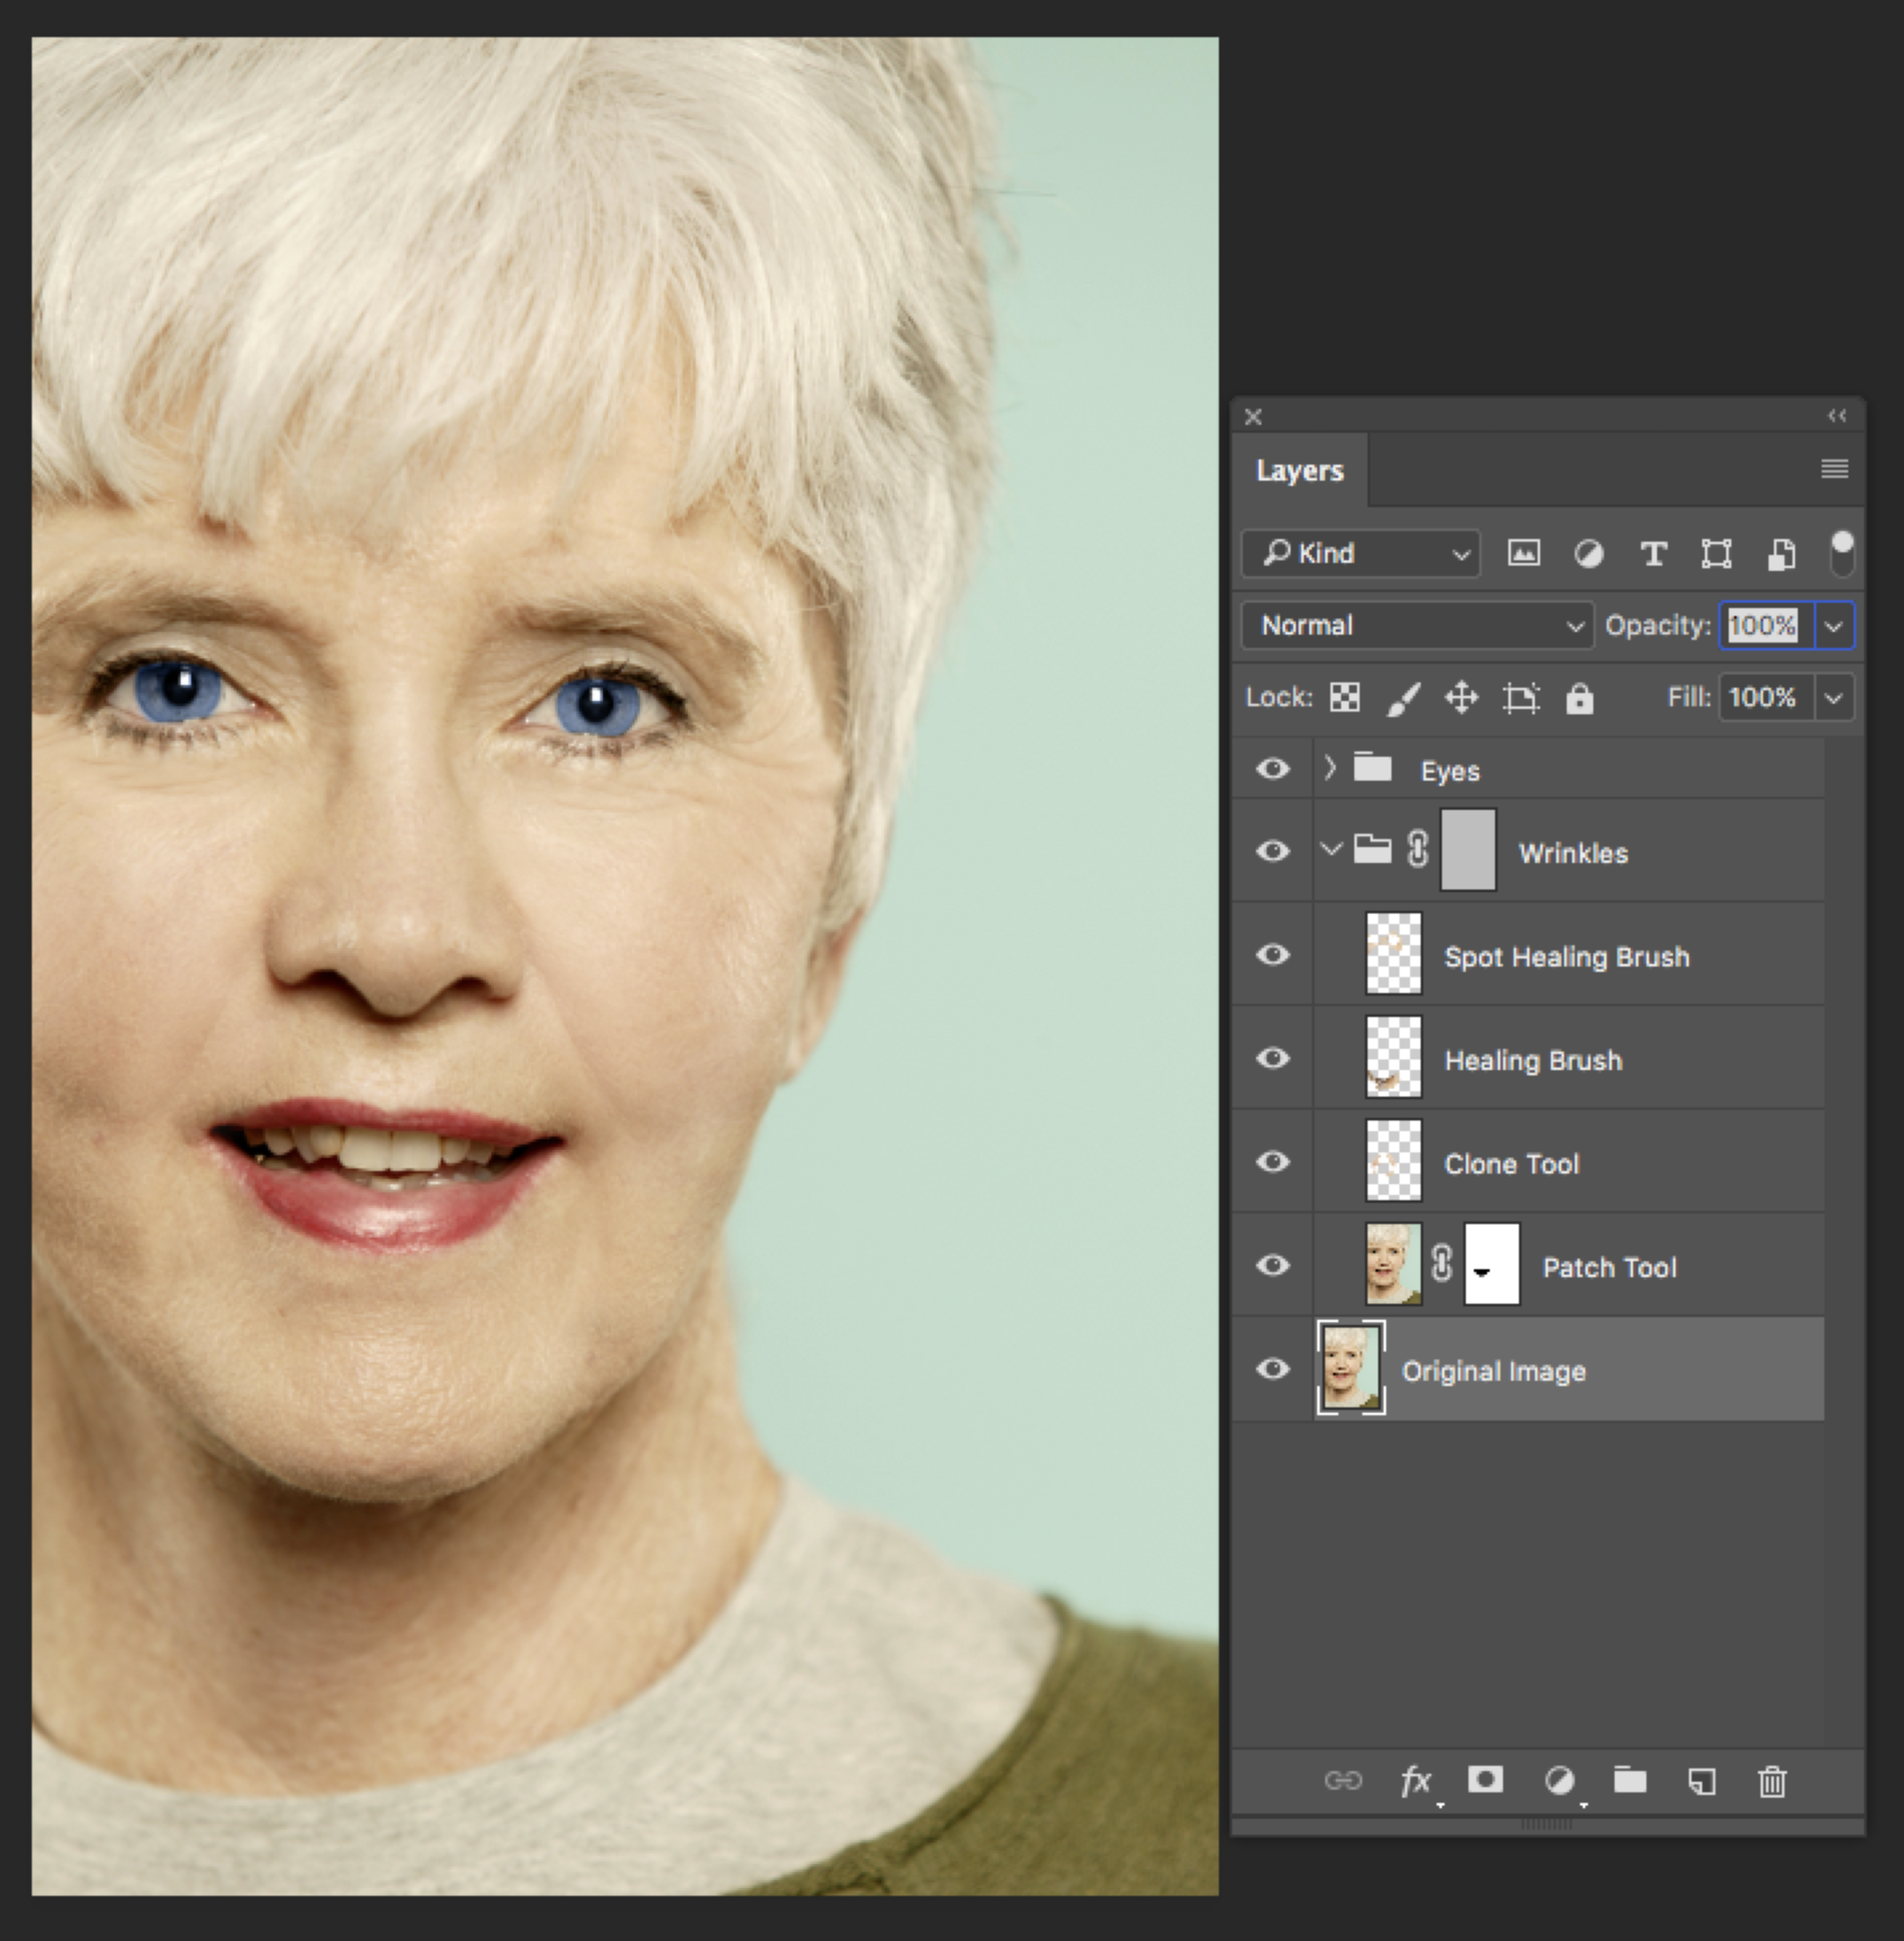
Smoothing Out Wrinkles
The next step in our tutorial will be to smooth out some of the wrinkles in our model.
Clone Tool
Let’s start with the Clone Tool. The Clone Tool uses reference (source pixels) to replace target pixels. We will begin by removing the wrinkles under the mouth:
- Create a new layer, and name it Clone Tool.
- Select the Clone Tool, and make sure that Mode is set to normal, Opacity and Flow are at 100%, and that Sample is set to Current & Below.
- Set the brush to be approximately 70 pixels, and with 0% hardness.
- .To fix the area to the left, pick source pixels just to the right of the blemish, then clone.
- To fix the area to the right, pick source pixels just to the left of the blemish, then clone.
- Now, let’s use the clone tool to remove the lines going from the nose to mouth on both sides – Tip: reduce the brush size down to around 30 pixels when cloning the detail around the nose.
Healing Brush Tool
The Clone Tool is great when there are the appropriate pixels to clone. Note however that to correct the wrinkles in our model’s neck, we don’t have pixels dark enough to sample from. This is where the Healing Brush comes in! It works on the same principles of the clone tool, but also matches shading and texture. Let’s use the Healing Brush to smooth out the model’s neck:
- Create a new layer, and name it Healing Brush.
- Select the Healing Brush Tool, and make sure that Mode is set to normal, Source is set to Sampled, and Sample is set to Current & Below.
- Use the Healing Brush to smooth out the wrinkles by sampling the skin in the bottom left side of the neck. Notice how it matches the tones!
Spot Healing Brush Tool
The Spot Healing Brush works under the same principle as the Healing Brush, only we do not need to choose source pixels. This brush is great for quick clean ups over small areas. Let’s use the Spot Healing Brush to clean up some of the wrinkles on the face by the eyes and cheeks:
- Create a new layer, and name it Spot Healing Brush.
- Select the Spot Healing Brush Tool, and make sure that Mode is set to normal, Type is set to Content-Aware, and Sample All Layers is checked.
- Use the Spot Healing Brush to smooth out the wrinkles Under the eyes, the forehead and on the far sides of the cheeks.
- Do not retouch the eyelids yet.
The Patch Tool
The Patch Tool is great for replacing large areas of an image. We are going to use the Patch Tool to fix the scar on the right-side of the mouth, and to fix the wrinkles on the model’s eye lids.
Let’s begin:
- The Patch Tool will not work on a blank layer, so duplicate the Original Image layer and name the duplicated layer Patch Tool.
- Select the Patch Tool, and make sure that Patch is set to normal, and that Source is selected.
- Select the area around the right side of the mouth, then drag to the left cheek to find the replacement patch.
- Repeat this process with the eyelids.
- The Finishing Touches.
Let’s put the finishing touches on our retouching:
- Create a Layer Group, and call in Wrinkles.
- Move all the retouching layers we just made into the group.
- Select the layer group Wrinkles, and give it a layer mask and choose the option of hide all.
- Fill the layer mask with 30% black. This allows some of the original image to show through, making the retouching a little more natural looking.
Your results to this point should look like this:
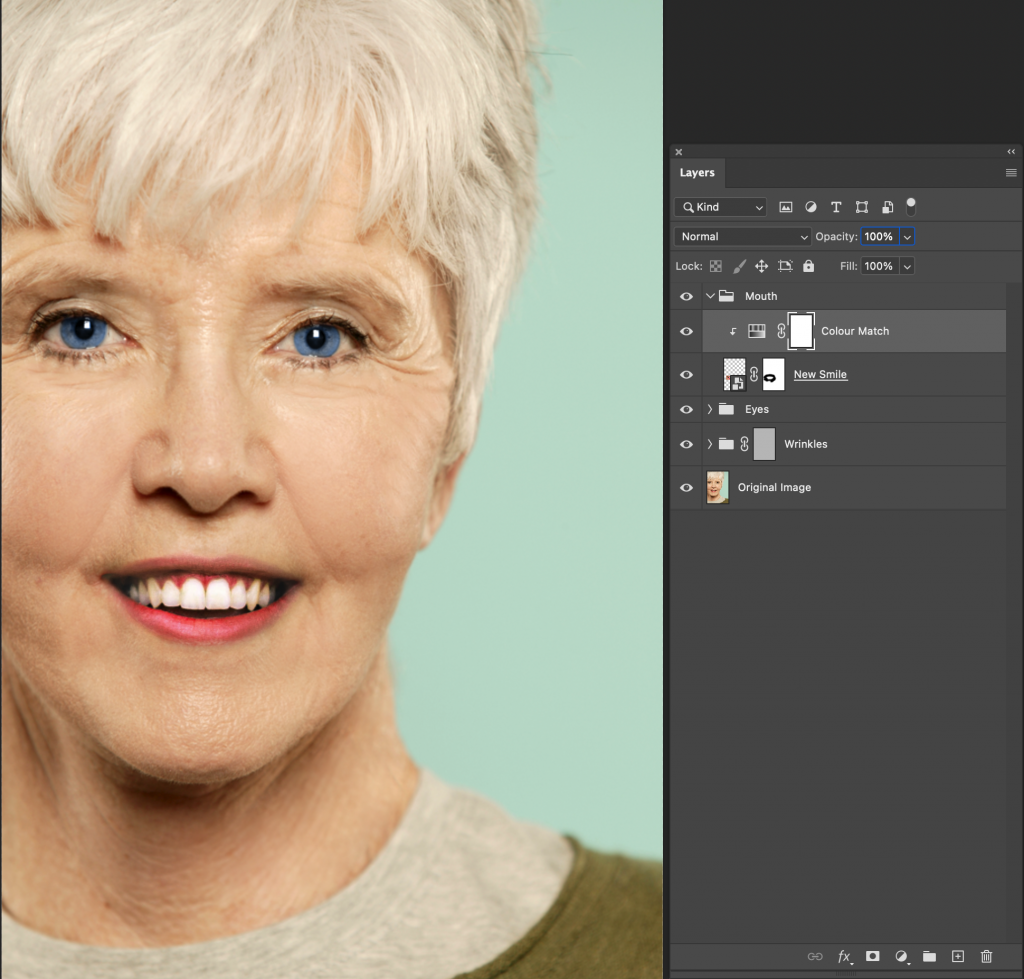
Retouching Teeth and Mouth
We are going to replace the model’s mouth with another person’s mouth.
Let’s start by fixing her lipstick:
- Place the New Smile file into the file.
- Use Cmd/Ctrl + T to resize the image. Resize it to about 15% and place it over the existing mouth. Change the opacity to help you see where to place the new smile. Be sure to make the opacity 100% once you are happy with the placement.
- Rotate the smile Clockwise about 2 degrees.
- Click on the checkmark in the Options Bar.
- With the New Smile layer selected, click on Layer → Layer Mask → Reveal All.
- Using a soft brush, paint away the outside of the mouth with black so it looks natural.
- Create an Adjustment Layer and select Hue/Saturation. Name it Colour Match. Ensure that this is a clipping mask to the new smile.
- Change the Hue to +13 and the Saturation to -10. This will make the smile look more natural.
- Group the New Smile layer and the Adjustment Layer in a folder named Mouth
Your image should now look like this:
Changing the Hair Colour
Now we are going to give our model a different hair colour.
Let’s begin:
- Create a new layer above the Original Image layer, and name it Hair Colour.
- Set the layer blend mode to Colour.
- Change your foreground colour to be R 120, G 90, B 0.
- Use the paint brush to colourize the hair. Don’t worry about “staying in the lines.”
- Create a new layer mask for the Hair Colour layer, choosing Reveal All.
- Use the paint brush to mask out the colour where you do not want it. Tip: Change the opacity of the brush to 25% to “feather” the colour near the hair line to make it look natural.
Changing Facial Features Using the Liquify Filter
Photoshop has very powerful facial recognition features that, when combined with the Liquify Filter, can make complex facial changes a breeze.
Let’s begin:
- Select all groups and layers except for the Working Layers – Not Used group.
- Press Shift Command Option E to create a new merged layer from these layers without deleting the original layers. Name this merged layer Liquify.
- We are going to use the Liquify Filter as a Smart Filter so that we can maintain non-destructive editing. To do this, make sure the Liquify layer is selected, and then choose FilterConvert for Smart Filters.
- Now select FilterLiquify.
- On the tool bar on the left, make sure the icon of the person is selected.
- Make the model’s face wider by sliding the Face Width Slider right to 10.
- Make the model’s nose thinner by sliding the Nose Width Slider left to -15.
- Make the model’s eyes bigger by sliding the Eye Size Sliders. Note that the model’s eye on the left appears bigger than the none on the right. To fix this, slide the left slider to 50 and the right slider to 85. Also change the Eye height of the right eye by sliding the Eye Height Slider to 35.
- Last, let’s tilt the model’s eyes. Click the chain link between the two Eye Tilt sliders, then slide them to 75.
- Toggle the Preview option off and on to see the results.
- Note that because we used this filter as a Smart Filter, we can go back and edit our work. We would not be able to do this if we did not convert to a Smart Filter.
Your final image should look like this:
Conclusion
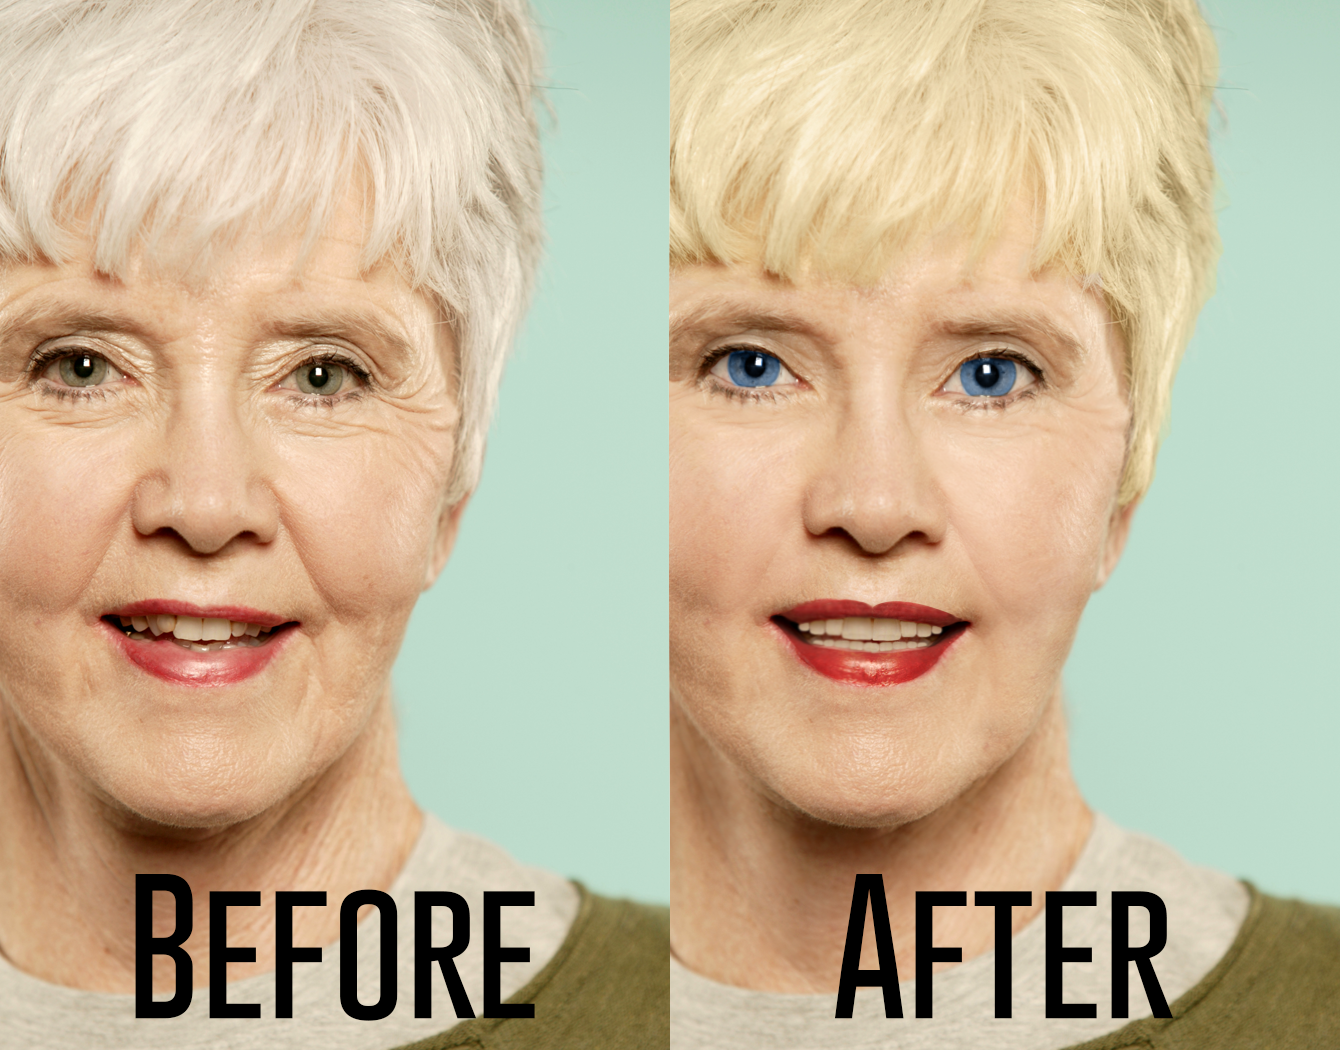
This lab tutorial demonstrated several key tools and techniques we can use to retouch people and faces. Please note that there are many other things we can do, and this tutorial is by no means an exhaustive example of everything Photoshop can do.