Digital Photography for Graphic Communications
Chapter 2 • Studio Equipment
This chapter discusses what you’ll need to set up a digital photography studio. In addition to the digital camera, you may need additional lenses, filters, studio lighting, lighting diffusers and reflectors, light stands and quality control devices to help make your photos accurate and consistent.
Camera System
A digital camera is the first thing you’ll need for a digital photography studio. Digital cameras are commonly discussed as belonging to one of three categories: consumer, prosumer, and professional. To illustrate these camera types and what they can do, consider this example: A high school basketball team comes to a print business and would like to have a poster showing their team, the team logo, and the team bus. To capture these images, you’ll need to take a portrait of the team members, scan their logo from a decal, and take a picture of the team bus.
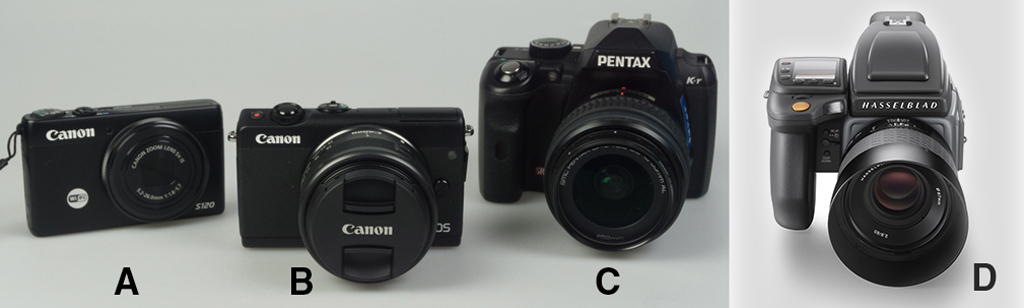
Point-and-shoot. Point- and-shoot cameras (Figure 2-1 A) are generally compact cameras with 3–10 megapixels, a built-in zoom lens, and price from $100– 500. They’re made for family and travel photography. To do the nec- essary captures for our basketball team example, you could use a point-and-shoot camera, which would probably have enough megapixels for the capture, a zoom lens for adjusting the field of view, and even have a tripod mount on the bottom. However, it won’t have interchangeable lenses, attachable filters, or an optical viewfinder that accurately frames the scene.
35-mm DSLR. Digital single-lens reflex cameras (DSLRs, Figure 2-1 B) are adapted from cameras designed to shoot 24×35-mm slides and negatives. These cameras have interchangeable lenses that provide a variety of focal lengths and applications, including zoom, wide-angle, macro, portrait, telephoto, and low-light shooting. These cameras generally record from 6–12 or more megapixels and cost from $500 to several thousand dollars. SLRs use a single lens that both records the image and previews the shot through the viewfinder. (Twin-lens reflex cameras used separate lenses for the image and viewfinder.) SLRs use a mirror to deflect light from the sensor plane to the viewfinder. During exposure, the mirror flips up to allow light to reach the sensor plane.
The 35-mm DSLR would be the ideal camera to use for our basketball team poster example. You could use a short telephoto lens to take the team’s portrait in a studio, mount the camera to a copy stand to capture their logo from a supplied decal, and take the camera outdoors to shoot the team bus.
Professional Cameras. These cameras (Figure 2-1 C) are made for shooting publication images as in magazines, catalogs, posters, banners, and billboards. They are generally based on 6×6-cm medium-format cameras, shoot up to 40+ megapixels, and can cost well over $10,000. Their large image size requires that these cameras be attached or “tethered” to a computer to hold the image files. The main advantage of these cameras is that they can record enough megapixels for full-page or two-page magazine covers or spreads, or for large posters or banners.
A professional camera would be overkill for our basketball team poster. The camera could do the portrait and copy-stand captures but would be clumsy to move around the studio due to its large size and computer cables. It would also be difficult to take outdoors to shoot the team bus. However, for shooting products from team coffee mugs to team vehicles in the studio, its quality could not be beat.
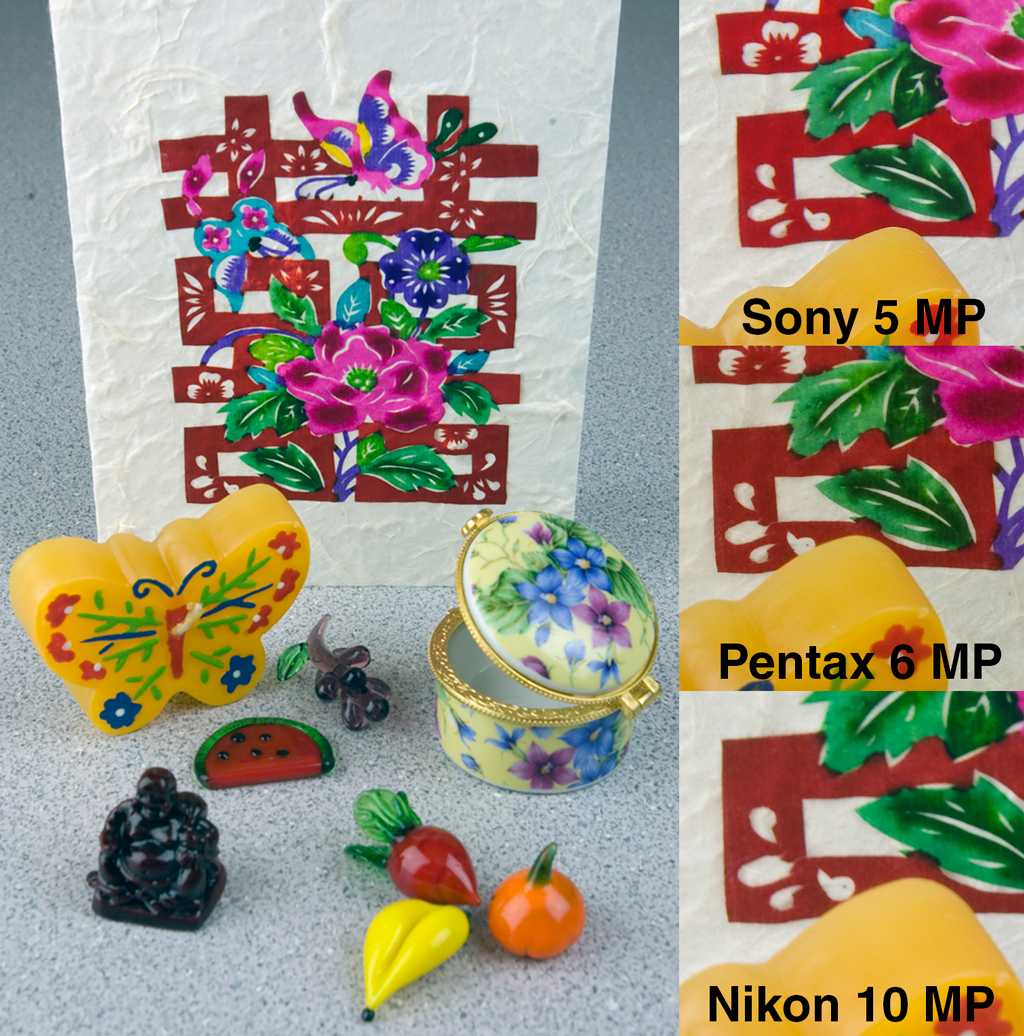
To show some differences among cameras, the same still-life scene was shot with a point-and-shoot, a 6-MP DLSLR, and a 10-MP DSLR camera (Figure 2-2).
Megapixels
Would you rather look at an image that’s sharp and detailed, or one that’s pixelized with the “jaggies”? To avoid the jaggies, you’ll need enough megapixels for your output device and enlargement size. Digital camera image size is measured in millions of pixels, or megapixels (MP, Figures 2-3 and 2-4). Current camera models range in image size from a few to nearly forty megapixels. Three questions that the prepress professionals want to know about digital cameras are:
- I have a digital camera. How large an image can I get from it?
- I want to buy a digital camera to make images of a certain size. How many megapixels do I need?
Answering both questions requires calculating image size based on prepress parameters including screen ruling, image sampling ratio (pixels per halftone dot), and image resolution required.
Calculating Megapixels Needed for Print
- Determine the sampling ratio you want to use (e.g., 2:1 for presses, 1.5:1 or 1:1 for digital printers).
- Calculate the pixels per inch (ppi) needed:
- Litho: ppi = screen ruling (lpi) × sampling ratio (e.g., 300 ppi = 150 lpi × 2)
- Large format: viewing distance
- Megapixels per sq.in. = ppi2 (e.g., 3002 = 90,000 pixels = 0.09 MP)
- Multiply MP/sq.in. by image size (e.g., for an 8×10-in. photo, 0.09 MP × 8 × 10 = 7.2 MP
Calculating Megapixels Needed for Web
- Determine the horizontal and vertical resolution of the display (Table 2-1).
- Multiply the horizontal and vertical resolution, then divide by 1 million to get the number of megapixels in the display.
- From the table you can see that a 16-MP digital camera should produce photos of adequate resolution for a 5K display.
| Display | Resolution | MP |
| iMac 21.5 in. Standard | 1920×1080 | 2 |
| iMac 21.5 in. 4K Retina | 4096×2304 | 9.5 |
| iMac 27 in. 5K Retina | 5120×2880 | 15 |
Calculating the Print Image Size You Can Get from Your Camera
- As above, determine the ppi you need, e.g. 300 ppi for print or 72 ppi for web.
- Calculate the number of MP per sq.in. (e.g., 300 ppi2 = 90,000 pixels/sq.in. = 0.09 MP/sq.in.)
- Divide camera MP by MP/sq.in. (0.09) to get available sq.in. (e.g., 6 MP camera ÷ 0.09 MP/sq.in. = 66.67 sq.in. of image area).
- Take the square root of the available image area to get image size, e.g., the square root of 66.67 sq.in. = 8.16 in.
- So a 6-MP digital camera will give you an image 8.16 × 8.16 in. at 300 ppi.
- Convert the image size to the proportion you want, e.g., 6-MP image in the proportion of 8×10 would be 7.3 × 9.1 in.
Lenses
Assuming you have a 35-mm or medium-format digital SLR camera, you’ll need a variety of lenses for the widest variety of photos. Lenses are classified by their focal length, which is the distance from the lens center to the camera’s imaging sensor. The longer the focal length, the more telescopic the lens; the shorter, the wider its angle of view. The image sensor of a digital 35-mm SLR may not be as large as the standard 24×35-mm. This extends the focal length of a lens by the camera’s focal length factor, which is usually specified in the owner’s manual. For example, a digital camera with a 16×24-mm sensor will have a focal length factor of 1.5. This means that a 50-mm lens on a 35-mm film camera will have an effective focal length of 75 mm. Lenses are loosely categorized as:
- Normal—lenses in the range of 40–70 mm (for a 35-mm equivalent camera), used for photographing groups of people, products, and scenery
- Telephoto—lenses of 70–1,000 mm, used for bringing distant objects closer and (in the low range) for portraits. Telephoto lenses flatten perspective (Figure 2-5, right), making subjects appear to have less depth.
- Wide-angle—lenses of 15–40 mm, used for capturing a wider view of the scenery, architecture, and rooms. Wide-angle lenses extend perspective, making objects appear further apart in depth (Figure 2-5, left). The widest-angle lens is the fish-eye.
- Zoom lenses—lenses that can change focal length over an extended range, e.g., 40–70 mm, 70–200 mm. These provide more flexibility than fixed focal-length lenses but are longer, weigh more, and usually have a smaller aperture compared to comparable fixed focal-length lenses.
- Macro lenses—lenses usually in the range of 50–100 mm that can focus very close to subjects. The distance of closest focus can be quoted in millimeters or as the reproduction ratio, the size of the image relative to the original subject. A 1:1 macro lens can focus close enough to capture small subjects at the same size on the image sensor.

Filters
Filters attach to the front of the lens and provide different image-enhancement effects. Filter size is quoted in diameter (mm) and usually indicated on a lens with the symbol “ø.”
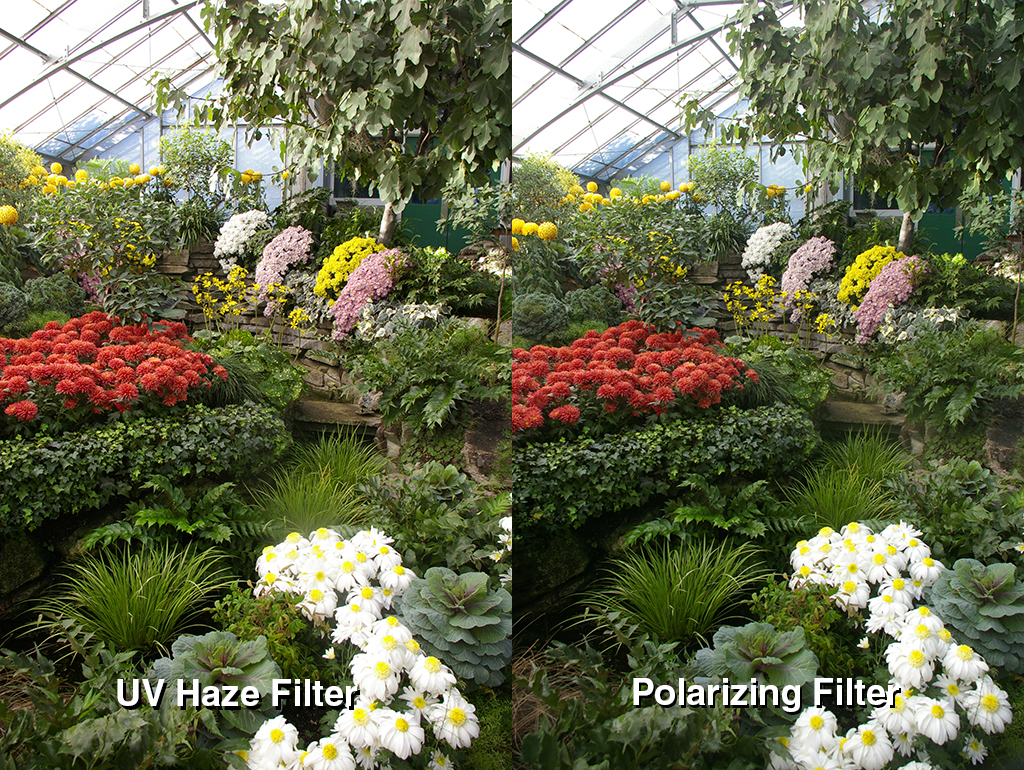
- UV/Haze filter—blocks ultraviolet radiation and helps to produce sharper images of scenery during hazy weather. Since the filter does not introduce any colored effects in photographs, it is often used to protect the front of the lens from scratches, fingerprints, dust, and damage (Figure 2-7).
- Polarizing filter—blocks glare (white light) reflected from nonmetallic surfaces and enhances color saturation on subjects. Often used for photographing scenery and product photography (Figure 2-7).
- Light-balancing filters—help neutralize various lighting conditions such as incandescent room lights, fluorescent office lights, and outdoor shadows. These filters have been largely supplanted by the automatic white-balance feature of digital cameras, which neutralizes the image to the light source.
- Special-effects filters—filters like cross-stars produce starburst and other effects.
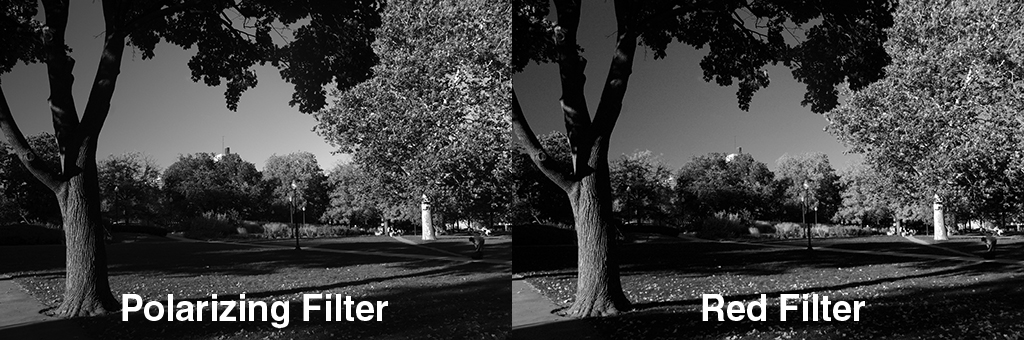
- Colored filters—filters such as red, green, and blue can be used to enhance certain image colors in black-and-white photos (Figure 2-8). For example, Ansel Adams often used a red filter to make the sky look darker in many of his famous Yosemite photos.
Lighting
For studio photography, you will need some type of lighting, in addition to the available daylight or office lighting. Studio lighting increases the available light intensity for your photographs, enabling you to use smaller apertures and faster shutter speeds. These, in turn, provide greater depth of field and sharper photos by minimizing the effects of camera motion. Studio lighting also provides a controlled “color” (color temperature) of white light, keeping your photos in consistent color balance.
Studio lights can be classified as to lighting duration and temperature. Continuous lights, such as incandescent or mini-fluorescent lamps, provide a constant light source. Strobe lights provide a bright flash in a fraction of a second. By shining all the time, continuous lights enable you to visualize your scene better and focus the camera, but may not be as intense as strobes. Strobe lights, on the other hand, make it difficult to see the scene as it will be illuminated, but provide brighter light. They also reduce motion of the subjects by providing a short burst of light.
Among continuous lights, quartz halogen incandescent and mini fluorescent lights are classified as “hot” and “cool” lights, respectively. Hot lights are more difficult to handle due to the heat generated but are cheaper to buy and provide more intense lighting. Cool lights remain cool to the touch so are safer to work with than hot lamps, but do not produce as intense a light.
Reflectors and Diffusers
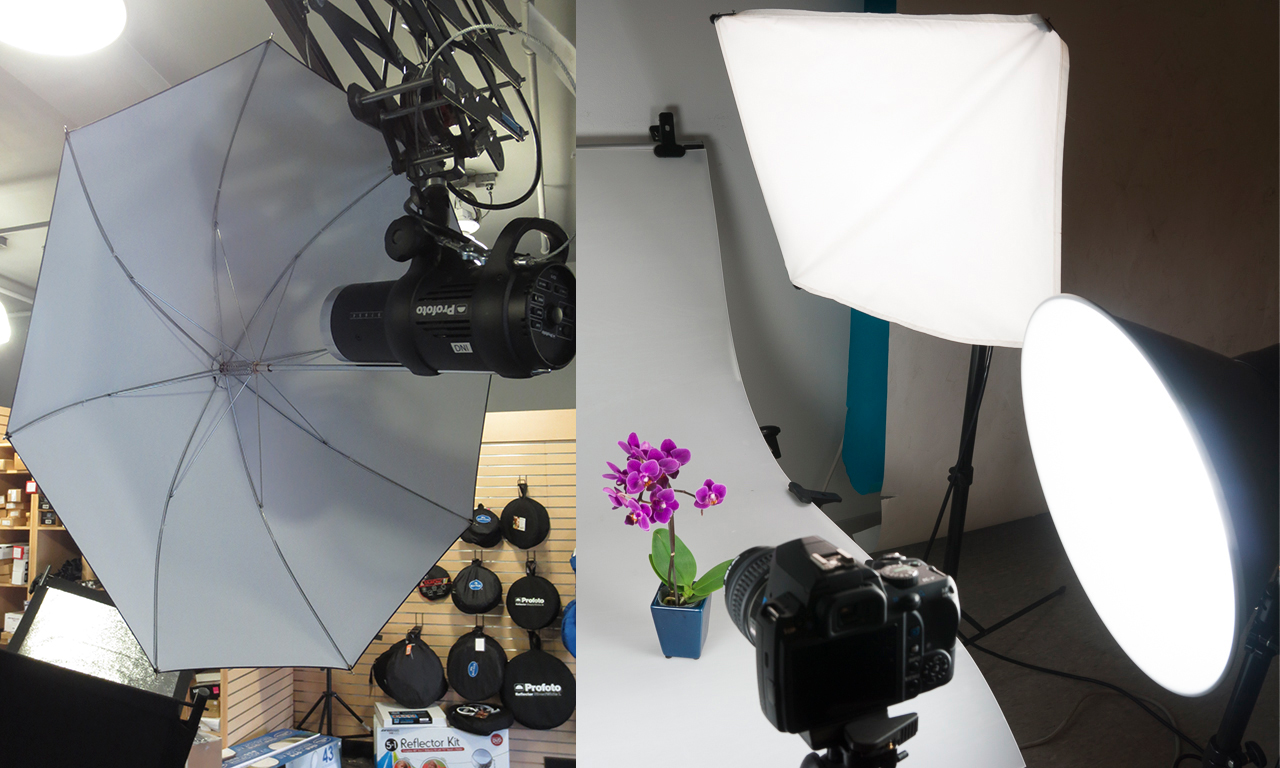
Studio lights act as point light sources, which can produce harsh illumination and sharp shadows. To diffuse their light you can use a reflector or a diffuser. Reflectors, such as aluminized umbrellas (Figure 2-9, left), diffuse light by bouncing it off of an uneven, metallized, semi-spherical surface that scatters the light. Diffusers, such as soft-boxes (Figure 2-9, right), transmit light through a translucent cloth that scatters it.
Stands
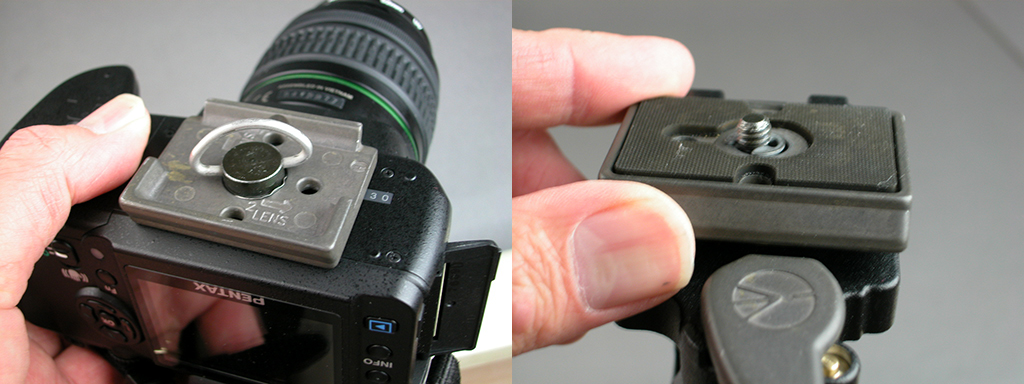
Tripod. To mount your camera and avoid image shake, you will need a tripod. Tripods come in two types: quick-release and screw-on. Quick-release tripods (Figure 2-10) have a removable base plate that you can attach to the camera, then snap into the tripod. Conventional tripods have an attached screw mount that you screw into the base of the camera.
Light stands. Light stands are used for mounting hot and cool continuous lamps and strobe. They are not as sturdy as a tripod but do enable the lamps to be positioned at anywhere from ground height to several feet above the floor.
Copy stands. A copy stand (Figure 2-11) is useful for photographing flat work. Similar in concept to a process camera used to make halftones, a copy stand has mounts to hold lights at a 45° angle from the artwork to evenly illuminate it and avoid glare. A copy stand can also be used to hold the camera for closeup macro work.

QC Devices and Targets
In studio photography, quality control devices help you get the most accurate and repeatable photos. Some are useful for outdoor photography as well.
18% Gray Card. An 18% gray card, such as the X-Rite Macbeth Gray Card (see Figure 2-11) is useful for setting manual exposure with the digital camera’s built-in light meter. The meter sets exposure to the midtone, the point in between the lightest highlight and darkest shadow. If you point the meter toward a subject, that subject may be lighter or darker than the midtone. In either case, the meter will expose it as a midtone. You can get a more accurate and consistent exposure by using an 18% gray card as the object to be metered. Use of this device is discussed in Chapter 5, Image Fidelity.
White-Balance Card. Most digital cameras have a white balance setting that calibrates the camera’s color balance to the light source. To set white balance, the camera must be pointed toward a neutral gray object. You can use a white or gray card, such as X-Rite’s Macbeth Gray Card or White Card (see Figure 2-11). These cards are neutral, meaning they reflect an equal amount of red, green, and blue light. To check the neutrality, measure the card with a colorimeter. The CIELAB values should have a*b* (red-green and blue-yellow) values near 0,0, indicating neutrality. This device is also discussed in Chapter 4.
ICC Profiling Target. Studio photographs can be made with more consistent color, and color from multiple cameras can be synchronized, by applying a custom ICC profile to the camera (see Chapter 4). To make a camera ICC profile, you’ll need a profiling application and a color target. The most widely known color target is X-Rite’s Macbeth ColorChecker (Figure 2-12). To make the profile, you’ll need to photograph the target squarely using the same lighting conditions as for products or other subjects to be photographed.
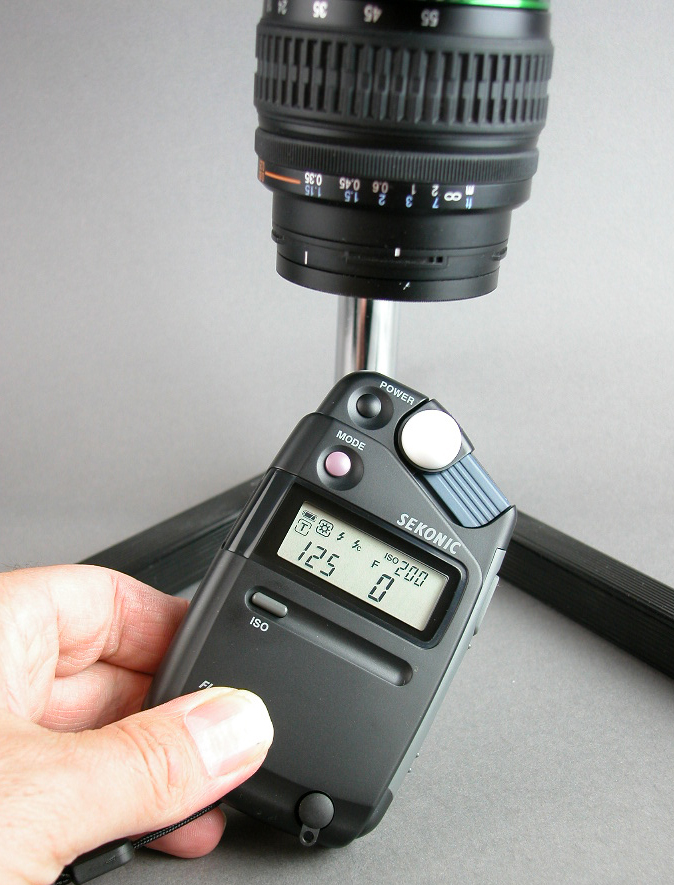
Light Meter. While most digital cameras have built-in light meters that can be used to set exposure, especially with the aid of an 18% gray card, a separate light meter (Figure 2-13) is often useful for getting accurate exposures. You will definitely need a light meter for studio strobes, which cannot be measured by built-in camera meters. A meter measures light that is either incident upon, or reflected from, the scene, then calculates the exposure value (EV), or aperture/shutter speed setting to produce a properly exposed photograph.
Cable Release or Control App. A cable release or control app (Figure 2-14) can be used to trigger the camera without touching it, reducing the chance of image blur due to camera shake.