Web Design Primer
Chapter 14 – Digital Photography for Web and Cross-Media
Since cell phones became popular, many web designers may have never worked with a digital single lens reflex (DSLR) camera. DSLRs offer larger image sensors as well as control over exposure, depth of field, colour balance, sensitivity, and graininess.
This chapter is intended to help you quickly set up the camera for a studio portrait, copy work, or product shot.
Quick Camera Setup Procedure
- Before mounting the camera, familiarize yourself with the controls for exposure mode, ISO, aperture, shutter speed, white balance, and auto/manual focus.
- Turn autofocus on. It’s often more accurate than the eye. But prepare to turn off for the gray card.
- Set ISO to 200. (Higher is more light-sensitive but also more grainy.)
- Mount the camera on the tripod or copy stand.
- Turn on and position the studio or copy stand lights.
- Choose an aperture for the depth of field you want—e.g., f/8 for portrait or copy work, f/16 or higher for 3D objects.
- Compose your photo with a flat subject on the copy stand, a 3D subject on a product photography stage or illumination tent, or portrait against a backdrop.
- Show the camera an 18% gray card, turn off autofocus, and set the exposure to get EV of 0. (Autofocus won’t work if it can’t detect edges.)
- Set white balance on the gray card.
- Bracket your exposures. Adjust the shutter speed ±0.3, 0.5, and/or 1 EV. Bracketing only takes a few seconds and will give you a range of exposures from which to choose on a large-screen display and with the help of levels or dot area measurements.
Camera Models
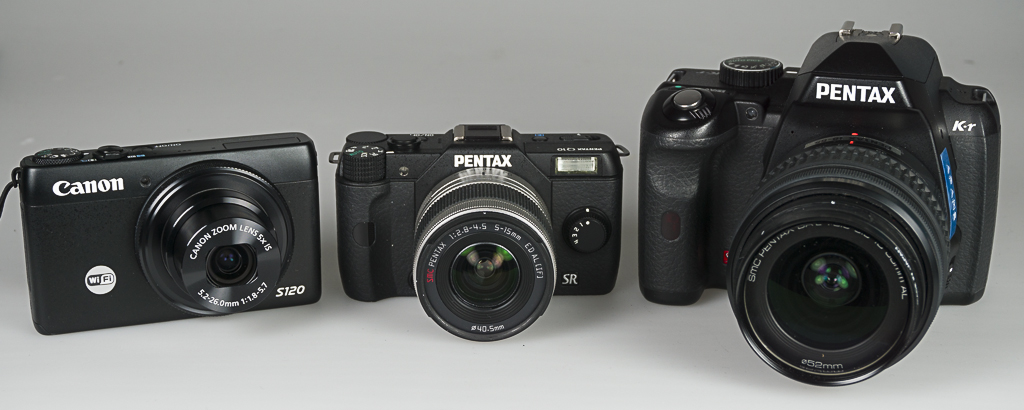
Professional and advanced amateur DSLR cameras that are useful for web photography include so-called professional point-and-shoot, mirrorless, and single-lens reflex cameras (Figure 14-1).
- Professional point-and-shoot cameras may be slightly larger and heavier than pocket cameras, but offer the ability to set exposure, aperture, and white balance manually. They can also capture images in camera raw format.
- Mirrorless cameras offer the same controls as DSLR cameras, but lack optical viewfinders, which saves space and weight. This type of camera is especially useful for photographers who have gotten used to composing images on-screen rather than by peering through a viewfinder.
- DSLR cameras are based on film cameras and include a traditional viewfinder. The term “single-lens reflex” comes from the camera’s use of a single lens (rather than a separate viewing lens, as in rangefinder cameras). A mirror directs light from the lens to the viewfinder and flips up, or “reflexes,” when an exposure is made, allowing light to reach the sensor.
Camera Settings
Modes. High-end point-and-shoot, mirrorless single-lens reflex (SLR) and digital SLRs with viewfinders typically have a dial (Figure 14-2) with a selection of various exposure modes (Table 14-1).
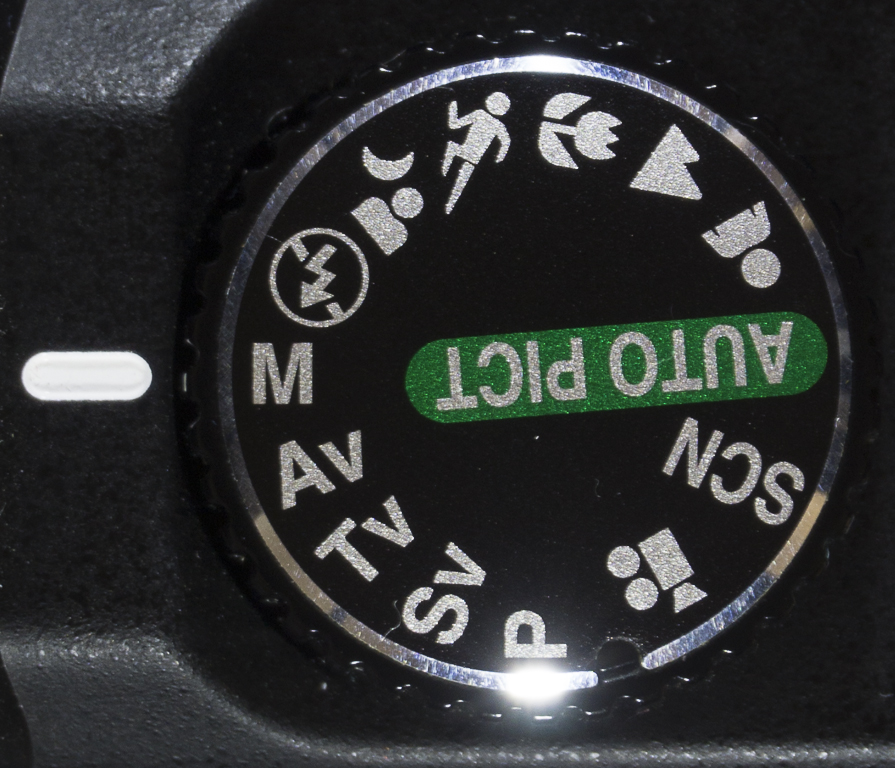
Manual mode is recommended for studio work. Although automated modes can be sophisticated tools, the camera could set up each shot differently. For copy, product, still-life, and portrait studio work, we want all images to look the same.
To use manual mode effectively, the exposure should be set on an 18% gray card (Figure 14-3) after composing the photo.

| Mode | Description |
|---|---|
| M | manual mode—user sets aperture and shutter speed |
| A | aperture-priority mode
|
| T | shutter-priority (“T” for time)
|
| P | programmed mode
|
| Scene | scene mode—useful for certain types of subjects, especially outdoors |
| Auto | Some camera manufacturers have proprietary scene-detection settings. |
Autofocus. The autofocus feature of digital cameras works by detecting edges of objects. Autofocus can be very useful, unless it detects the wrong area of the subject or if it’s trying to focus on a gray card or other subject that has no apparent edges.
Autofocus can usually be set to focus on a single or multiple points. In some cases the single point can be moved around the frame, making it easier to choose the spot you want to be in-focus.
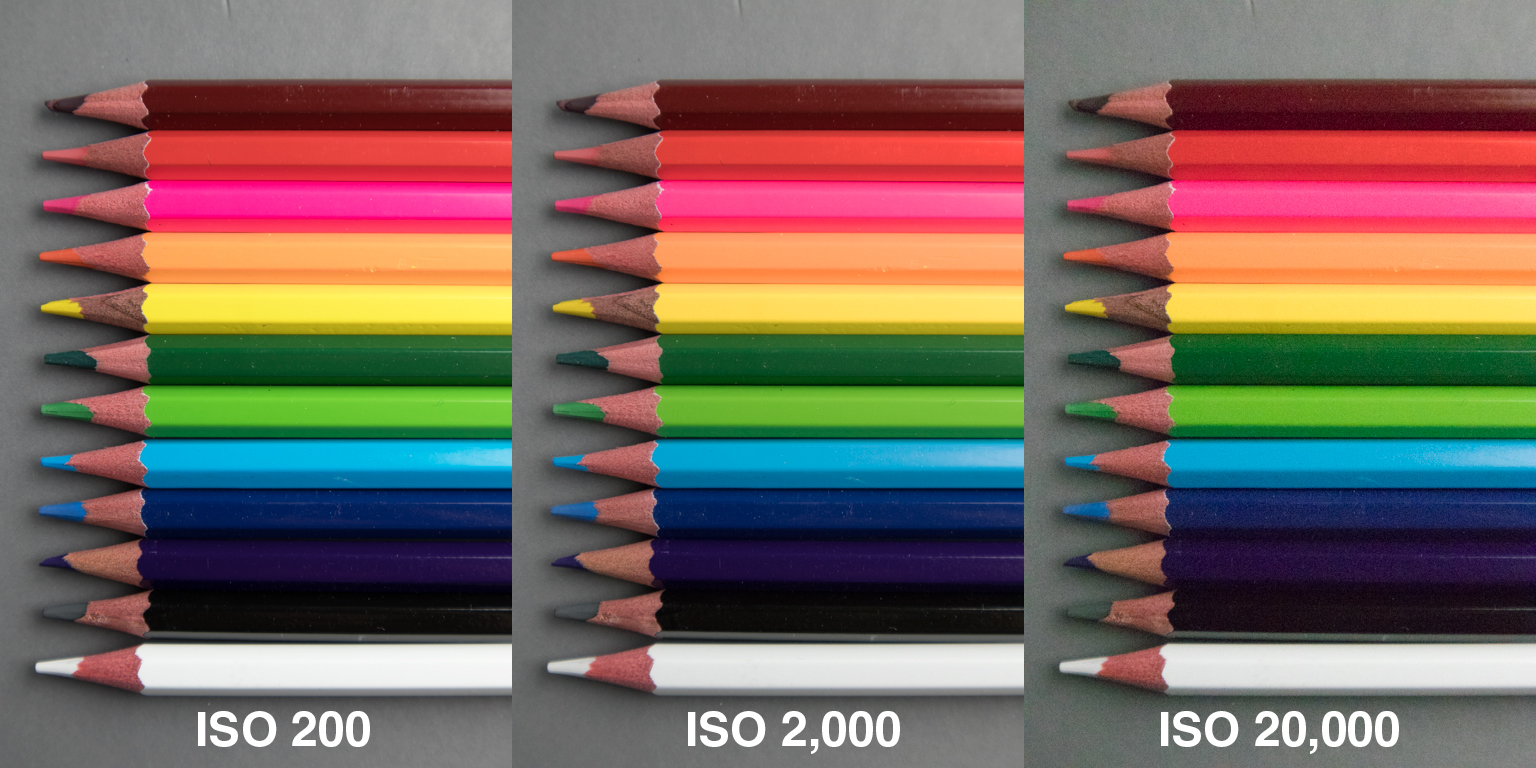
ISO. The ISO setting controls the sensitivity of the camera’s light detector. Most cameras range from 100 to several thousand (e.g., 10,000 or 25600). Higher ISO = greater sensitivity = shorter exposure times = granier photos (Figure 14-4). Most modern cameras produce satisfactory photos at ISO settings of 200–1,000.
Higher ISO settings are useful for outdoor photos when there is low light. The challenge of low light is maintaining a shutter speed above 1/30 sec. to avoid handheld motion blur, while also setting a small enough aperture to get good depth of field.
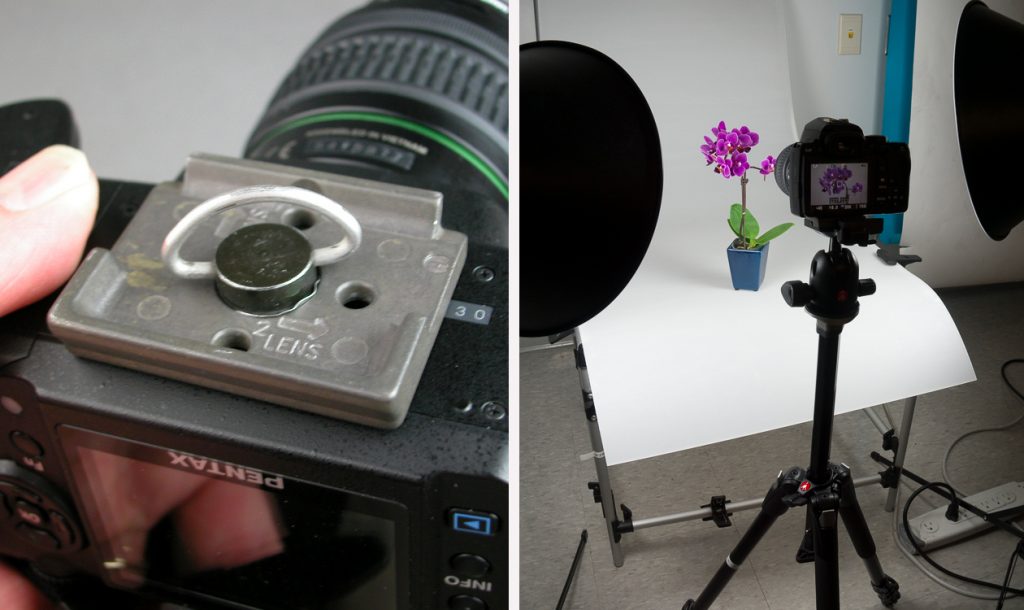
Tripod. A tripod helps keep the camera steady and avoid motion blur from camera shake. Quick-release tripods (Figure 14-5) have a detachable plate that screws into the tripod socket on the bottom of the camera and then clamps to the tripod.
Copy stands also have a screw mount that holds the camera steady. However, for some shots, touching the camera to make the exposure could cause it to move. For sensitive shots the camera can be triggered using its built-in timer or with a remote control.
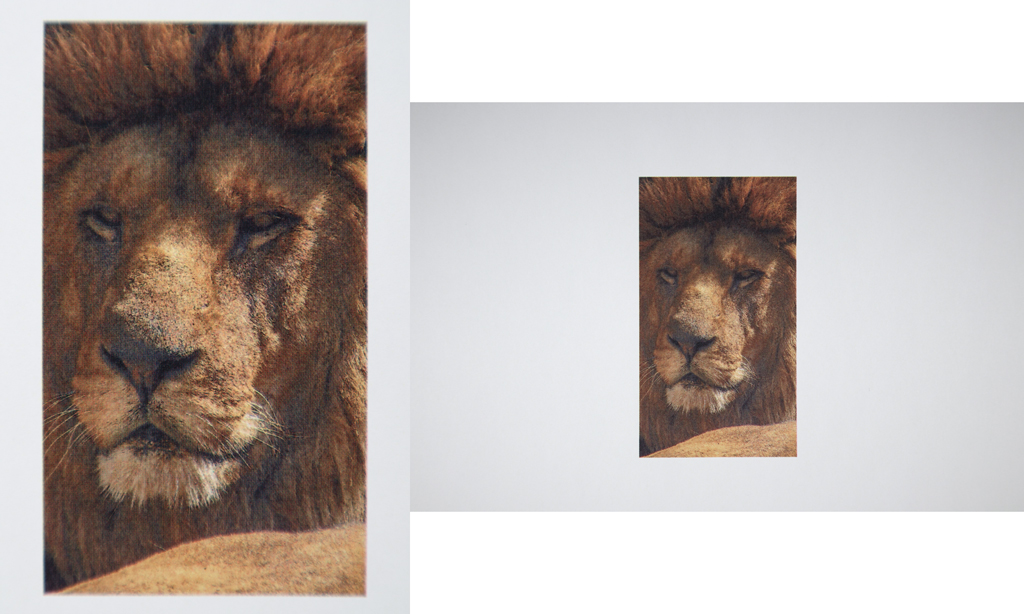
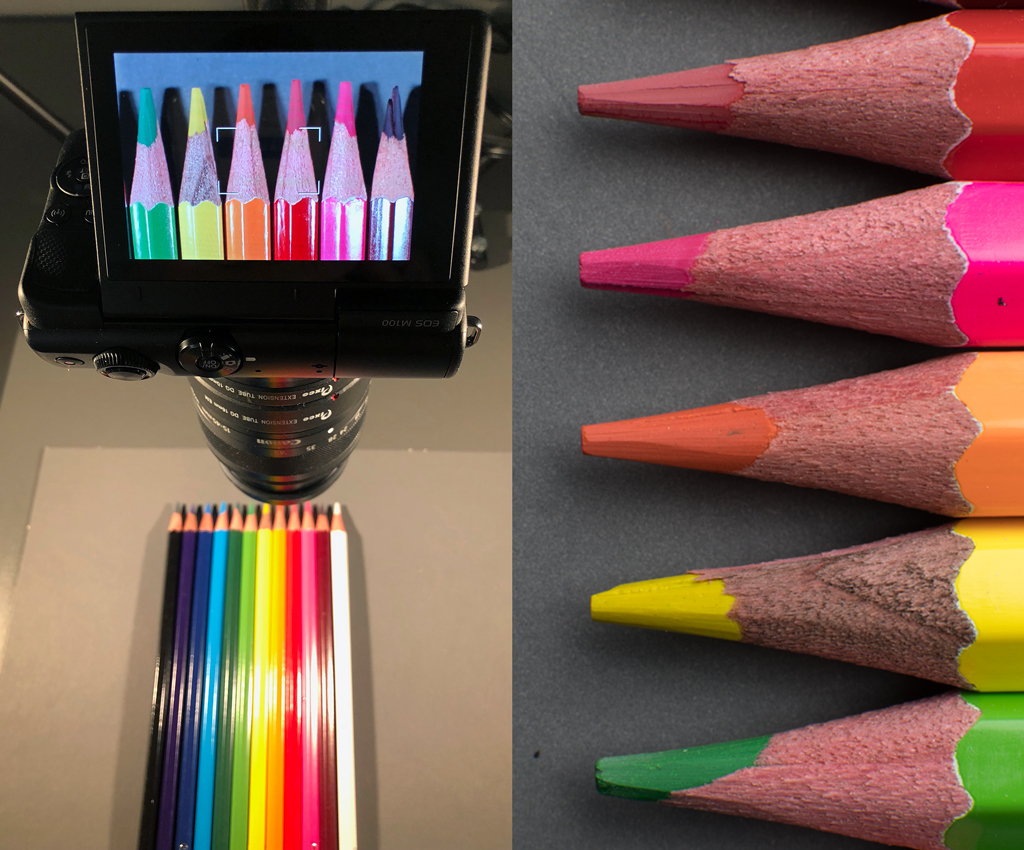
Zoom. Unless your’re using a specialized or macro lens, your camera probably has a zoom lens that lets you change the focal length to crop the scene.
For copy and product photography, position the camera or set the zoom lens so the subject takes up most of the frame, without cutting off any of its parts (Figure 14-6). This ensures that the largest number of megapixels is used for the subject.
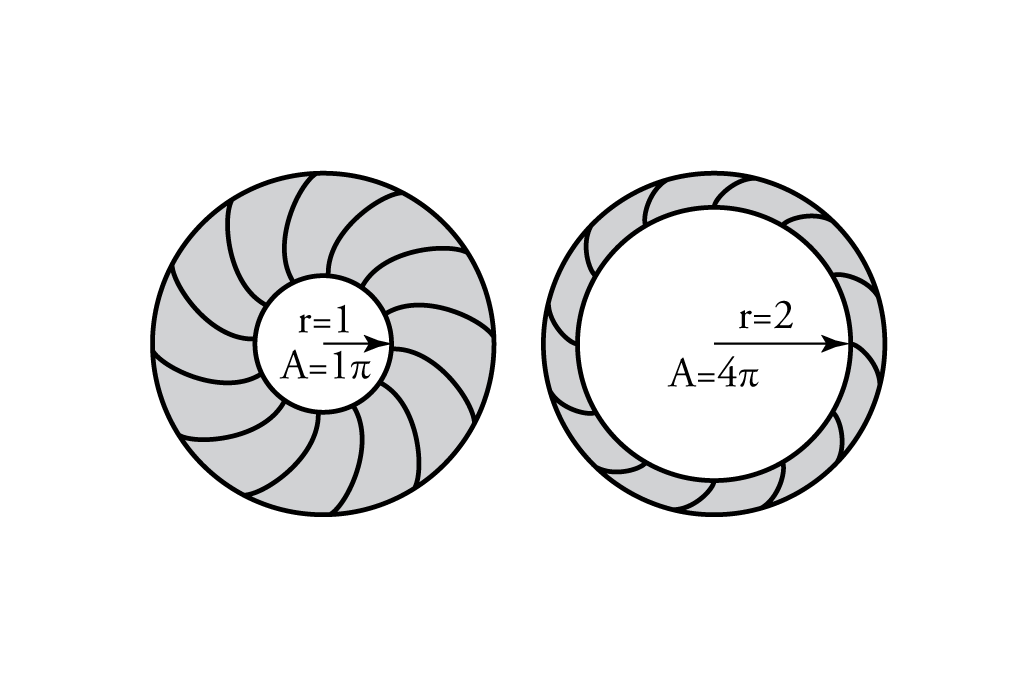
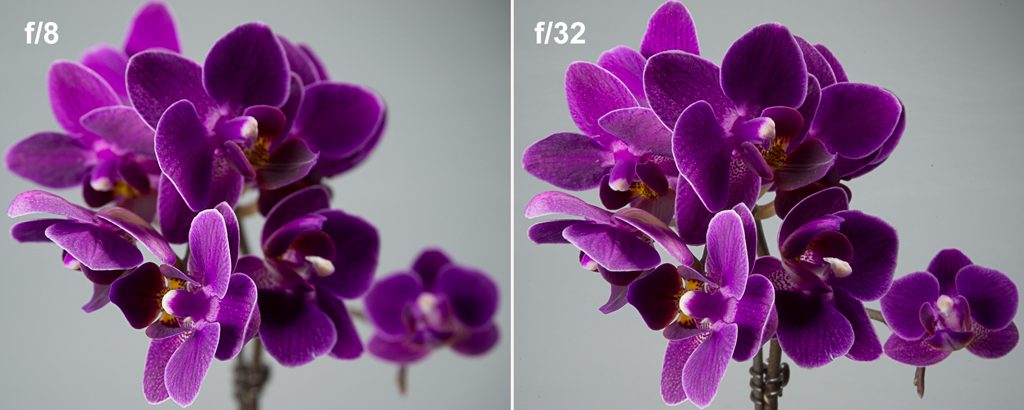
Aperture. The aperture is an expandable iris diaphragm that controls how much light is admitted to the camera (Figure 14-7). The aperture controls depth of field and the focus from front to back (Figure 14-8). The scale in practice is 1.4–32, where higher number is smaller aperture and greater depth of field.
Shutter speed. The length of time light is exposed to the sensor. Controlled by a curtain in front of the sensor. Typically ranges from 1 sec. to 1/4000 sec.
When handheld, speeds slower than 1/30 sec. make produce camera shake that blurs images.
Exposure bracketing. In addition to the technically correct exposure of EV 0 on an 18% gray card, bracketing refers to exposing additional photos, ±1/3, 1/2, and/or 1 EV (Figure 14-9).
To bracket the exposure, increase and decrease the shutter speed while leaving the aperture at the same setting so depth of field is not affected.
Looking at a small, non colour-managed photo on the camera’s display is not as accurate as looking at the same image on a large, colour-managed computer screen.
And, on the computer screen, the highlight and shadow values can be measured with the Info tool as levels or percent dot area.

Saving files. Modern professional point-and-shoot, mirrorless, and DSLR cameras can typically be set to save photos in Camera Raw and JPEG Fine or JPEG Medium format.
Camera Raw. This format records the maximum number of megapixels that the camera is capable of. Camera Raw be saved in proprietary or .DNG (digital negative) format. Examples of proprietary formats include Nikon NEF, Canon CRW, and Sony ACR.
Camera Raw files are best opened in Photoshop but can be batch-covered using Adobe’s free DNG Converter program. A disadvantage of Camera Raw is the large file size. The advantage of this is that when opened in Photoshop, multiple photos (e.g., a bracketed series) can be selected and have the same crop or other settings applied before opening. You can also choose the size of the photo you want, in megapixels or pixel dimensions.
JPEG. This format is compressed, meaning it reduces the file size to save space and speed up copy and transmission. Higher-quality JPEG settings (e.g., 9–12 on a scale of 0–12) may be indistinguishable from uncompressed TIFF format.
Fine and Normal indicate quality level and corresponding file size of the JPEG. Normal is useful if you want to fit lots of photos on a small memory card. However today most memory cards are 8, 16, 32, or 64 GB and can hold hundreds of Camera Raw and JPEG-Fine photos.
Mounting and Lighting Equipment
Several types of camera accessories are useful for studio shots used in graphic arts, including 2D copy, 3D product, still-life, and portrait shots.
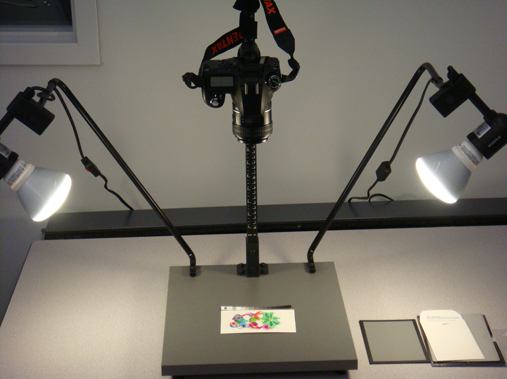
Copy stand. A copy stand (Figure 14-10) consists of a horizontal camera mount and two lights held at a 45° angle to the subject, to minimize light reflection into the lens. It is useful for 2D shots such as art work, drawings, printed photos, and 3D subjects where only one side needs to be captured.
To use a copy stand, first familiarize yourself with the camera’s settings, including mode, shutter speed, aperture, ISO, white balance, and auto/manual focus, as they may be difficult to find after mounting on the stand.
Check that the camera is level after mounting. A level, such as a bubble level or the iOS Compass app (with level as the second screen) may be helpful.
Tripod. A tripod is useful for 3D products, still lifes, and portraits and helps avoid motion blur. Quick-release tripods (see Figure 14-5) have a detachable plate that screws into the tripod socket on the bottom of the camera and then clamps to the tripod.
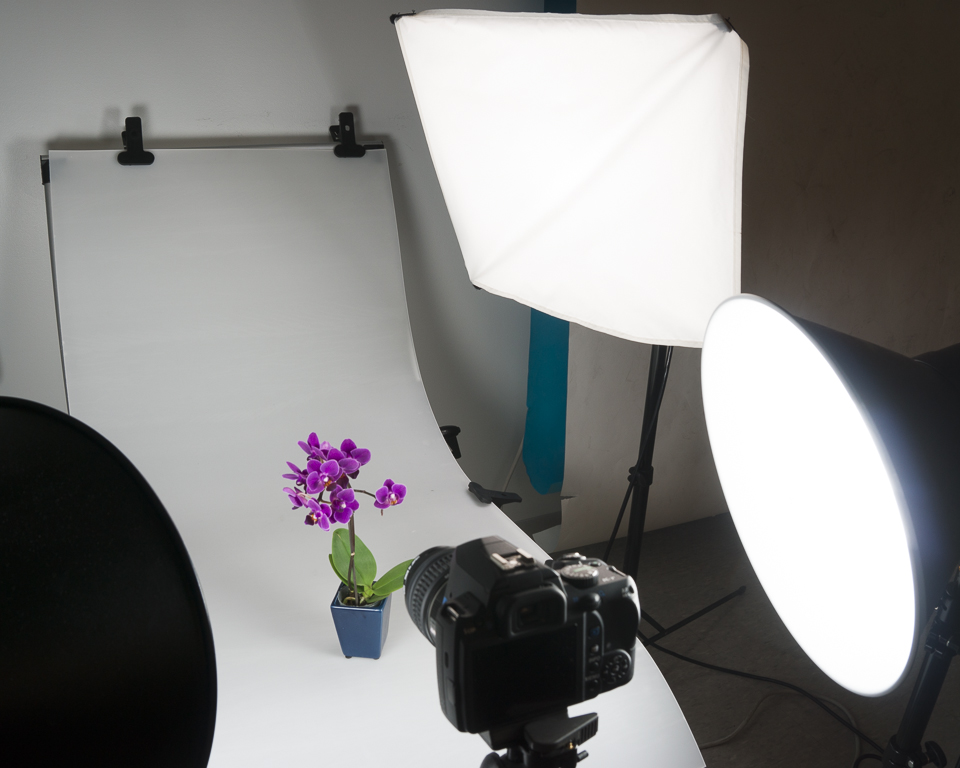
Studio Lights and Diffusers. Studio lights are necessary to get the proper exposure indoors. Lighting types include quartz-halogen “hot lamps,” xenon strobes, fluorescent, and LED.
Other ways to categorize lighting including “constant” vs. “momentary illumination” and “hot” or “cool”. Constant illumination (quartz-halogen, fluorescent, and LED) makes it easier to view and compose the scene, while strobes provide the most powerful light. Cool lights (fluorescent and LED) are safest to handle.
Light diffusers (Figure 14-11) are necessary to break up harsh light. Diffusers can include translucent cloth or plastic, or reflective umbrellas.
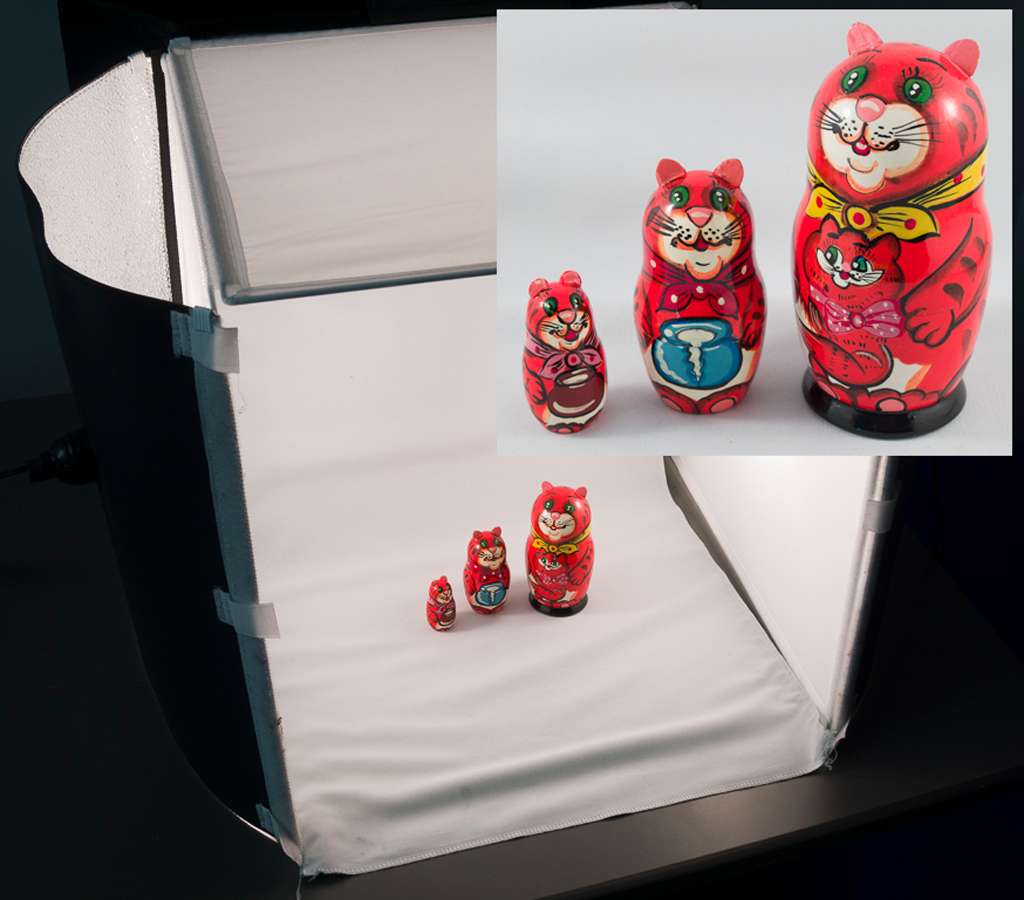
Product Photography Tents. These are useful for illuminating small products or still-lifes of related items. They consist of a background with surrounding lights (Figure 14-12).
Camera Accessories
UV Haze Filter. A UV haze filter is a clear filter that cuts out UV light which helps protect camera lens. If it gets scratched, the filter is a lot cheaper to replace than the lens.
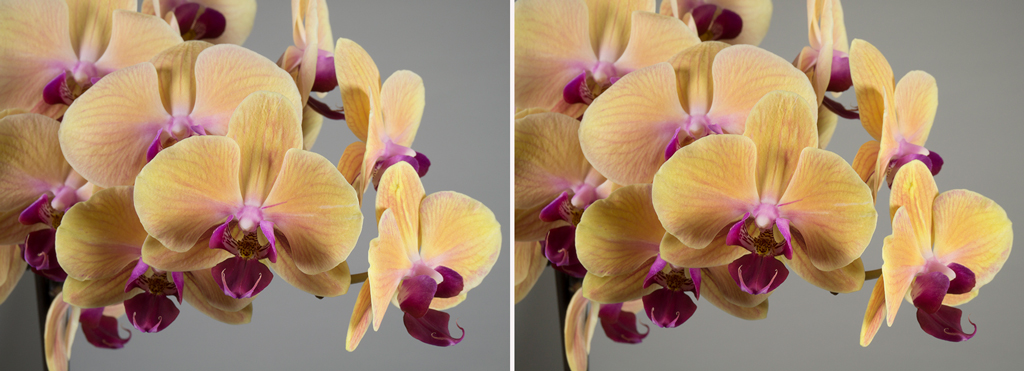
Polarizing Filter. This filter acts like polarized sunglasses for the camera. It filters out reflected light from non-metallic surfaces, reducing glare and increasing colour saturation (Figure 14-13). Polarizing filters are generally dark and reduce exposure by 1 EV. They may also affect white balance. For best results, calculate exposure and reset white balance after attaching the filter.
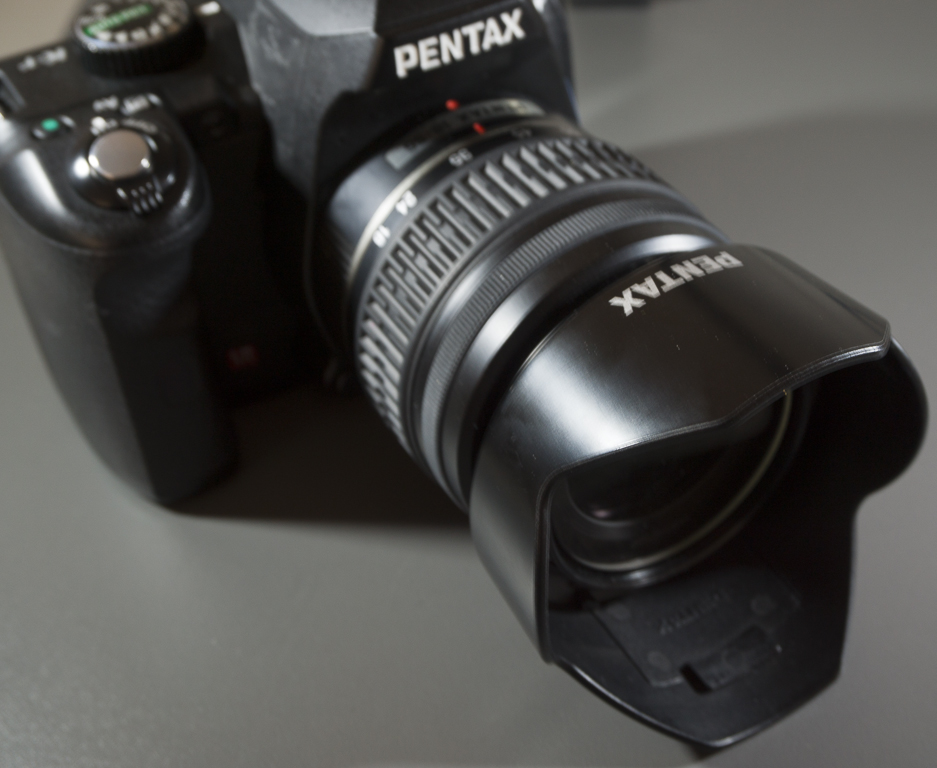
Lens hood. A lens hoodattaches to the front of the lens (Figure 14-14). It helps reduce glare that could come from stray light entering the lens, which could reduce the contrast of the photo.
Macro lens. Macro lenses (Figure 14-15) are especially made for photographing items up close. The magnification of the macro lens is expressed as a ratio of the actual scene or subject size to the size of the reproduction. A 1:1 macro lens can photograph items actual size.
File Types
Most professional point-and-shoot, mirrorless, and DSLR cameras can record images in Camera Raw and JPEG format.
Camera Raw is an uncompressed format that saves the maximum number of megapixels (MP) of which the camera is capable. That is, if a camera is capable of 12, 16, or 24 MP, Camera Raw images will be recorded at the maximum resolution.
Camera manufacturers have proprietary Camera Raw formats for each camera model. To open these images in Photoshop or Preview, Adobe and Apple must update their converters for each new camera that comes on the market.
Upon opening in Photoshop, the files can be saved in other formats useful for print or web publication. For print applications, the most useful formats are PSD, TIFF, and JPEG High Quality. For Web applications where download speed is paramount, JPEG, PNG, and GIF are useful.
| Type | Description |
|---|---|
| Proprietary Camera Raw | Unique to each digital camera, these can be opened in Preview or Photoshop, provided that Apple and Adobe have updated to the necessary file converter. |
| DNG Camera Raw | Digital Negative, a standard, universal Camera Raw format. Can be opened in Photoshop and other applications. |
| JPEG | A “lossy-” compressed file format where some data is discarded to reduce file size. Highest quality format can be difficult to distinguish from uncompressed TIFF. |
| PSD | Photoshop Document, Adobe’s proprietary version of TIFF. Can be read by InDesign and Illustrator but not web browsers. |
| TIFF | Tagged Image File Format, a standard for uncompressed files. Can be read by most word processing and page layout programs and also by web browsers if in RGB mode. |
| PNG-24 | Portable Network Graphic, 24-bit colour. A continuous-tone format of PNG for photos. Supports transparent backgrounds for Web publication. |
| PNG-8 | PNG, 8-bit colour. An indexed colour mode suitable for flat art or “comic-book” colour. Also supports transparency. |
| GIF | Graphic Interchange Format. An indexed colour format for flat or “comic-book” colour, mainly for publication on the Web. |
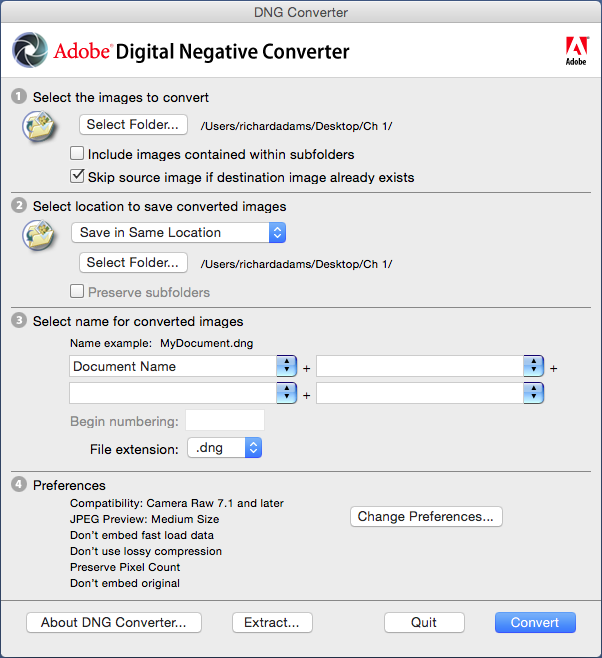
Adobe DNG Converter
This free program from Adobe does batch conversion of proprietary Camera Raw images to standard Digital Negative (DNG) format (Figure 14-16).
To use DNG Converter:
- Copy proprietary Camera Raw images from your camera’s SD card to a folder on your computer.
- Start DNG Converter and browse to the input folder.
- Designate a folder to contain the converted DNG files.