
Web Design Primer
Chapter 16 – Apps for iOS
Apps for the iPhone and iPad are written with Apple’s free Xcode program for macOS, which can be downloaded from the App Store. Programs need to be written on a Macintosh computer. At present they cannot be written on an iPhone, iPad, or Windows computer.
In 2017 Apple introduced its “Everyone Can Code” initiative, which includes educational material for colleges and universities, and a free iBook, Everyone Can Code: App Development with Swift.
Numerous app developers have also published videos of varying lengths on YouTube and Lynda.
Orientation to Xcode
The Xcode interface is complex and detailed. As many as eight windows and palettes can be displayed simultaneously, making a large-screen display almost essential for working efficiently with the program.
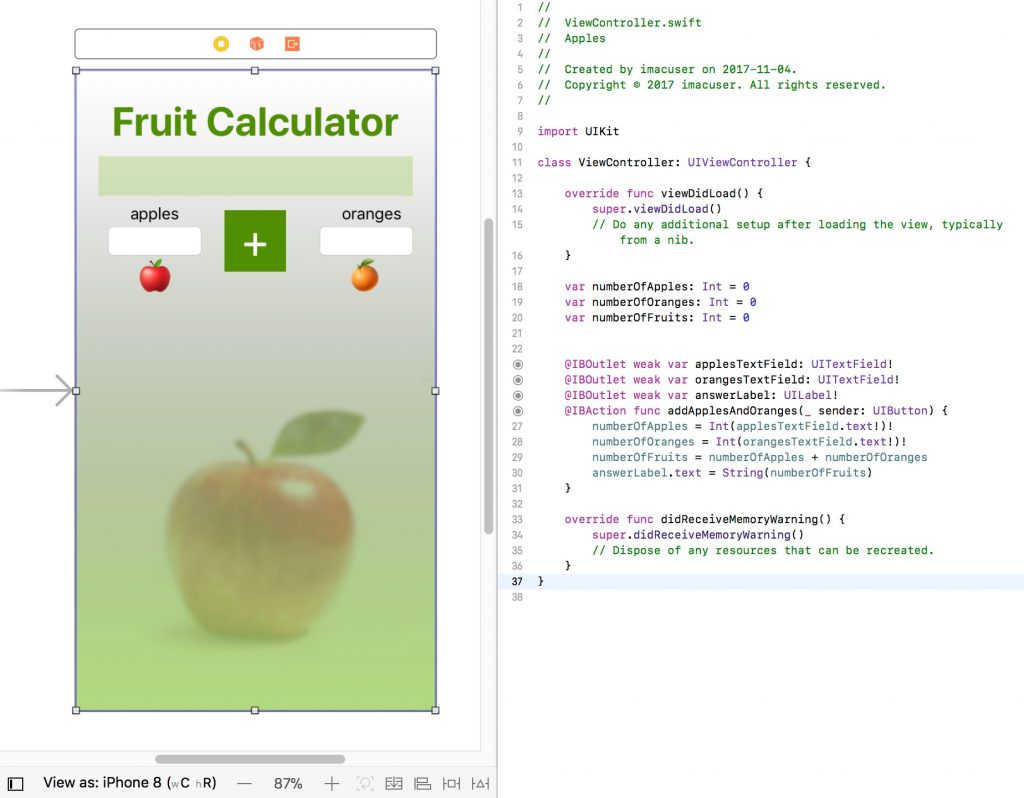
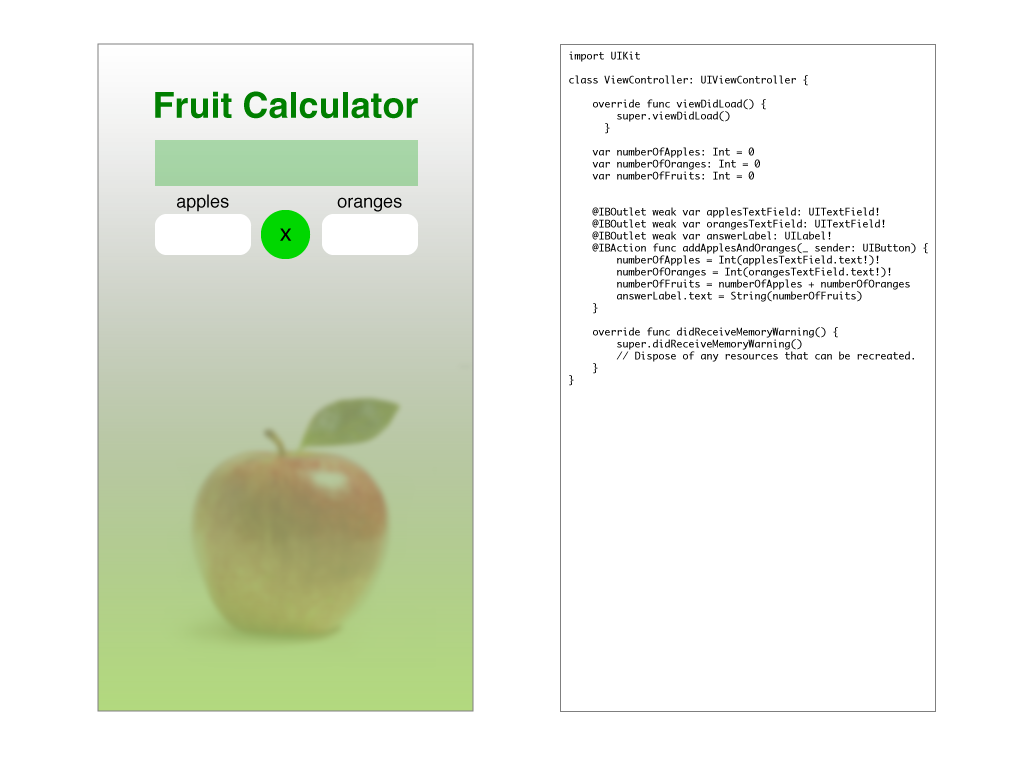
An app consists of several files that contain the graphical interface and programming statements. The Storyboard (Figure 16-1) provides a simulation of an iOS screen, similar to the page on a page layout program. The Storyboard can contain various objects that allow for user interaction (Table 16-1). These are connected to programming statements in the ViewController, a separate file with lines of code that can be displayed next to the Storyboard. Elements in the Storyboard are connected to the ViewController by right-clicking and dragging a connection line. The connected elements are designated with a dot in a circle.
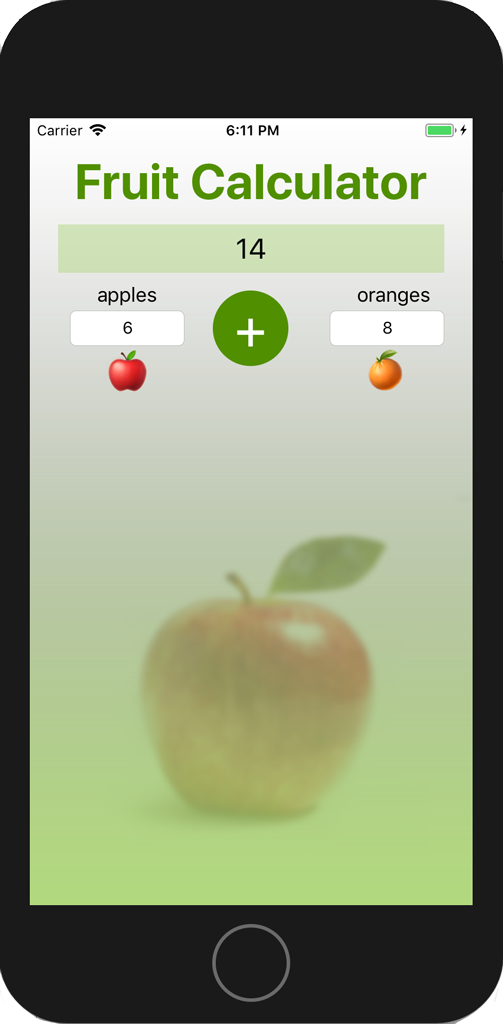
Xcode contains a built-in iOS simulator, called the Simulator (Figure 16-2), that can be set to look like any recent model of iPhone or iPad.
| Object | Description |
|---|---|
| text field | allows readers to enter text or numbers from the keyboard |
| label | used for labeling parts of the screen, such as text fields and buttons, and for displaying information output by the program |
| button | used to initiate actions that are programmed into ViewController functions |
| variables | used in the ViewController to store data and numbers; include four types—string, integer, floating point, and double precision. |
Program Example
To provide an example of a program and the procedures used to create it, we will list the steps necessary to creating the “Fruit Salad” app shown in Figure 16-1, developed by Dr. Abhay Sharma for his Advanced Technology class at Ryerson University. This program accepts numerical input from readers, who type in the number of apples and oranges respectively into text fields. When readers touch the addition button, a function reads the numbers into variables, calculates the total number of fruits, and displays the total via a label.
Design the Interface
- First we recommend designing the app’s interface by sketching it on paper or using a free mockup site such as Balsamiq.
- After designing the interface, make a list of all the text fields, labels, and buttons that you will need. Each will require a unique name in the program. Thinking of names of more than a few object variables can be confusing, especially when they need to be paired with data variables.
- In the list of objects, include the variables that you plan to use to store numbers and text for calculation or output.
Place Objects on the Storyboard
- Place objects on the Storyboard, including labels for the app title, field labels, and output fields where numbers and text will be displayed; text fields for user input and buttons to initiate actions.
- Right-click and connect all labels by drawing a line from the Storyboard to the ViewController. Assign variable names to all labels and text fields, and function names to all buttons.
- In the ViewController, declare variables that will be used to hold data entered into text fields and calculations made by functions. Variables can be one of four types—string, integer, floating point, or double precision (Table 16-2). Each variable needs to have its type declared and be set to zero or blank.
| Variable Type | Abbreviation | Description |
|---|---|---|
| String | String | text and numbers |
| Integer | Int | whole numbers (no decimal) |
| Floating Point | Float | numbers with decimal places, 32-bit accuracy |
| Double Precision | Double | numbers requiring high precision, 64-bit accuracy (usually not necessary for most apps) |
Write Code
- Inside the function, write code to store the text field numbers entered by readers into variables of type “String.” Note that the text fields are converted to integer variables by adding the type Int to the front of the statement. Also both variables need to be “unwrapped” using an exclamation point.
 numberOfApples = Int(applesTextField.text!)!

 numberOfOranges = Int(orangesTextField.text!)!
- Write a statement to add the numbers of apples and oranges:
numberOfFruits = numberOfApples + numberOfOranges
- Write a statement to output the number of fruits to the label field:
answerLabel.text = String(numberOfFruits)
Again the variable type must be converted from integer to string before being written to a label because labels can contain only string variables.
Debug and Test
- Xcode has a live debugger. If the program finds errors in the code, it shows a red stop sign icon with an explanation. All errors must be fixed before the program can run.
- Hit the Run button in the upper left corner of the screen to launch the Simulator and run the program. If the program has errors that have not been detected by the live debugger, the program could crash. A common source of crashes is multiple connections from one Storyboard object to the ViewController. In this case check the Connections Inspector (right-facing arrow at the top right of the screen) to make sure each object has only one connection.
Create an Icon
Icons for iOS apps can be created in Adobe Illustrator, Photoshop, and similar programs and saved in PNG format. The authors suggest preparing a document at 1024×1024px, the maximum resolution required.
An icon design should be very simple and not include a lot of text, which could be difficult to read on a small icon. Some icons consist only of a logo or one or a few letters.
An app requires several images of various resolutions for different Apple devices, screen sizes, and locations. Numerous “app icon maker” sites exist that will accept a 1024×1024-px PNG file and create the various resolutions required.
Install
- Programmers who sign up for the free version of the Apple Developer Program can install apps on an iPhone or iPad connected to the Macintosh computer via a USB cable. However the app will expire after 7 days.
- Users who sign up for the paid version of the developer program can install apps as above with no expiration date and also distribute them to beta testers.
Making a Web Portal App
Many apps are actually “web portals” that lead to a web site, where users can get information, search, buy things, and perform other tasks. A web portal is easy to make if you have an existing web site that is styled using responsive design and is easy to read on a smart phone. Requirements for a web portal app include:
- The author should have access to a web site with responsive design.
- The web site should accept secure login (https).
- A web portal can be written with only two lines of code. (Readers are referred to Apple documentation or one of the many available videos for the most up-to-date code.)
- In the info.plist file, the programmer should set the App Transport Security Settings > Allow Arbitrary Loads in Web Content (Boolean variable) to “YES.”
For Further Information
Readers are referred to the many resources available from the Apple Developer Program, Apple’s free iBook App Development with Swift, and developers who post videos on YouTube.
