
Stories with Maps
Chapter 1: Getting Started
Getting Started with Inky
Why Use Inky?
While Ink stories can be written using any text editing software, they are much easier to create using Inky—and Inky makes locating errors and mistakes in your Ink story much easier! That’s because Inky provides feedback to the writer in real time, pointing out potential errors and highlighting Ink’s command syntax and mark up, distinguishing command language from narrative language, for easier reading. For those with coding experience, the interface will be somewhat familiar, as it replicates features found in many code editors. Non-coding writers, think of the way a modern word processor will highlight potential problems with your spelling and grammar; Inky will help you in a similar manner, but by visually differentiating the instructions you are giving to the computer from other parts of your story (such as those parts your reader will read). However, Inky does not, as yet, correct spelling or grammar. The assistance offered by Inky is essential for a beginner setting out to learn the basics of Ink and of writing playable stories.
You should start by downloading and installing the most recent version of Inky from here. This manual was written using version 0.12.0, released February 22, 2021. More recent versions may have introduced new functions and efficiencies that are not referenced in this manual. You will find versions that support Mac, Windows, and Linux operating systems.
A Note on Navigating This Edition: As you progress through the lessons in this text, you can access the Pressbooks Table of Contents through the drop-down menu located in the upper left corner of each page. By clicking into the various Parts and Chapters, you can highlight specific topics and sub-headings for easy navigation. You can return to the top of the page at any time by clicking the up arrow at the bottom-center of the screen.
Test Driving Inky
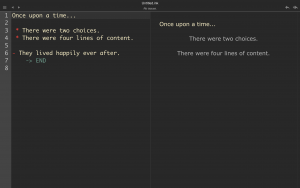
Once you have the software installed on your machine, fire it up! You will be greeted with this not-quite-empty page:
*Tip: You can switch between Light and Dark Modes by accessing the drop-down menu View>Theme>Dark (or Light)
Take a few moments to familiarise yourself with the interface. Elements of a basic word processing program are there. Hovering the mouse-pointer over the top of the screen will reveal drop-down menus. The usual suspects are here: File, Edit, View, Window, and Help. You will also find two menus unique to Inky, Story and Ink. These will be particularly useful as we progress through the lessons.
Students familiar with programming languages and code editors may recognize the layout of the left-hand pane. This is the Editor pane, where you will write your story. You could, of course, use this panel like a traditional text editor without incorporating any of Ink’s playable elements at all. However, there are some features that distinguish the pane from a common word processor. The lines are numbered for ease-of-reference, and the will occasionally try to predict the Ink commands being entered. If this predictive text feature at this stage is confusing, just ignore it for now. However, know that when you begin to craft your own interactive stories, you will do so in the Editor pane.
As Illustration 2 above shows, when you first launch a project in Inky, the Editor pane contains the “Once upon a time…” example we saw in the Introduction (Illustration 1). Look at it again. Note how the text is simply written as prose, but it is integrated with some Ink markup. Throughout the lessons that follow, we will be learning about the specific functions of symbols such as “ * ” and “ – ” and “ ->END ”, all three of which are seen in this sample story. For now, observe the relationship between the Ink story in the Editor pane on the left and the output text presented on the right side of the screen. Writing prose and dialogue in Ink is similar to writing prose and dialogue in any word processor, but with the added ability to give additional instructions as to how and when the text is printed to the reader.
The pane on the right-hand side of the screen is the Preview pane. Here you will find the text that will be outputted to the reader when the Ink story currently being written in the Editor is run. It is a way for you to see how your story would actually play out when a reader interacts with it. Pick one of the choices in the sample story. In the illustration below, the first choice has been selected.
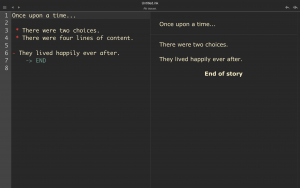
That was quick. As you can see, when you select one of the two choices (prefaced by the asterisks in the Editor pane), the other choice disappears, the concluding text (“They lived happily…”) appears, and you are told that this is the “End of story” (which appears because of the ->END command on line 7 in the Editor pane). In the lessons that follow, we will demonstrate techniques to enable playable stories with greater length, and greater depth.
One last thing before we move on. See the arrows in the upper right-hand corner of the screen? The Single Back Arrow will take the Preview pane back to the previous choice (in other words, it will ‘undo’ the last choice). The Double Back Arrow will reset the Preview pane to the beginning of the story. As you begin to craft playable stories with increasingly complicated structures and divergent paths, it will become essential that you are able to check the output that your various branches of text will produce. Being able to do this easily and in real time is a key feature of Inky!
Play around with the Editor pane. Add some lines of text after “Once upon a time…” and you will see them appear in the Preview pane. But if you add text on lines that appear after one of the choices, you will not see it…yet. Experiment with this brief, one-choice sample story as much as you like. Be adventurous! If you want to return to its initial state, simply use the drop-down menu File>New Project to open a new window and start over.
Ink Stories and Flow
As you begin to practice writing playable stories with Ink and Inky, remember that you are essentially writing two things at once. Inky is very helpful in making sure you remember this because it shows you the Ink markup or code (in the Editor pane) and the reader version of your Ink story as it unfolds through interaction (in the Preview pane).
You are, of course, writing text that forms the story your readers will read. However, at the same time, you are also writing instructions to the computer for how you would like that story to be told based on input from the reader. This will probably feel new. You now have the capability to write scenes with multiple outcomes based on reader choices. With Ink, you could decide that you want the reader to see them all, or you could limit them to seeing one of several, or maybe one outcome ends the scene while the rest repeat until the one that leads to the “end” is selected. As the writer of a playable story, it is all up to you. However, thinking about your narrative in this manner takes practice. Understanding how Inky interprets an Ink story will help you to practice writing your Ink stories.
Reducing the process to its most basic description, Inky reads the text you write from the top down, one line at a time, and it follows the accompanying instructions step-by-step in the order they are received. This is referred to as an Ink story’s .
Thinking in terms of flow takes practice, especially since Ink stories can flow along multiple, often intersecting paths. As you move through the following lessons, try to keep the idea of flow (or flows) in mind. Writing playable stories can get complicated. Sometimes a piece of Ink code does not produce the result the writer expects because Inky does not understand your instructions. This could be because you’ve given incorrectly phrased instructions (which will usually generate an error), or because, while Inky understands your instructions, those instructions are not written in a way that achieves your desired outcome. Usually, the solution to the problem lies in finding where your instructions are being mis-understood or where you are not making your intentions clear to Inky. Stay calm and follow the flow. Think about how Inky is working through your instructions. You will eventually find the line that is jamming things up.
Next Steps
Continue to play around with the introductory “Once upon a time…” story until you feel comfortable with Inky’s basic interface. When you are ready, turn to Chapter 2: Your First Story. See you there!
Think of the parser as Inky’s built-in background assistant. Through formatting and colour-coding, it visually differentiates which bits of your text are for the reader, and which bits are instructions for the computer. It will colour-code elements it recognizes, and it can be very helpful with predictive text suggestions.
The process by which Inky reads an Ink story, advancing line by line, following the instructions it is given in the order they are received, until an END of the story is reached.
