
Stories with Memory
Chapter 4: Labels and Conditionals
Where are you going? Where have you been?
If the primary unit of a story’s map in Ink is the knot, then the primary unit of the story’s memory is the label.
Before proceeding with the lessons in this chapter, take a few minutes to explore the sample scene, “Labelling Choices.” As always, play through the short scene more than once. Select the choices in different orders. Do you notice anything different in the text?
When you are finished, download the file (Labelling Choices.ink) and open it in Inky. We will be referencing this code throughout the lesson.
Learning Objectives
- To understand labels, and to be able to assign labels using proper command syntax
- To understand basic conditionals, and to be able to create conditionals using proper command syntax
- To demonstrate how labels and conditionals can be used to allow the story to remember the choices the reader has made, making it possible for the story to react accordingly
Assigning Labels in Ink
A is assigned by using an opening and closing parenthesis, for example, “(This_is_a_label).” Label names follow the same conventions as knots and stitches. They may only contain numbers, letters, and underscores; no special symbols or spaces. A label can be assigned to choices and gathers. The label name is placed immediately after the syntax command, and before the text. For example:
* (this_is_a_label) Labelled Choice
* (this_is_a_different_label) Another Labelled Choice
+ (sticky_choice) A Sticky Choice
– (the_result) The gather to bring the weave back together
Each of the lines above establish either a choice for the reader to select, or a gather for the flow to encounter. When Inky’s flow interacts with any of the above lines, it will also create a label named after the text included between the parentheses.
Using Labels in Ink
Labels, as we shall see, are useful in many different and complex ways. However, a label’s most basic function is as a unit of memory. By assigning a label to a choice or gather point, we tell the story to remember if the reader has made the labelled choice or navigated through the labelled gather. Think of a label as a simple method for instructing the story that ‘this line is important and to take notes.’
In the sample story, “Labelling Choices,” there are several choices presented to the reader, each one beginning with a word set off in parentheses. In Illustration 34 (below), the labels shown are “(rested),” “(bookworm),” “(artsy),” etc. The labels can be any unit of text (as long as they adhere to Ink’s standard naming convention, described above), but it is helpful if the labels are somewhat descriptive to their context, particularly in longer stories or scenes.
In this case, the labels have been assigned names that denote characteristics related to the selected choices. Therefore, if the reader selects the option, “Examine the chair,” then the story, internally, activates the label, “rested.” If the reader selects “Examine the desk,” the story activates the label “curious.”
Conditional Text
With labels in place, we can add conditional elements to the text. Look at lines 13 and 21 in Labelling Choices.ink, shown in Illustration 34 (below).
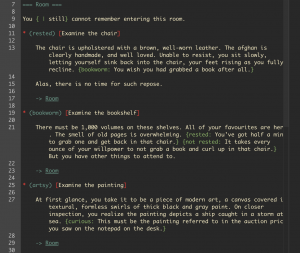
The last sentence of line 13 is set off with beginning and ending curly brackets ( { } ), and begins with the label “bookworm” followed by a colon and some text. The curly brackets introduce a condition that must be met before the line will be displayed in the output. In this case, the label (bookworm) must be activated before the line “You wish you had grabbed a book after all” will appear.
Contextual Commands
Think back to the section in Chapter 3 on sequences and alternative text. Sequences are also introduced by enclosing them within curly brackets ( { } ). Curly brackets, in general, serve as a signal to Inky that they include instructions that must be followed. However, Inky is able to understand those instructions based on the context in which they are presented. Because “bookworm” has already been introduced as a label (see line 19) and is followed by a colon, when Inky parses the information in line 13—interprets it in real time—it instructs the story to only print the text within the brackets if the label “bookworm” has been activated (that is, if the reader has previously selected the “examine the bookshelf” choice on line 19, which has the (bookworm) label). In this way, you can control the output the reader sees from the current flow. The text at the end of line 13—”You wish you had grabbed a book after all”—only makes sense within the story if the reader has selected “Examine the bookshelf” before selecting “Examine the chair.”
Looking at line 21, we see two sets of curly brackets. One begins with the label “rested,” and the other begins with “not rested.” Ink understands the word “not,” which allows us to give the more specific instruction to print the text within the brackets only if the label “rested” has not been activated (that is, that the reader has not yet selected the choice “examine the chair” on line 11, which has the (rested) label). Note how the context of the two bracketed sentences changes based on whether or not the reader has first selected “Examine the chair.” Using this technique, you can write sentences that anticipate each of the potential choices your reader might make while simultaneously instructing Inky to display only the text that correctly corresponds to the reader’s choice.
Inky also has a short-hand method for including both options—{exampleLabel: display this text} and {not exampleLabel: display this text}—within a single command. For example, look at line 39 shown in Illustration 35 (below). The bracketed portion reads:
{curious: trying to forget the mess on the desk below. | trying to avoid looking at the desk below.}

By separating the two sets of text within the brackets with the vertical slash ( | ), we instruct Ink that if the label “curious” has been activated, it is to show the first set of text. Otherwise, it should show the second set. This shorthand method produces the same result as listing two separate sets of brackets, one with instructions for “curious,” and one with instructions for “not curious.” It is yet another example of the ways Inky is capable of parsing the instructions contained by the curly brackets based on multiple contexts.
Inky at Work: Labels are a powerful tool in Inky, and we are going to expand on their usefulness and complexity in the coming sections. However, as we do, remember how simply and elegantly labels can be used as well. One of the most convenient advantages labels afford a writer in Inky is the ability to quickly add a phrase or alter a line of dialogue for a certain story flow or thread.
Additionally, labels are easy to add at any point during the writing. For example, if you decide, toward the end of your editing process, that you want your characters to treat the player/reader differently if the player decides to, say, share their lunch with the new kid, simply add a label to that choice, such as (shared). Then, as you go through the story, it is easy to add any additional text or dialogue you would like with {shared: new text}.
Some Advanced Logic
The final choice available to the reader, shown in lines 43-50 in Illustration 36 (below), demonstrates something else made possible through the use of labels. When a label is triggered, Inky is not only remembering whether or not that choice has been selected. It is also remembering how many times that choice has been selected.
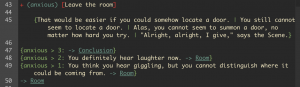
Note that the choice on line 43 is a sticky choice, marked by a “ + “. When the reader selects “[Leave the room]”, the label “(anxious)” is activated. The flow then continues on to line 45, which contains a default sequence of 4 pieces of alternative text. As we learned in the previous section, Inky will present the alternatives in order, one at a time, each subsequent time the sticky choice is selected. Therefore, the first time [Leave the room] is selected, Inky prints “That would be easier if you could somehow locate a door,” then the flow continues to line 47.
Inky Can Count
Line 47 reads:
{anxious > 3: -> Conclusion}
This looks very similar to the previous instructions to check for an activated label; in this case, the label is “(anxious)”. However, the label is followed by the greater-than symbol and the numeral three, “ > 3 “. The line concludes with a divert to a knot called “Conclusion”.
Line 47, if written out as a sentence, would say something along the lines of, “If (anxious) has been visited more than three times, then go to ===Conclusion===”. What Inky does is evaluate this line to determine if it is ‘true’ or ‘false.’ If the line evaluates as (false), it is not activated. It will only activate statements that are (true).
Because (anxious) has now been selected only once, the statement on line 47 evaluates as (false) and the flow proceeds to lines 48 and 49. (Anxious) has still only been selected once, so the instructions for “ > 2 ” and “ > 1 “ are passed for now since both evaluate to (false) as well. The flow continues to line 50, which contains instructions to divert back to the knot “Room”, which refreshes the remaining choices.
Because the choice [Leave the room] is a sticky choice, it is available to be selected again. Doing so will activate the label (anxious) for the second time. The flow will then proceed to print the second alternative text from the sequence on line 45, as it is the second time the sequence has been visited.
Because it has been selected twice, Inky increases the label (anxious) to a value of 2, so for now the flow will still bypass lines 47 and 48, which still evaluate to (false). Line 49 checks if the label (anxious) is greater than 1. It is (true), so the text on line 49 is printed to the output. Line 49 ends with instructions to return to the knot, “Room.”
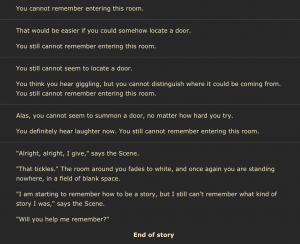
Illustration 37 (below) shows the output if “[Leave the room]” is selected 4 consecutive times. See if you can match the printed lines to the instructions listed in lines 43-50.
Many Possible Texts
This simple sample scene provides for numerous variations in the ways the text could potentially be presented to the reader. For example, there are little details that change based on the order in which the choices are selected. It is possible for the scene to end without every choice even having been selected. The sticky choice, “[Leave the room],” need not be selected consecutively. Although it might be, if the reader exhausts all of the other options first, before attempting to leave. You are writing a potential story—what particular version will emerge will be determined by your readers. By using labels and some simple conditionals, you are instructing Inky how to weave the text together.
Review
- In this chapter, we have learned that labels are a basic unit of information that can be tracked by an Ink story, and we have learned how to assign a label to a choice or a gather by using parentheses, ( ).
- We have also learned how to introduce conditional instructions by using curly brackets containing contextual commands, which Inky can then parse, or interpret, in order to present the story in a manner consistent with the decisions the reader makes. By using labels and conditionals, you can write a story that not only keeps track of the reader’s position in a web of nodes; it also keeps track of the route the reader takes and the decisions they make along the way.
- We also introduced the use of greater-than signs as a unit of logic that checks the number of times a label has been selected. In the next chapter, we will explore other logic commands, adding greater complexity to the instructions we write.
Putting It All Together
The sample story presented in this chapter illustrates a scene that takes place in primarily a single knot, but still presents multiple possible presentations of the available text.
Take some time to experiment with this form for an Ink story. It represents a template that can be used for any scene or story that involves exploration or investigation within a single location. By assigning labels to the available choices, it becomes easy to adjust the text that is ultimately output based on what the reader has already discovered. By using a combination of basic and sticky choices, coupled with sequences of alternative text and logic instructions, you can write a scene that allows for multiple variations of the text while it slowly tightens the weave, funnelling the reader to either an ending or a passage into the next scene.
IMPORTANT REMINDER! (Because the techniques in this chapter often require the use of recursive diverts that direct the flow back to the same knot, keep in mind this warning from Chapter 2) Do not create any infinite loops! In a scene such as this, which continuously diverts back onto itself, it is ridiculously important to remember to NOT EVER delete the choice text between the name of the knot and the first divert.
Inky will allow you to write:
1 ===infiniteLoop===
2 -> infiniteLoop
This will immediately put Inky into an infinite loop, with the knot diverting back into itself over and over again forever until you can use your computer’s task manager to Force Quit the program. Your story, if unsaved, will be unrecoverable.
This can happen quite accidentally during the editing process if the writer removes the first choice in the knot, having decided to re-write it, unintentionally leaving no text between the name of the knot and the first divert back to the top of the loop. This advice may be inspired by true events. Save often, and stay away from infinite loops.
In the next chapter, we will introduce variables and expand our set of logic commands, making for stories that include even more complex sets of instructions!
Think of a label as exactly that, it is a tag, a reminder that the Ink story's flow has passed through the thread
