
Stories with Maps
Chapter 3: Adding Complexity
Detailing the Scene
In this chapter, we will continue to explore ways that Ink and Inky can be used to write your Playable Stories. In the previous chapter, we imagined our story as a map woven into a tapestry, a surface with a geography. In this chapter, we are going to learn how to decorate that tapestry. Writing with Ink and Inky opens up possibilities that are simply not available in a traditional story. As we demonstrate some of these possibilities, consider how the new options might affect the way you approach your writing.
Before continuing with your reading here, take a few moments to play through “Adding Complexity”. Explore various options. Start it over a few times. Pay close attention to the words that appear on the screen. Are they always the same?
Once you are through playing, you can download the file (Adding Complexity.ink) and open it in Inky. We will be referencing this story throughout the lesson.
Learning Objectives
- To generate alternative text, and to differentiate between sequences, cycles, and shuffles
- To understand glue, and to know how to apply it to your text using the proper syntax
- To create a gather point, and to understand its purpose
- To create nested choices using best practices, and to understand their function
Alternative Text
For a demonstration of the alternative text functionality available when writing stories with Ink, look at the opening text that appears in the preview pane in Inky after loading the story “Adding Complexity”—also shown in Illustration 24 (below):

If you are following along with the story “Adding Complexity” running in Inky, there is a possibility that the first two lines/sentences on your screen match those in Illustration 24. Very possibly, however, the text of the second sentence pictured above differs from what you see when opening the Ink story yourself. Now, click the double-arrow icon in the upper right hand corner. What happens to the text in this sentence in the preview? Continue clicking the double-arrow. What continues to change? And how? How many times did it take you to get the same pairing of locations in the second sentence as the one shown in Illustration 24?
Now look at line 1 in the editor pane, shown in Illustration 25 (below). In the text of line 1, we see two sets of phrases contained in curly brackets ( { } ), and the individual phrases within each set are separated from each other by a vertical straight slash ( | ), or pipe. You will usually find the pipe punctuation mark sharing a key with the backslash ( \ ) on your keyboard. Used in this fashion, the curly brackets and pipe tell Inky that you are writing a . For example, the sequence in line 1 includes “a pirate ship,” “a haunted house,” and “a moon base.” By writing the sentence with these alternate phrases using this syntax, the sentence will alternate between the phrases of the sequence each time the Ink story’s flow encounters the line.
In the case of line 1 in “Adding Complexity,” the line is only encountered when the story begins. Clicking on the double-arrow icon and restarting the story quickly demonstrates the variety of alternative text available. This is useful as an example of how alternative text works, but in practice, this is not the best example of alternative text’s usefulness. After all, a reader who only reads the story in this example once will never see the other alternative text. When writing your own playable stories, alternative text works best when used within loops, when diverts repeatedly direct the flow back to the beginning of a knot or stitch. Alternative text, as we shall see, provides a convenient way to write paragraphs that do not necessarily read the same way every time, allowing you to write paragraphs that will be new and interesting for the reader even after repeated visits. Additionally, alternative text is easy to add at any point in the editing process. It is as simple as enclosing a set of phrases inside curly brackets, separated by pipes.
Now we will examine ways we can exert some control over how Inky selects which alternative text phrase of the sequence it will use.
Shuffled Sequences

Notice that each set of phrases in line 1 shown in Illustration 25 (above) begins with a tilde (~). This punctuation mark is often found on the key in the upper-left of the keyboard, under the escape (esc) key.
If you are following along with “Adding Complexity” running in Inky, try the following exercise. Delete the tilde from both sets and then click the double-arrow several times. What happens now? It seems we are stuck in “a pirate ship” and “a colosseum,” the first alternate text in each sequence. This is because the tilde (~), when it appears at the beginning of a sequence of alternative text, is a command syntax that tells Ink to randomly alternative text.
When the shuffle command is removed, every time the story is restarted, Inky, by default, starts by selecting the first phrase in the sequence. Again, in this case, the example works well to demonstrate how the shuffle function works by illustrating what happens when the shuffle command is removed. In practice, however, without the shuffle command, this example would never display the alternative text for the reader. Only if the flow was diverted in a loop back to line 1 would the second or third option in the sequence be displayed. Without the tilde, the reader will only ever see the first option in the sequence.
Cycled Sequences
Now let’s look at what happens when a sequence of alternative text is used within a loop in the Ink story’s flow. There is another sequence of alternative text written on line 22, shown in Illustration 26 (below). However, instead of using the tilde (~), this sequence begins with an ampersand (&).
Again, if you are following along with “Adding Complexity” running in Inky, try the following exercise. Restart the story by clicking the double-arrow icon. In the preview pane, select the choice “Try to get a word in edgewise.” Because this is a sticky choice, denoted by its (+) command syntax, and because line 23 diverts back to the same initial list of choices, it can be selected repeatedly. What happens when you select “Try to get a word in edgewise” repeatedly?

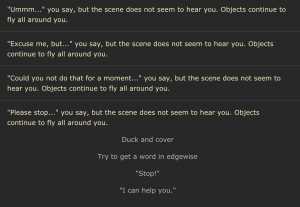
As shown in Illustration 27 (below), each time the sticky choice is selected, Inky progresses through the sequence shown in Illustration 26, in the order in which the alternate text is written. If you continue to select the same sticky choice, you will notice that after the phrases have all appeared in the order they are written once, the sequence repeats, beginning again with the first phrase, “‘Ummm…’”. This is because the ampersand (&) is the command syntax to repeatedly through the alternative text in the order that it is written. When a sequence of alternative text begins with an ampersand (&), Inky will move through the list of phrases you provide in the order in which you provide them, then it will begin again with the first phrase. It will repeat this as many times as the relevant line is generated.
Default Sequences
There is one final experiment to be done here. What happens if you remove the ampersand (&) from the beginning of the sequence? Try it.
After you remove the ampersand (&) and then restart the story in the preview pane, if you select the option “Try to get a word in edgewise” more than four times, the last phrase in the sequence, “‘Please stop…,’” will appear repeatedly. This is because, without instructions to shuffle or cycle the sequence of alternative text, once it has exhausted each of the options in the sequence, Ink thereafter will to the final choice, remaining there.
There are some interesting maneuvers that can be performed by using sequences of alternative text, even without using the shuffle or cycle functions. For example, an empty alternate text sequence is acceptable: { | | | }. When the sequence is completely empty, it might not be terribly exciting. However, by including a certain number of empty phrases at the beginning of a sequence, you can add a counter of sorts to your story, revealing a piece of text only after a choice has been selected a certain number of times. Used in this manner, you can use a sequence of alternative text to create a form of conditional text (we will cover conditional text in a later chapter). In this case, you would create text that only appears once the choice has been selected enough times to meet the condition you require.
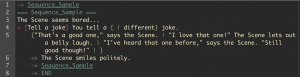
In the example shown in Illustration 28 (above), line 4 contains a sticky choice with a short sequence of alternatives; the first phrase is empty, and the second phrase is the word “different.” As the output shown in Illustration 29 (below) demonstrates, the word “different” is inserted into the text the second time the sticky choice is selected, and every subsequent time as well.
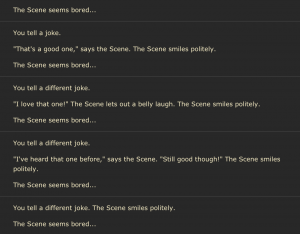
Similarly, because the sequence will always default to the final option once all previous phrases have been exhausted, by putting a blank phrase at the end of a sequence, you can make it appear to the reader that the choice no longer yields a result, as it will always ultimately default to the final blank phrase. This is demonstrated by the sequence in line 5 shown in Illustration 28 (above), and in its output, shown in Illustration 29 (above). After the third time the sticky choice is selected, Inky will default to the empty phrase following the final vertical straight slash in the sequence.
Glue
Typically, as an Ink story moves through its flow, when it encounters a new line number in the story, it will begin a new line in the output as well. Placed at either the beginning or the end of a line, the command tells Ink to continue to print the text from the next line in the Ink story’s flow on the same line in the output, rather than inserting a line-break. This is a useful function for fine-tuning the way the text you write will appear to the reader.
The command syntax for glue is a combination of the less-than and greater-than symbols (<>).
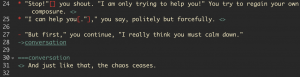
This is demonstrated in two ways in the sample story “Adding Complexity”. Both lines 24 and 25 end with the glue command, as shown in Illustration 30 (above). These are both choices that, incidentally, lead to the end of this scene. Look at the way the text is presented in the preview pane when you select the choice in line 25, shown in Illustration 31 (below). Rather than breaking to the next line, the text from line 27 continues directly within the same paragraph. Note also that while line 28 diverts to a new knot called “conversation,” line 31 opens that knot with the glue command as well, so that text is also affixed to the end of the previous text (on line 27) without a line break.
Glue works across knots and stitches. It works at the beginning or at the end of a line. One glue command does not cancel another out, meaning, if you accidentally put the command at both the beginning of one line and the end of another, the lines will still appear together. The command is easily inserted at any stage of the writing and editing process, and should be considered a tool used to fine-tune the presentation of your Playable Story.

As you begin to craft and play-test your own Playable Stories, you may occasionally find the text is not presenting itself in the format you had intended. Glue is an easy, un-intrusive, and useful tool for shaping the output that the reader will ultimately see.
A Few Notes About Spacing
The Glue command syntax is a convenient tool you can use to manually format the display of the text of your playable story. However, Inky will also assist with some automatic formatting of its own.
Notice what happens with the spacing of your text when Inky translates it to the preview pane. A numbered line in the editor pane on the left can hold as much text as you would like it to hold. Try it. You can keep typing sentence after sentence, and it will all appear as a single paragraph in the preview pane on the right. However, if you hit the return key, you will advance the cursor to the next numbered line, and the text you enter here will appear in the preview pane after a line break.
However, if you hit the return key five… ten… even fifty times, the next text you enter will still be previewed with only a single line of blank space between it and the preceding line’s text. This happens if you try adding horizontal blank space on a line as well. You can hit the spacebar a dozen times between words as you type them into the editor pane, and they will only be separated by a single space in the output on the preview pane.
Because Inky automatically collapses additional blank spaces between words into a single space, you will be able to better organize the text in the editor pane by using indentations. As we shall see in the following section, indenting portions of the text in the editor pane will make your story easier to read at a glance. However, because of Inky’s automatic formatting, the organizational indentations will not affect the presentation in the preview pane.
For now, just know that the spacing you enter may not translate directly to the text that is created. There are ways to add vertical and horizontal blank space to your text, but they are advanced techniques, and they will not be addressed in these lessons. In many cases, stories written in Inky are ultimately presented as part of a larger multi-media project, and the position of the text on the screen will be handled by different processes further down the assembly line.
Gathers and Gather Points
As we discussed in Chapter 1, Inky moves through the instructions written into your Ink story, line by line, in a process referred to as flow. Basically speaking, Ink presents the story to the reader in the order in which it was written in the editor. However, Ink’s flow follows diverts to other knots or stitches when diverts appear, which may move the reader to an earlier line or jump them forward to a later line. Additionally, Ink stops and waits for the reader’s selection when the flow encounters a choice, be that basic or sticky. Once a selection has been made, Ink displays the text following that specific choice, continuing from that line on to subsequent lines, in order, until it reaches a new command. The process continues until the flow encounters the command “-> END”.
Look at Illustration 30 and Illustration 31 (above), which are part of the knot named “SelfPreservation” in the story “Adding_Complexity.ink.” In this knot, the initial choices divert back to the knot (creating a loop), and after the reader has explored these, they will presumably click one of the later choices (on lines 24 and 25). Line 27 demonstrates the command syntax for creating a point, a dash ( – ). A gather point is a convenient tool you can use to bring multiple threads back together. In this simple example, regardless of which choice is selected—line 24 or line 25—the gather point on line 27 directs the flow to continue from there. After printing the text from line 27, the flow continues to line 28, which contains a divert to the knot named “conversation”.
If we remove the dash from the beginning of line 27, as shown in Illustration 32 (below), we create an error.

See what happened? It immediately created a loose end warning for the choice on line 24. This is because line 24 leads to no instructions of its own. Each of the preceding choices in the flow either divert back to the beginning of the knot, as seen in Illustration 26 (above), or they lead to sub-choices which we will investigate in a moment. If the reader selects the choice in line 25, the flow continues unimpeded to line 27, prints the text, and then moves on to line 28, which contains a divert to the knot “conversation”. However, without a gather command on line 27, line 24 is a dead-end because the flow encounters the unselected choice on line 25.
Put the dash back in at the beginning of line 27. The error goes away, and line 27 once again gathers the flow and puts everything back on track, as it appears in Illustration 30 (above). Gather points are powerful tools in that they can supersede apparent loose ends that occur before them in an Ink story’s flow; they provide an easy method for you to bring your story’s flow back to a central path before moving on to the next major set of choices. Think about gather points in the context of our fabric or tapestry metaphor. If the Ink story is the tapestry, then each choice you introduce represents an individual thread, branching out on its own. After you write multiple choices into your story, you can bring all of the potential threads you have created back together by using a gather point. When writing in Ink and Inky, figuratively, you create threads for the reader to pull on, but eventually you will need to gather them, weaving your story’s fabric back together.
Inky at Work: One of the key benefits to using gathers is simple efficiency. A common use-case for gather points is dialogue trees. Imagine a situation in which the player can choose from four different lines of dialogue, that will each print a different response from the character in the story, creating tone. Without a gather point, each different response will have to be followed by a divert directing the flow where to go next, even if they all divert to the same place.
It is far easier to put a gather on the next line of text after the block of choices in order to continue flowing through the story. You could even have one of the four responses divert to a new thread, while the other three have no diverts, leaving them to be collected by the gather point.
Nesting Choices and Gathers
We have demonstrated the ways that you can separate the threads of your playable story by writing choices, and how you can pull the threads back together with a gather. This works in the context of your Playable Story’s overall fabric. However, you can also write choices and gathers that only exist in the context of a single thread. A simple example would be offering a choice of, say, ice cream or pizza, and then nesting the flavour choices strawberry, chocolate, or vanilla if the reader chooses ice cream (those flavours on pizza would just be weird). As this example shows, nested choices are typically for options that do not make narrative sense until the reader has already made a specific earlier choice. To continue our fabric metaphor, Ink allows you to fray an individual thread into smaller threads.
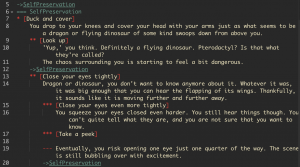
Look at Illustration 33 (above). This knot’s first choice is indicated by a single asterisk on line 7. Within this choice there are two nested choices that branch off of the choice created in line 7: lines 9 and 13, which use a double asterisk (**). A nested choice only appears if the reader first selects the top-level choice that contains it (the choice on line 7 in this example). In the Ink story “Adding Complexity,” if the reader never selects “Duck and cover,” they will not be offered the choice between “Look up” or “Close your eyes tightly.”
Notice also that the sample code subsequently nests another tier of options under the nested choice “Close your eyes tightly” by using a triple asterisk (***) command syntax. On line 19 in Illustration 33 (above), you can see that gathers can be nested as well! This triple-dashed gather ensures that each of the nested sub-choices of “Close your eyes tightly” leads to some text with a divert back to the same knot. This could be performed infinitely, nesting tiers within tiers for as long as your story’s structure requires it. Which is why…
Review
- You can create a sequence of alternative text by enclosing a list of phrases in curly brackets ( { } ) and separating each phrase with a vertical slash ( | ). Placing a tilde ( ~ ) at the beginning of the sequence will shuffle phrases, presenting them at random each time the sequence is printed. Placing an ampersand ( & ) will cause the sequence to cycle repeatedly in the order it is presented. By default, with neither shuffle or cycle added, the sequence will display each phrase in order before repeating the last phrase listed.
- Glue ( <> ) is a versatile command syntax that can be affixed to the beginning or the end of a line in the editor panel in order to connect that line to the preceding or subsequent line when it is displayed in the preview panel.
- A gather point is created by putting a dash ( – ) at the beginning of a line. This is useful when multiple choices will lead to the same place once the text unique to each choice has been displayed. Rather than putting the same divert after every choice, a gather point placed after the group of choices will ensure the flow continues no matter which choice had been selected.
- Choices and gathers can be nested by adding an additional symbol. For example, (**) will nest a choice underneath a choice labelled with (*). Be sure to use the tab function to organize your nested elements, making it easier to identify the flow of the Ink story by viewing the editor panel.
Putting It All Together
This chapter added quite a bit to your tool belt! It will take practice before all of their uses come naturally, and later we will add even more advanced techniques made possible using these tools within Ink.
For now, you should have a better understanding of how Ink can reproduce the same knot or stitch with alternative text on subsequent visits, and you should know how you can shuffle or cycle through those alternatives.
We introduced the glue command, a simple tool that tells Ink to ignore a line break, allowing you to easily take control of the appearance of the text on the screen when necessary.
In the previous section we learned about choices and how they are used to create threads in your story. With the introduction of the gather point, we now also know how to bring those threads back together.
Finally, we have demonstrated how to add layers of complexity to your choices and the threads to which they lead by nesting them within each other. Remember, that gathers can be nested as well.
Before moving on to the next chapter, take some time to experiment with everything you have learned so far. There is no better way to understand writing in Ink than to write in Ink!!! Believe us, you will not break anything.
In the following chapters, we will start to include some simple coding logic and learn how to add conditional requirements for the passages of text presented to the reader. We are going to learn how to give our stories a “memory,” a way to keep track of the reader’s decisions and to react to them accordingly. It will get trickier, but we will keep it simple. Using Ink, we will put the “writing” in writing code.
A series of phrases within a knot that can replace each other upon multiple readings. They can appear randomly, repeatedly in order, or once each.
The phrases in a sequence of alternative text will appear randomly if the sequence is preceded by a tilde (~).
Cycled sequences of alternative text begin with an ampersand (&), and the phrases they contain will continue to repeat in the order they are written
The default instruction for a sequence of alternative text is to continue to display the last phrase in the sequence once every previous phrase has appeared
Glue is a versatile tool in Inky. By using (<>) at the beginning or end of a line of text, it will "stick" to the adjacent preceding or subsequent text and appear on the same line in the output.
A gather is created by beginning a line with a dash (-), and it ensures that the Ink story's flow will continue with that line. It gathers the threads back together.
