
Stories with Maps
Chapter 2: Your First Story
Setting the Scene
Playable stories written in Ink need a beginning. So do lessons.
So before you begin writing your first scene, why not take a moment to play “Your First Scene”!
Once you are through, you can download the file: Your First Scene.ink and open it in Inky. We will be referencing this story throughout the lesson.
Learning Objectives
- To differentiate between Knots and Stitches, and be able create and name them using the correct command syntax;
- To understand Diverts, and to generate Diverts using the correct command syntax;
- To differentiate between Basic Choices and Sticky Choices;
- To generate Choices using the correct command syntax;
- To differentiate between Choice Text and Output Text, and to utilize Mixed Output commands in order to generate both.
Knots
are the largest units of an Ink story. They are typically bigger than paragraphs or pages (or screens), and they may contain several of both. However, it seems inappropriate to compare them to something as large as chapters. A chapter of a story might necessitate multiple knots. Perhaps it is best to think of them as scenes in a playscript.
As you will see, knots are, well… knots. They are the intersection of multiple , or perhaps they are bumps along a single thread. They are what you will build your stories out of. In “Your First Scene,” there is exactly one knot.

Skip line 1 for now; we want to look at line 2. It reads:
=== Your_First_Scene ===
The “===” (three equal signs) at the beginning of the line is your first piece of command syntax. Syntax, or “markup,” refers to the symbols or codes that communicate directly with the computer and are not meant to be seen by the reader.
In this case, using two or more equal signs (=) to begin the line tells the editor that you are creating a new knot. Using Inky, you can generate a pre-written knot snippet from the drop-down menu Ink > Basic Structure > Knot (main section).
Incidentally, the syntax:
==Your_First_Scene
will perform the same task as line 2 as it is written in the screenshot above. It will tell the machine to create a new knot named “Your_First_Scene”. While the above syntax is valid, the example in Illustration 5 (above) and the pre-written knot snippet (see Illustration 6 below) use three equal signs before and after the name of the knot, and we recommend that you follow this convention when using Ink (as we will in this book). This should be considered best practice for clarity and consistency: it helps to make knots more easily identifiable when writing longer works.
A NOTE ON NAMING: There is a universal naming convention, used for many elements in an Ink story, including knot names. There are three rules.
- The name may contain letters (capital and lower-case) and numbers
- The name may not contain spaces
- The name may not contain special characters other than the underscore (_)
Knots in Ink are bound by this naming convention. You could name the knot “YourFirstScene” or “firstScene”, but in this book we will use underscoring when naming knots and other Inky elements that are bound by this naming convention.
When using the drop-down menu to create a new knot, you will see the following boilerplate text appear in the editing window:

When using the pre-written knot snippet, you need only change “knotName” to something relevant for your story, and then replace the next line (“This is the content of the knot.”) with text to be displayed to the reader.
Stitches
A is a subsection within a knot. If we are continuing to think of our knots as scenes, then a stitch is a potential event within that scene. Thinking in terms of nodes on our story’s map, if a knot is the biggest possible node, a stitch is a smaller node that exists completely inside a knot. A stitch is created using a single equal sign (=).

Line 22 in Illustration 7 (above) from “Your_First_Scene.ink” reads:
= How_did_you_happen_by_here_again
and it creates a stitch by that name. Note that a stitch is bound by the same naming convention as a knot. Because the stitch exists within a knot, its name is appended to the knot’s name with a period (.). The full name of this stitch reads:
Your_First_Scene.How_did_you_happen_by_here_again
A stitch can be referenced from within its home knot using only the stitch name. However, when referring to this stitch from within another knot, the full name is required—that is, the name of the ‘home’ knot, a period, and the name of the stitch. Inky will assist with predictive text suggestions based on the names of existing knots and stitches as well.
Tip: The example above quickly leads to a cumbersome, lengthy name for the stitch. When writing your playable stories, keep this in mind as you name your own knots and stitches. Inky’s predictive text will help with the writing, but long, cumbersome names make for cluttered, difficult reading.
One example of an efficient use for stitches is within a knot that offers several characters with whom the reader can interact. Each character can be assigned their own stitch, containing their own potential dialogue options. As you practice writing your own playable stories, try to think of ways that knots and stitches can help you to organize your nodes.
Diverts
You create your story’s flow between knots and stitches by adding . The command syntax for a divert is an arrow created with a dash and a greater-than symbol, “ -> ”.
Diverts reveal their true importance when paired with choices, which we will explore in the next section. Inserting choices into your playable story will allow you to create multiple paths for your reader to follow, but diverts are how you control the story’s flow. They are the instructions determining which path your playable story will follow and when.
Our “Your_First_Scene.ink” example begins with a divert on line 1 because the entire story takes place within the knot “=== Your_First_Scene ===”.

Exercise
If you are following along with the story “Your_First_Scene.ink” running in Inky, try the following experiment. Edit the text to remove line 1. You will see that the text in the preview pane disappears and is replaced by “End of story”.
This is because the text in lines 4 and 6, shown in Illustration 8 (above), are contained within the knot named “Your_First_Scene”. Without the divert in line 1 giving instructions for the flow to move to that knot, this Ink story has no content. The flow never begins.
If you then remove line 2, which creates the knot, the knot named “Your_First_Scene” no longer exists. Therefore, the text from lines 4 and 6 are no longer contained within a knot. However, now we have introduced a new error.
Keep this exercise in mind as you begin writing playable stories of your own. Inky makes it easy to create nodes in the form of knots and stitches. Then, by inserting diverts into your story, you can create paths that will direct your story’s flow from node to node. As you practice your use of knots and diverts, focus on thinking in terms of your story’s flow. Your text is no longer limited to a single, predetermined path from beginning to end. You can now predetermine multiple paths from which the reader can choose (more on choices in the next section). Diverts, created with the command syntax “ -> “, are how you insert these branching paths into your playable story.
DANGER! DANGER! Be careful when creating diverts that you do not inadvertently create an infinite loop! Never add a divert directly after the name of a knot when that divert is for the knot it is within. (Remember Inky implements the lines in the Editor pane in the order they are written.) This means that you should always have some text between a knot name and a divert within that knot to the same knot.
For example, Inky will allow you to write:
1 ===infiniteLoop===
2 -> infiniteLoop
Because Inky runs your story as it is being written (as is seen in the Preview pane), this will immediately put Inky into an infinite loop, with the knot diverting back into itself over and over again forever until you use your computer’s task manager to Force Quit the program. Your story, if unsaved, will then be unrecoverable.
Creating an infinite loop can happen quite accidentally during the writing process if, having decided to re-write a knot, you remove the first choice and thereby unintentionally leave no text between the name of the knot and a divert back to the same knot.
This advice may be inspired by true events. Save often, and be vigilant about infinite loops!
Choices
Knots and stitches are the major structural units of your story. Diverts are a way of constructing the flow between knots and stitches. However, what makes your story playable by the reader is the ability to make in how they explore the map of your story.
Allowing the reader to make choices is a key element of a playable story. And with Inky, it is easy to incorporate them into your text. When playing an Ink story, choices are presented to the reader as clickable links (hyperlinks) that will take them to another node in your story.
Inky at Work: When writing your playable stories, remember that hyperlinks and direct choices by the reader are not necessarily the only inputs that can direct the story’s flow. Perhaps a more complex input mechanism could be added by a different team later in development. Remember that you are writing the story, but your story might eventually be attached to a much larger production, with a wider set of tools available for use.
Some stories might operate on whether or not the reader chooses to take the left path or the right. But what if your story is intended to be attached to an action game? Maybe the story follows a different flow depending on whether or not the player succeeds in a battle. Maybe the story has three or four potential threads to follow depending on not only whether or not the player won or lost, but also on how well they performed. Rather than containing direct choices for the reader, your Ink story might be a game script to be used as a blueprint for a whole development team!
We are going to focus on the basics here, and explore choices in Inky in terms of dialogue and player choice. However, as you practice, try to think outside of the box. What other factors could decide how your story’s flow will progress?
Ink has two types of choices: and .
A basic choice is added by placing an asterisk, (*), at the beginning of the line. Alternatively, you can use the drop-down menus and select Ink>Choices>Basic Choice and Inky will insert a pre-written snippet. Of course, you need at least two lines, each starting with asterisks in order to present the reader with an actual (either/or) choice!
The example below demonstrates an elementary use of basic choices. In this case, each choice represents a compass direction, allowing the reader to move along four different threads.
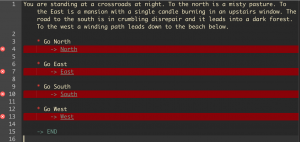
Note that Inky has marked the lines with the diverts ( -> ) with a red x. It is reporting an error because we have not yet created the knots for each of those named directions (so the diverts have nowhere to flow). This error reporting is helpful because it alerts you to parts of your story that require attention (for example, something still needs to be written). In the example above, each of the four directions could lead to different knots, each containing its own adventure for the reader to follow!
An option marked up as a basic choice in Ink will no longer be available or visible once it has been selected by the reader, even if the story diverts back to the knot or stitch that initially contained it. In other words, a basic choice is used up once it is selected.
The example in Illustration 10 below (from the stitch named “How_did_you_happen_by_here_again” from “Your_First_Scene.ink”) shows one sticky choice on line 25 (we’ll discuss sticky choices in a moment) and two basic choices on lines 28 and 34:
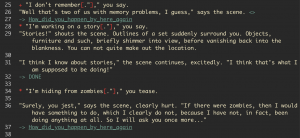
If the reader initially selects the choice on line 34, the Ink story’s flow continues to line 36, printing that text. The flow then continues to line 37, which diverts the flow back to the stitch named “How_did_you_happen_by_here_again” (which these three choices are within). However, when this stitch is re-presented to the reader, there will only be two choices—the ones the reader did not initially select—instead of three. The choice on line 34 will not appear again because it has been ‘used up.’
You can prevent a choice from disappearing by making it a sticky choice. Sticky choices are created by using a plus sign, (+). Line 25 in Illustration 10 (above) is a sticky choice. As with basic choices, there is a drop-down menu available for sticky choices, Ink>Choices>Sticky Choice, that will add a boilerplate Sticky Choice snippet to the editor.
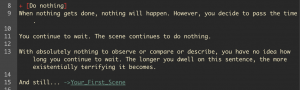
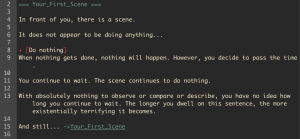
In the example in Illustration 11 below, the first choice the reader is presented with (on line 8) is a Sticky Choice. Every time the knot “=== Your_First_Scene ===” is re-presented to the reader, the reader can continue to select “Do nothing,” as many times as they would like: the divert (“->Your_First_Scene”) will always flow the story back to the beginning of the knot, and the option will still be there.
Display of Text in Inky
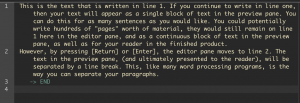
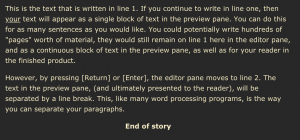
On a basic level, the text you write into a numbered line in Inky equates to a paragraph of text. In other words, you can write as many words and sentences as you like into a numbered line in the editor pane, and they will appear as consecutive words and sentences in the preview pane (and, in turn, in the finished story that your reader will ultimately see). It is only when you press [Return] or [Enter] that the editor pane advances to the next numbered line. In turn, the text in the preview pane will show a line break between one block of text and the next. Used in this manner, Inky behaves somewhat similarly to a common word processor.
For example, consider the writing in the editor pane shown in Illustration 12 (below).
By writing text as shown in the editor pane in Illustration 12 (above), the result in the preview pane will look like Illustration 13 (below).
However, when you use Inky to introduce choices for the reader, you also give yourself more presentation options to consider.
By default during the reading of an Ink story, when a choice is selected (choices are by default presented in grey and centre-justified), the Ink story will first display whatever text is included as a part of that choice’s numbered line. The flow then continues to the numbered lines that immediately follow that choice, displaying any text they contain, one after the other (quite quickly), until a new syntax command—for example, a divert, or another choice—is encountered.
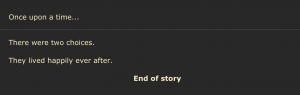
For a demonstration, let us return to Inky’s sample story, “Once upon a time…”, shown below.

If we select the first choice listed, “There were two choices”, then that line will be added to the story in the preview pane, followed by the text from line 6, and then the flow is directed to end. The result is shown in Illustration 15 (below).
But what if you do not want the text from a choice, after it has been selected, to be added word-for-word to the story? Perhaps, instead, you would like something different to appear. Perhaps you would like the choice to disappear completely after the reader has made their selection.
Thankfully, Inky makes it easy to differentiate between the text contained in the choice itself and the text that displays to the reader as a result of making that choice.
Square Brackets
You can control how the text in a choice displays before and after that choice is selected by using square brackets ([ and ]). There are a variety of techniques for controlling the display of text that make use of square brackets, but they all follow a few basic rules.
- Anything that appears before the bracketed portion of the text will appear in BOTH the initial choice text and in the display text.
- Text that is enclosed within the brackets will ONLY display in the initial choice text. It will not be displayed after the choice is selected.
- Text that follows the bracketed text will ONLY appear in the display text after the choice has been selected.
As mentioned previously, controlling the text that is displayed following the selection of a choice can be useful for writing playable stories that do not immediately reveal the outcome of the reader’s decisions. Perhaps you want the choice described as “Stay quiet,” but when the reader selects that prompt, the text reads, “You coldly stare them down, sweating them out with your silence.”
Square bracket techniques can also be crucial for maintaining proper grammar and punctuation.
There are three potential uses for brackets demonstrated in the sample Ink story, “Your_First_Scene.ink”.
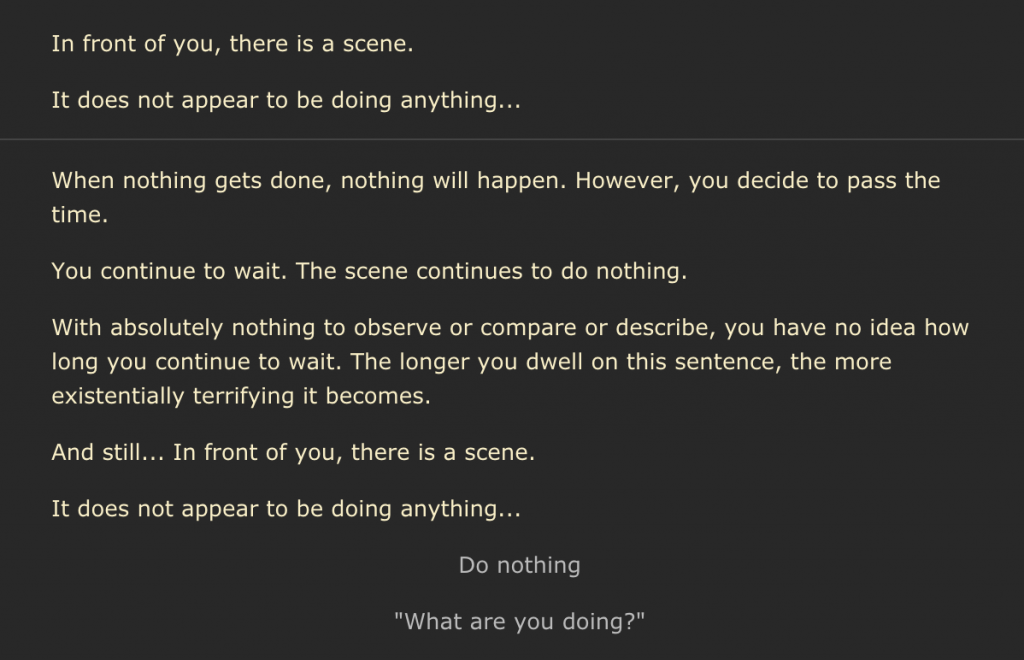
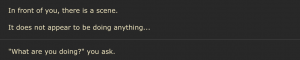
The text of line 8 is completely enclosed in straight brackets, as shown in Illustration 16 (above). Therefore, after it is selected, the text “Do nothing” will not appear in the display at all. Instead, the flow proceeds to print lines 9 through 15 before reaching a divert that takes the reader back to the beginning of the knot. The text in the preview pane, after “Do nothing” is selected, will look like Illustration 17 (below).
You can also use square brackets to create choices that allow your reader to select exact lines of spoken dialogue while also allowing you to maintain proper grammar and punctuation when they are displayed in the preview pane.

Illustration 18 (above) shows an example of using an empty set of square brackets. This is one method of adding additional text immediately following the choice text without that text displaying on a subsequent line. The text preceding the square brackets appears both before and after the choice is selected. The brackets, which contain no text, are included to prevent the text following them from displaying until after the reader has selected that choice. The initial text of the choice and the text displayed when this choice is selected are each shown below (Illustrations 19 and 20).

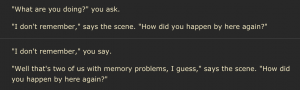
In Illustration 21 (below), lines 25, 28, and 34 each demonstrate another common use for square brackets.

Instead of containing no text, as in the example in Illustration 18, this time the square brackets contain alternate punctuation. With line 25, when the choice text initially displays, it ends with a period (and a closing double quotation mark) after “remember” because that is the end of the sentence before being chosen. But when that choice is selected and the choice text is re-presented with the added “you say,” the period after “remember” has to be changed to a comma (and closing double quotation mark) in order to include “you say” in the sentence. You can see the result in Illustrations 22 and 23 (below). The same process is followed in lines 28 and 31.

Review
- Stories written in Ink are structured by knots and stitches. The flow of the story follows the threads connecting these nodes of text. You can direct the flow by introducing diverts.
- Diverts are often placed after choices, allowing the reader to craft their own path through the playable story. Choices can be basic, which means they are single-use options that disappear after having been selected, or they may be sticky, meaning they can be repeatedly selected by the reader.
- Choices, depending on how they are written by the author, also impact the resulting text displayed to the reader. The result of a choice may include the same text as the choice itself, additional text that is revealed after the choice is selected, or a mixture of the two.
Putting It All Together
The elements presented in this chapter make up the basic tools used to create branching narratives with Ink.
By breaking your story up into separate knots, you create a map through which your reader can travel along the various flows you have created. You can think of this literally, offering choices asking the reader if they would like to go left or right, up or down. Or perhaps your reader’s journey will be a bit more philosophical. Does your reader choose to confront the beast guarding the door? Or do you give them the option to use cunning and stealth to slip past the monster?
Can you think of some situations in which it would be important to use a sticky choice instead of a basic choice?
These are examples of just some of the most basic uses of Ink and Inky. Try to make a scene for yourself. Play around in the software. Experiment. Practice.
In the next chapter, we will add a few more tools to the belt, allowing for a more nuanced presentation of the text and the ways it can be changed based on the reader’s choices, as well as adding another layer of depth onto the choices themselves.
The nodes that make up an Ink story. They are the locations on your story's "map".
The paths that move the Ink story from Knot to Knot.
A sub-node of text that can be used as a location within a knot.
Syntax that creates a new thread for the Ink story's flow to follow
The text elements that allow the reader of the Ink story to decide which threads the flow will follow
Basic choices can only be selected once, and if the flow returns to the knot in which they were selected, the basic choice will no longer appear.
Sticky choices can be repeated, and if the flow returns to the knot in which they were selected, they will still appear.
