
3 Chapter 3: A Guide to Shooting in 360
So you’ve got your camera and you’re ready to roll. In this chapter, we present our handy dandy field guide on how to prep your equipment, different types of 360 shots you can try and how to capture quality video no matter how fancy your gear is.
Setting your camera up for success
Making sure you’re on point with your camera setup is absolutely vital because if you get this wrong, you may record at the wrong frame rate or resolution and possibly spoil your whole shoot. Again, this goes back to understanding what features your camera has and then knowing how to access them. It also helps to have everything you need gathered together, organized and checked to make sure they’re in good working order. Use a gear checklist (like the one we’ve provided below) before a major shoot:
GEAR CHECKLIST:
◻ 360 camera
◻ Extra camera batteries OR an external USB power bank
◻ A fast transfer/high speed microSD card (we recommend a U3 rated SDXC card). An extra one is highly recommended
◻ Monopod/Selfie stick – This/these are an absolute necessity. Holding a camera without a selfie stick will mean you will have a giant hand in the bottom of the screen. The monopod (get one with feet!) allows you to set up the camera and then leave it alone to record the scene
◻ All necessary charging cables.
◻ Lens cover or soft case (scratched lenses will destroy your camera!)
◻ Any kind of waterproof case or sport housing you may need
◻ Smartphone with 360 camera app – Make sure you have the app not only downloaded, but check all of this before you leave your home. Also, do all of this the night before so you can make sure it all works. Then you can fully charge your camera.
◻ Lens cleaning kit – A regular camera lens cleaning kit will do.
OK, everything checked off? Before you go on your shoot, it’s a good idea to run through your camera settings to make sure you’ll get what you want.
- Insert the battery and turn on the camera power. Does it show as fully charged?
- In the menu, select the recording format that you want. We recommend you choose the highest quality possible. The minimum you want to select is 4K. If your camera has 5K capability (or higher), then we suggest using that setting. Check the frame rate as well. We suggest shooting at the highest frame rate available, with 30 frames per second (FPS) being the top option for many consumer-level 360 cameras. If you’re shooting some slow motion or time lapse footage, 25 FPS will suffice.
- Also, check the menu for any other recording anomalies. Some cameras may have a default record time before entering sleep mode (the Ricoh Theta V, for example shuts off after five minutes of recording on its default setting). This can be a disaster if you are using the camera to record a wedding, only to later find out it stopped (and did not automatically restart) midway through the vows! If there is a default time limit, be sure to change this.
- Insert and format the microSD card. Once you have done this, do a short test record and play it back to make sure it recorded properly.
- Clean the lens with your lens cleaning kit. If it has a lens cleaning fluid, never put the liquid directly on the lens. Spray or squirt the liquid onto the lens cleaning cloth first. Dirt on a 360 lens is bad news when shooting. A scratch it even worse news so make sure you are careful. While we are on the topic of scratches – NEVER LAY YOUR 360 CAMERA down on an unprotected lens. This is an easy way to scratch your lens. Some of the newer cameras (Kandao Qoocam 8K, GoPro Max) now come with inexpensive (and replaceable) lens covers. These should be used at all times and not just when shooting underwater. Protect your lens!
- Put your camera in a soft, protective case as you head out!
FUNDAMENTAL SHOT TYPES
The cool thing about 360 video is that, thanks to technological innovations and a growing legion of daring filmmakers, new shooting techniques are being experimented with all the time. But at this point, it’s prudent to master a few basic types of 360 shots before moving onto more advanced ideas.
As we’ve mentioned before, unlike other forms of video storytelling where there are numerous types of shots, including medium-shots, close-ups and extreme close-ups, most kinds of shots in 360 video are variations of wide shots. Having said that, there are some consistent types of shots that form the basis of 360 visual storytelling. They may be basic, but they are very effective.
In a sense, most 360 video shots are either stationary (camera stays still) or moving shots (camera is on the go).
Stationary shot with no particular primary subject or focal point
Fig. 1:
In this shot above, of a Hong Kong market at night, the 360 camera is set to record the environment or scene at hand with no particular focal point. Everything in the scene is free for the viewer to explore and, for the most part, approximately equal distance from the camera. As we’re working with a 3DoF camera, the viewer can choose where to look in the video, but remains stationary while the action unfolds around them.
Stationary shot with a primary subject or focal point
Fig. 2:
In this wide shot, the camera is also planted to remain stationary, except this time, there is a primary subject or focal point that the filmmakers want you to see. The viewer is still free to explore other parts of the scene, however, it is clear from the camera position that the statute of Bruce Lee in Hong Kong’s Tsim Sha Tsui harbourfront is meant to draw your attention. When you’re shooting a stationary shot with a particular focal point in mind, remember these key tips: a) be sure that the subject is at least two feet away from the lens to avoid blurring or distortion b) the subject is not caught in the camera’s blind spot and in danger of being in the stitch line and c) make sure the camera is dead level (or as much as reasonably possible).
Moving/tracking shots (aka “the walking shot”)
Fig. 3:
If you want to bring the viewer through a scene, then you may consider using a moving shot to bring the camera from one spot to another. In order to create this type of shot, you will most likely have to hold the camera with a selfie stick (unless you have access to a drone or some kind of professional dolly). And unless you have a 360 camera that’s large enough to hide under its blind spot, you will more than likely end up being in the shot itself. That’s not necessarily an issue, as many 360 content creators end up being “hosts” in their videos, perhaps leading their viewers through tours of places or if a reporter acts as a guide. If you’re going to be in the shot, just act natural and try to become part of the environment as much as possible. There are many different ways one could hold and position the camera while walking, including straight overhead (so the camera operator appears at the bottom of the video) or in front of the body a few feet (so the camera operator appears when you look behind). Some filmmakers have also mounted 360 cameras onto helmets to try to create a first-person perspective feel, although those can be tough to shoot. Feel free to try different variations and compare the results. Whatever you do, when you tackle a moving or walking shot, we would advise you to:
- Keep your movements consistent and minimal
- Don’t pan, tilt or rotate the camera – this can be disorientating for people, especially those watching with headsets
- If you’re going to move, do it one direction, smoothly and slowly. If your movement involves a sudden change in direction, it helps if that change feels natural and somewhat expected (i.e. following the curve in a road or moving from a staircase to a hallway)
- If your camera has built-in stabilization, make sure it’s active
- If you’re moving shot is following a primary subject, remember to keep the camera at least two or three feet away for visual clarity
There are some cool variations of the walking shot you can do that changes the perspective for the viewer.
One variation is what we’ll call the “follow shot.” Instead of holding the camera in front of you, you can rest the selfie stick on your shoulder and extend the camera back so that it’s three or four feet behind you. When held nice and straight, the stick will disappear, giving the audience the perspective of following the shooter. This can be particularly useful for shots where you’re bringing your viewer on a guided tour or through a crowd scene — the shooter can easily blend in with the crowd and the viewer will have the illusion of moving through the scene on their own.
Fig. 4:
For another variation of this shot, you can simply hold the camera a few feet away from you on your left and right side while you’re walking. We suggest holding the selfie stick with two hands while trying to rest it on the crook of your arm for optimal stability. This will give the viewer the perspective of walking alongside you.
Fig. 5:
First person perspective
A popular way of shooting 360 video so that people feel like they’re actually performing an action (as opposed to exploring an environment at their own pace) is to mount the camera to, say, a vehicle or a helmet. So, the camera is moving and capturing more of a first-person perspective. In our thinking, the difference between a moving shot and an action shot is that the moving shot is deliberate, planned movement. With the action shot, the movement is more spontaneous, harder to predict and more about creating the illusion that you’re doing the action itself. Think of 360/VR videos of skydiving or riding roller coasters. Once again, for anything involving movement, stabilization is the name of the game, so having a camera (hopefully with excellent built-in stabilization) securely mounted will be of utmost priority.
Timelapse
One feature most 360 cameras now have is the built-in ability to create time lapse shots, as a timelapse can be pretty difficult and time-consuming to create manually. This feature works with both stationary and moving shots. Be sure the camera is placed in a secure area that will show something of interest in all fields of view over a span of time — for example, try an interesting sunrise or a crowded place, rather than a small room with constant artificial light. Unless, perhaps, there’s something really interesting happening in that room.
Fig. 6: William Briscoe Photography’s YouTube channel has several incredible timelapse 360 videos that put the full majesty of the northern lights on display.
https://www.youtube.com/watch?v=ehJg_OlcjpE
“Drone” shot
This kind of trick shot simulates the effect of a drone taking off or landing and can be an eye catching way to showcase an interesting environment. To simulate a take off shot, grip the monopod securely at its base. Next, position the camera close to ground level, remembering to be aware of where the stitch lines would appear. Press record. Once you’re rolling, hold the shot for a few seconds and then start running backwards (don’t rush and try not to bounce up and down too much while doing so). At the same time you’re running backwards, gradually lift the monopod higher and higher until the camera ends up directly above your head as high as you can manage with your monopod. Hold the shot for several more seconds. The stick will disappear under the camera and your viewer will feel like they are getting an aerial view of the scene. To create a landing effect, simply reverse the steps, starting with the camera shooting above your head and then running forward, eventually bringing the camera down to ground level.
Fig. 6:
Tiny or little planet photos
One popular feature of 360 cameras is to create weird and wonderful fisheye images, which are often referred to as “tiny” or “little” planet photos, depending on which editing software you’re using. Here are some examples:


You don’t have to really do anything special to capture a tiny planet image. You can use the photo function on your camera to take a 360 image or simply pull a still frame from your 360 footage. The magic happens in the editing software you’re using. Each app or program has a different method, but in general, most will allow you to view your footage in a fisheye or tiny planet mode with a click of a button. Consult your program’s specific FAQ if you’re having trouble figuring it out.
Here are a few useful tips you can apply to taking tiny planet photos:
- Experiment with multiple camera positions. Even small changes in your 360 camera orientation can produce very different results. So when you’re out there shooting with producing tiny planet content in mind, always grab a few variations of the shot so you can see how they turn out when you apply the effect later on
- If you have a tiny planet image where the bulk of the image’s details are loaded onto one side of the photo, try to keep the details at the top of the photo instead of the bottom.
BEST PRACTICES FOR SHOOTING IN 360
While there are many other kinds of 360 shots you can try, the shots we’ve discussed are the building blocks of many 360 video projects. Here are some general tips to help you shoot high quality video.
- Remember that 360 cameras record in every direction. Being aware of your environment and what your viewers could be seeing at all possible vantage points is important. As much as possible, we want to give people visually dynamic scenes to explore. Watch out for obstructions and uninteresting things, like plain walls. If you can reposition your camera to capture your environment in a more interesting manner, then try to do so.
- Unless you’re going for a very specific perspective, we advise placing the camera at eye-level to your subject or in a scene. If you place your camera too low, say right on the floor, it can make for a very awkward experience for the viewer who watches the footage later, especially in a headset. Feel free to experiment with higher and lower angles, but understand that most individuals expect to see the world from eye-level. Be aware that sudden changes in levels (i.e. going from eye-level in one scene to floor-level in another) can be a jarring viewing experience and take people out of that precious feeling of immersion.
- The monopod is your best friend for stability – use it! As mentioned in the gear guide (Chapter 2), not all monopods are created equal. You want one that is fairly rigid and reaches a decent height for shooting. Some people find that a regular light stand (with the proper screw mount on top) works nicely.
- Hold each shot longer than you would when shooting traditional video. Your pacing with a 360 story will be slower so people have time to look around in your images unlike traditional shooting where you cut faster. To be safe, shoot about one minute of each scene and be sure to leave “padding” (extra recording time) at the beginning and ending of your shots for transitions. You have to shoot wisely with 360 video because if you only have 30 minutes of battery life (assuming you don’t have a second battery), and if you shoot one minute per shot, that means you only have 30 shots! So shoot wisely, friends.
- Don’t rotate, aim or fuss with the camera once you start recording a scene. Set the camera direction and leave it. Since you are recording omnidirectionally, the audience has control of which way they look. This is especially true if you are doing a walking shot. This also means, don’t follow any action that might be happening, say someone walking through the shot. Keep the camera steady. Remember, it’s recording everything in every direction!
- If you are using a selfie stick make sure that is it is straight up and down and not angled out as you would normally use a selfie stick. If the selfie stick isn’t completely straight, parts of it could stick outside of the camera’s blind spot show up in the video, or the video will fall on a strange angle (fig. 9):
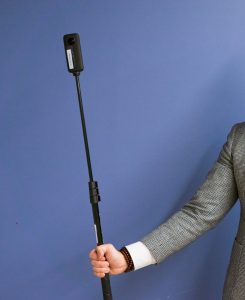
Joshua Cameron, Ryerson University, CC BY 4.0 - Speaking of the blind spot, remember that objects that show up on or near the stitch line can look distorted. Avoid positioning the camera so that the primary subject is in the blind spot. It’s a good idea to train one of your lenses fully onto your focal point.
- Keep your distance. Remember that any object that comes too close to your 360 camera can look blurry or warped. Maintain at least two feet of distance from any object or person (this includes the camera operator).
- Get good at playing hide and seek. Even while shooting stationary scenes, you’re likely to end up appearing somewhere in the video (unless you’re willing to walk completely away from the scene while you’re shooting). Some easy ways to melt into the background is to move as far away from the lens as possible, wear dark clothes and don’t look at the camera. Try to blend in with the environment.
- Most 360 cameras come with smartphone apps that allow you to control camera settings and preview your footage. Use your apps to help make adjustments in between shots and to monitor the action.
- Not only will a smartphone show you what you are recording but perhaps more importantly you can use it to start and stop recordings. This means you can set up the shot, move well out of the scene and then press record. By doing this you will avoid getting footage that has you in it running back and forth starting and stopping the camera. This will save you battery life and make the video clip files just a bit smaller, which will be appreciated when you go to edit.
- Be proactive with your subject or main character. Shooting in 360 is a different set up than traditional recording and you may have to be more active in directing your subjects on where to stand or move. If you’re capturing a performance, you would be wise to have the subject perform their routine a couple of times so that you’re aware of how they will occupy the space around the camera.
- Watch out for rain, water and dust on the lenses. The lenses in 360 cameras are extremely delicate. Any small particles on the lens can drastically distort your footage.
- Ambient sound in the shot is also important in 360 video. If the sound is coming from one side – say a door closing – then, like in real life, people will turn to look at it. Use this sound to your advantage and make sure when you are recording video you and your crew DO NOT TALK. Make sure everyone knows you are recording so the crew should move further away from the camera so they are not dominant in the shot and they should STAY SILENT.
- Look for good lighting. If possible, shoot in locations that can offer even, natural light. Lighting is especially critical if you are doing interviews with people. You will also find that many 360 cameras do not do well under low light which makes lighting even more important. Using artificial lights for 360 is difficult but not impossible, and shooting pro Henry Stuart offers some excellent tips here.
TL;DR:
SOME KEY SUGGESTIONS
◻ Where possible, use even natural light. In some cases, this might mean asking your subject to go outside (if you were interviewing them for example).
◻ Use practical lights were possible. A practical light is a light that is organic to the shot, like a desk lamp, or a table lamp. Practical lighting is used in professional productions all the time. You might need to replace the bulb in the lamp with a brighter, or dimmer (usually) bulb, so that it does not overpower the scene. Remember, don’t place anything too close to the camera or it will make it look larger. The further away, the more something blends in.
◻ Creatively use a camera mounted light. You will also find creators on YouTube who have adapted various ways to light 360 footage. Typically the light is placed above the camera in the stitch line. Thin lights can work depending on the camera. One note of caution – different lights have different colour temperatures (some look red, others look blue), so be careful not to mix your lighting sources – say outside light and your own artificial light
◻ If you are shooting in a room with a window, place the stitchline towards the window. This will help create an even exposure between the two lenses.
