
1 Chapter 1: What is 360 Video?
In this chapter, we’ll touch upon the history and evolution of immersive 360 visual experiences, look at how modern 360 video works and highlight some technical terms and concepts that are important to know as you move into shooting and producing immersive content.

What is 360 Video?
SOME HISTORY, KEY TERMS AND CONCEPTS
Before we dive into the how-to aspects of creating cool 360 videos, we should spend a little time getting familiar with this technology so that we’re all on the same page. There are several key terms and concepts specific to the realm of 360 content that we need to acquaint ourselves with, as well as important bits of history and context that will help us better understand the capabilities and opportunities of this emerging content form.
Essentially, 360-degree photos or videos are visuals in which the view in every direction is captured and presented simultaneously. You may think this is a recent innovation, but actually, people have been trying to capture and reproduce immersive 360 experiences for centuries.
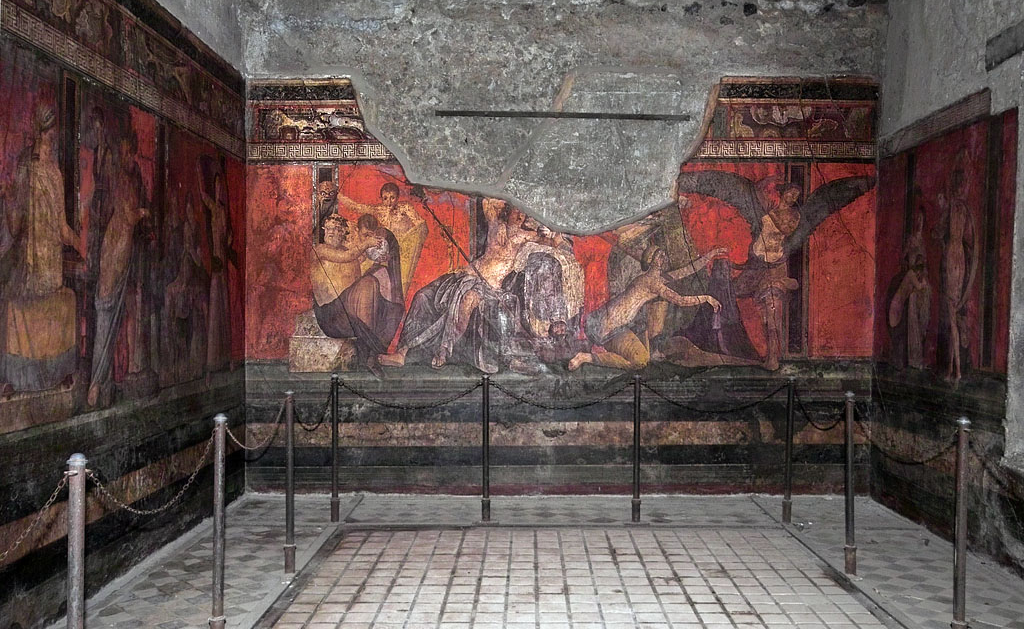
During the days of the Roman Empire, painters would adorn the interiors of buildings and villas from floor to ceiling to depict scenes of natural landscapes, court life, cities or dramatizations of historical or mythological events, creating something of a 360 visual experience (fig. 1).
The concept of the panorama (essentially taking an ultra-wide horizontal perspective allowing you to see as much of the subject as possible) is as old as art itself, with many examples from many cultures over hundreds of years, like this example (fig. 2) from China’s Song Dynasty.
It would seem that people have always enjoyed images that make them feel part of the scene and artists have likewise consistently developed new techniques and presentation methods to help strengthen that feeling of immersion. During the late-18th century, painters and visual artists in Europe were especially developing intriguing new ways of showcasing their work, particularly for their panorama art.
While the concept of presenting ultra-wide scenes wasn’t new, English painter Robert Barker is largely credited for coining the term “panorama” inspired by the Greek words for “all” (pan) and “view” (horama) in 1792. Barker famously introduced the term when he developed a more interactive presentation experience to showcase his panoramic paintings of cities. He would wrap his work around giant cylindrical displays, allowing people to walk around and see an unbroken horizontal view of the scene. These “cycloramas”, as they were called, lead to a deeper sense of immersion and the effect of people feeling like they were almost walking through the scene itself.
This concept caught on and soon other artists began innovating panoramic exhibits. Travelling shows and purpose-built panorama theatres became wildly popular throughout the 19th century. These buildings popped up over Europe and North America, including one that was built in Toronto, Canada in 1887.

The audience would stand in the middle of the scene on a raised platform to view the scenes. These ranged from wonders of the world like Niagara Falls, to religious scenes, to famous battles. While many of these scenes were painted, few have survived. One that did was the “Cyclorama of the Battle of Gettysburg”, which originally opened in Chicago in 1883. This work took more than a year and a half to finish and opened to rave reviews from visitors and veterans of Gettysburg alike. A second version of this battle was painted and was eventually put on display in Gettysburg in 1913. This painting was purchased by the National Park Service in the 1940’s and has been restored and rehabilitated several times since. Click here to check out the Gettysburg example.
This 360 medium was popular but was not particularly portable and could be easily damaged. The paintings themselves were large and took time to move and set up. The Gettysburg Cyclorama, for example, is 377 feet long, 42 feet high and weighs 12.5 tons! But clearly, there was enough interest to make this a viable medium for many years. This was a way of allowing people to experience, at least in part, spaces and events that they would never otherwise be able to. This was especially significant in the age when transportation was slower and travel was much more difficult and quite costly.
Meanwhile, during this era, photographers also developed early versions of cameras that could capture panoramas. By sequencing several wide shots together, photographers back then were able to recreate unbroken views of cities and natural landscapes by pressing the images onto silver-coated copper plates called daguerreotypes. Indeed, the U.S. Library of Congress has a really incredible collection of early panorama photography you should check out here.
Another popular and unique way of showcasing photography in a more immersive way was the spectacularly-named Kaiserpanorama. Patented in 1890 by scientist August Fuhrmann (no idea why he didn’t call it the Fuhrmanorama… way catchier, right?), this fascinating circular mini-theatre comprised a number of wooden viewing stations that rotated through a series of illuminated glass slide images (fig. 4).
These glass slide images were designed using the stereoscopic effect. Essentially two images of the same subject are taken, but at slightly different angles for the left and right eyes. Because the images are ever so slightly incongruous with one another, when the eyes see the images together through the Kaiserpanorama, the brain interprets them as one image but with a sense of depth, at least much more so than a standard image. This stereoscopic technique is the basis for many of the “3D” experiences you’re likely familiar with in the modern era, from 3D comic books to those red toy View-Masters to old superhero films that charged you an extra $10 to rent 3D glasses. The concept of the stereoscopic effect is also important to know if when it comes to shooting, editing and viewing your own 360-3D videos. More on this later.

THE BIRTH OF 360 PHOTOGRAPHY
As camera technology improved, moving from pressed plates to flexible film, so did the ability to create more immersive visual experiences. New innovations, such as rotating cameras, were developed. However, for much of the early-to-mid 20th century, 360 photography and video were still incredibly expensive and difficult to create and the image quality lagged far behind conventional camera technology. Indeed, most people producing 360 visual content at this time were doing so for scientific or military research or documentary work. The late-20th century saw smaller, more agile and more affordable panoramic cameras hit the market, but as these devices still required lots of setup, training and production know-how, this technology remained largely limited to the professional set.
However, this all changed dramatically in the early-2000s with the development and widespread introduction of sophisticated, powerful (yet relatively affordable) digital cameras and smartphones.
THE DIGITAL 360 ERA
Companies like Nikon and Canon introduced game-changing digital single-lens reflex (DSLR) cameras, inspiring whole new generations to take up photography. California’s GoPro became an international market leader by popularizing affordable action cameras designed to be sturdy and stable enough to take on everything from kayak trips to skydiving.
GoPro’s action camera took the photo market by storm by offering a small, robust camera with a very wide lens. While this became popular with extreme sports lovers, it also found a place in 360 shooting.
Standard cameras utilize one lens, allowing you to shoot with a narrow field of vision, generally a few degrees up to 180 degrees. In order to create a 360 effect, one would use a computer program to arrange and overlap the separate wide shots together to create an unbroken view of a scene in all directions — essentially, a panorama that covered the entire field of view for a person. This is why 360 video is often referred to as being spherical — spheres have no edges, so you can keep looking around and around — vs. flat video (i.e. 180 degree visuals where the edges are clearly visible).
The ability to shoot and edit digital files and the higher optical quality of these new digital cameras made 360 content production far easier. One could now position a few digital cameras together in a custom rig, covering every angle. Each camera would shoot video simultaneously, giving the shooter high-quality videos and photos from each angle. Several rigs were developed using multiple GoPro cameras, which were quite clunky and hard to manage.
There were several other major disadvantages with these rigs. One was the cost. At about $500 per GoPro camera the price quickly escalated (and don’t forget the SD cards needed as well!). The other issue was that if one of the cameras stopped working (battery issues for example), then there would be a piece of the 360 scene missing.
The other disadvantage with these rigs was that they required tremendous computing power (and time!) to sequence all the footage together. Clearly this was not technology aimed at main street.
There were other attempts to create 360 photos. One involved placing a single GoPro camera on a motorized tilt pan head which would automatically rotate and take the photos needed to create a 360 photo. It would then stitch the photos together using software. The issue with this set up was that if there were people in the scene they had to stand completely still (sort of a throw back to the early days of photography!). Again, this was not a technology that would work for most people and was only photos, not video.
However, over the past decade, we’ve seen some exponential advances in 360 shooting technology that has reduced the need to construct such elaborate rigs. For one, high-definition video would become a standard (if not minimal) feature on every type of digital camera, including the ones built-in to ever-improving smartphones. Now, it’s easy and cost-effective to find 360 cameras that can shoot 4K resolution video, with 6K and 8K cameras trending down in price as well. There are 360 cameras that are capable of shooting 11K video, but these tend to still cost upwards of $20,000 and are ideal for professional filmmakers.
Major strides have also been made to create cameras and programs that make sequencing the footage far easier than before. The act of sequencing separate shots together to produce this 360 effect is called stitching, which is an important term to remember. The stitch line is where the edges of the visuals come together. An excellent stitching job will help the 360 “illusion” appear smooth and seamless. However, it can be challenging to achieve this seamlessness as objects on or near the stitchlines easily distort or blur or differences in lighting can become more apparent.
Now, it’s easy and cost-effective to find 360 cameras that can shoot 4K resolution video, with 6K and 8K cameras are trending down in price as well.
AN EVOLVING STITCH-UATION
We’ll address these potential issues later in the chapters on shooting and editing, but for now, just know that stitching is an essential aspect of producing 360 video content. Above, you can see the differences between unstitched 360 video and stitched 360 video content (fig. 7).


As we mentioned before, the primary method for shooting high quality 360 video several years ago was to rig up multiple cameras and then stitch the footage together using computer software, often a third-party program. Even with a high-end computer and powerful software, this is a labour intensive and time-consuming method of producing 360 content. However, one of the most critical developments for the widespread adoption of 360 video has been the manufacturing of affordable, user-friendly and visually powerful digital cameras designed specifically to capture 360 content.
In recent years, numerous companies — from well-established brands like Samsung and GoPro to upstarts like Insta360 — have brought to market myriad 360 camera options for shooters of all kinds, whether you’re a hobbyist who just wants to share some interesting vacation videos on social media or a professional filmmaker creating cutting-edge cinematic virtual reality experiences. In general these days, 360 cameras feature multiple lenses on one camera body. At the minimum, there is a front and rear lens, each capturing a 180 degree field of view on either side.
When you bring them together, that gives you a 360 degree field of view. Some of the more advanced cinematic 360 cameras have several lenses on the camera body, which provides the ability to capture video at much higher resolutions.
The trend to make 360-specific cameras has also led to the creation of auto-stitching features or “no stitch” workflows to help you save time and energy from having to do it all manually. Our guidebook is an introduction to 360 video storytelling and, as such, our focus is on the use of the more user-friendly and affordable 360 cameras, most of which come with native stitching software or have designed their production workflow to minimize (or remove) stitching altogether. So we will not be delving into the technical aspects of manually stitching 360 content, although there are many effective programs one could use to do so (see our Resources chapter).
Instead, for this guidebook, we advise you to start with a 360 camera and to follow the directions of your particular 360 camera to prepare your video files accordingly (And see our Gear Guide in Chapter 2 to figure out which camera is right for you!).
YOUR OWN PERSONAL IMMERSIVE THEATRE
As important as the innovations of 360 cameras have been, of equal importance has been tremendous advancements in how we view 360 content. A few decades ago, 360 video was a highly specialized type of content that was only accessible to the public as theatre experiences. Probably the most famous person to explore 360 cinema was Walt Disney. Disney put a lot of effort to make people feel like they were part of the story and the interactive attractions at Disneyland (and subsequent parks that opened after his death) are great examples of this. He was however, first and foremost a filmmaker, and in 1955 he installed “Circarama” (later to be called Circlevision) in his theme park. In the early days, this technology used eleven 16mm projectors but this would eventually change to nine 35mm projectors. Disney’s first film that used this technology was “America the Beautiful” and it would later be used at Epcot’s Canada Pavilion with the film “O Canada!”.
Both the cyclorama paintings and the Circlevision technologies offered audiences a panorama experience but not a true 360 experience. One theatre that offers a true 360 experience is Space 360 which opened in Gwangju, South Korea. This is a spherical theatre built by the Lucerium National Science Museum and Korea Hydro and Power. Up to 45 people at a time stand on a glass bridge and are surrounded by projected images.
The problem with all theatre based 360 experiences, whether it is a 360 painting or a film, is the special building required. Also, the actual viewing experience is hindered by audience size. If you are with a large group of people then your field of view can be limited by others who block the screen/painting. In the case of Disney’s use of 360 film projection, the screens were elevated above the audience who were then required to stand to watch the film. The view in the Space 360 theatre is again limited by people around you and the bridge which is not completely transparent. There are also two exits on either end of the bridge which cut in to the experience.
THE DIFFERENCES BETWEEN 360, 3D-360 AND VR VIDEO
Nowadays, we can watch 360 video content easily on your desktop computer or your smartphone. But for a much more immersive experience, we can also use a headset or head-mounted device (HMD). These wearable goggles can help block out environmental distractions to help immerse the user entirely in the 360 content, allowing one to better experience this sensation of presence. They also often have control features, either built-in the headset itself or in the form of hand controllers or an phone-based app, which grant the viewer more control or interact with the content.
Headsets are available in a variety of forms. The most basic headsets, like Google’s famous Cardboard model, are designed to work with your smartphones, as dozens of video player apps and streaming platforms (including YouTube, Vimeo) offer different levels of 360 and stereoscopic playback. Other headsets, such as the Oculus and HTC Vive series, offer more power, higher build quality and native playback support. Although every model of headset has different strengths and weaknesses, they all share one common flaw — it’s really hard to look cool while wearing them.
However, headsets are essential for experiencing what has proven to be the next tier of immersive video — 360-3D and virtual reality.
Whether you’ve used a 360 camera before, there is a good chance you have watched some 360 video or virtual reality content before, perhaps on YouTube or Facebook. It’s important to understand that 360 video, 3D video and virtual reality (VR) are distinctive in their own rights.
These terms are often used interchangeably by those working in news media and advertising (and often to the annoyance of those who specialize in virtual reality), but they’re not technically the same thing. Let’s break it down real quick.
“360”
Quite simply, a piece of 360 content allows people to choose where in the photo or video they want to look by using a mouse, trackpad or by moving their phone to control the viewing angle — this example, when uploaded or embedded on a platform that supports 360 content, would only show you a small section at a time, and you could drag your cursor left or right to see more.

It can be a pretty neat experience that lets you experience a scene from interesting angles and perspectives. If you’re watching on your computer or your phone, the experience doesn’t fully immerse you, as you remain well aware of the borders of the video, the other people in the room and other objects and sounds around you. You can watch 360 content on a headset or head-mounted device (HMD) for a more immersive experience.
If you viewed this clip wearing a headset, you might notice that while the video is pretty cool, the video looks kind of flat, like there’s no feeling of depth. That’s because most 360 video is monoscopic.
“3D-360”
If you recall, earlier in this chapter we discussed how employing stereoscopic techniques can create the illusion of depth by showing each eye a slightly different version of the same image. Monoscopic video shows the exact same image to both eyes, meaning the brain has no issue interpreting the visual, thus leading to no 3D trickery.
Below (fig. 9) is a clip of a proper stereoscopic 360 video produced by National Geographic. You’ll need to watch it on your headset to actually perceive the depth, but do you notice the difference between this piece and some of the others you’ve watched?
Why is most 360 video (right now anyways) monoscopic? Great question! Much of that has to do with cost and complexity. Cameras designed specifically to capture stereoscopic 360 video are very expensive, ranging from several thousand to tens of thousands of dollars. They feature double the lenses in order to simultaneously record separate images for the left and right eyes. It is possible to augment monoscopic 360 video to create a stereoscopic version or a video with sensory depth, but this usually involves advanced production skills involving additional 3D scanning equipment and software like Matterport or Vpix360.
Again, since this guidebook focuses on presenting an introduction to 360 video, we won’t be tackling this, but will refer to some further reading in the resources section for those who are interested. What’s important for now is for you to know a) the difference between monoscopic and stereoscopic 360 video b) that most 360 video is monoscopic and c) that only some 360 cameras have the option to shoot stereoscopic content and they tend to be much more expensive and geared towards professional filmmakers.
Fig. 7: 3D VR filmed in space by National Geographic
WHAT IS VR VIDEO?
“Virtual Reality”
OK, so is any of this 360 stuff we’ve been watching “virtual reality?” Yes and no. It turns out that virtual reality has been maddeningly difficult to define.
The Tow Center at the Columbia Graduate School of Journalism, for one, defines virtual reality as “an immersive media experience that replicates either a real or imagined environment and allows users to interact with this world in ways that feel as if they are there.” Other definitions emphasize that true VR involves a three-dimensional experience where one has full freedom of movement and the ability to manipulate aspects of the environment.
While the term “virtual reality” remains loosely defined and open to interpretation, most researchers and content creators would agree that a fundamental aspect of VR is the idea of presence, the sensation of actually feeling like you’re physically part of the scene, but through the connection of technology. When VR is done well, it can actually trick your brain and body into believing you’re about to swing through a canyon in Utah (fig. 10).
Try watching the tightrope video again with a headset. Did your stomach drop a little? Did the brightness of the sun remind you of a summer day? Those sensations are something VR content producers are hoping to elicit in viewers. Now, aspects of this are very achievable even without 3D depth, but not without a headset. So it is widely accepted that one of the elements that make an experience virtual reality is the use of a headset to help immerse the viewer.
Fig. 10: 360 video, Canyon Swing: Jump Into the Unknown by Discovery
Degrees of freedom
Another key aspect of VR is giving the user some degree of agency to choose how they engage with the content or interact with what they’re seeing. This is what’s known as degrees of freedom (DoF). We’re going to get a little sciencey and jargony here, so bear with us for a moment.
There are six basic ways a solid object can move through three-dimensional space, thus, there are six degrees of freedom.
Three degrees of freedom correspond to rotational movements around x, y and z axes, also referred to as “pitch, yaw and roll.” In other words, if you use a VR headset that offers 3DoF (three degrees of freedom), you can look forwards and backwards, side to side and shoulder to shoulder (fig. 11)— basically wherever your head can rotate. You may be able to use your hand controllers to manipulate some objects or perform certain actions, but 3DoF VR essentially limits you to be tethered in one spot, why is why it’s often called standing VR.

The actual ability to move within a scene requires other degrees of freedom: elevating (moving up and down), strafing (moving side to side) and surging (moving forwards and backwards). With a 6DoF system, now you’re able to explore a scene more freely and perform basic, natural movements, like walking and crouching. Being able to move through the physical and virtual space can also be referred as room-scale virtual reality, because your runway is the length and width of the room you are in.
In general, VR headset systems are only available with either 3DoF or 6DoF capabilities (see our Headset guide). The 360/VR content you see on YouTube or Facebook are generally 3DoF experiences. On the most basic level, this would mean giving people the ability to look wherever they wanted to, like with 360 video. More premium types of VR headsets like the Oculus or HTC Vive brands, have superior movement tracking technology, allowing them to enjoy 6DoF games and video content.
As this is an introductory guidebook, our primary focus is on producing 3DoF video content, as specialized software and gaming programs like Unity and Unreal are often required to create environments that actually utilize 6DoF (Learn more about this in Chapter X – The Future of 360) and most 360 cameras aimed for consumer users on the market are not advanced to support the depth mapping and 3D video needed for this.
TL;DR
We hope this chapter has provided some history and context into the evolution of 360 video. Of course, the real fun is in shooting, editing and showing off amazing 360 experiences (we’re about to get to that, we swear!), but it is important to understand some of the key terms and concepts that underpin this medium. As a props for making it to the end of the chapter, we’ll make things easy and break everything down for you.
- History has shown that people have a real fascination and desire to experience art, photography and video in immersive ways.
- 360 photography and video technology have been evolving for centuries, becoming substantially more affordable and user-friendly.
- Modern 360 video is created by sequencing multiple shots together (i.e. two 180 degree shots = one 360 degree shot) — this is known as stitching.
- The seam at which two shots are sequenced together is known as the stitch line.
- 360 video, 3D-360 video and virtual reality are not the same things and many people take issue with using these terms interchangeably! Quick recap:
- 360 video is content that allows the user to watch from an angle of their choice.
- 3D-360 video is shot with stereoscopic video techniques, giving a sense of depth to the scene. This is more advanced 360 work and most 360 content you’ll see right now is monoscopic.
- Virtual reality is an immersive, interactive experience in a simulated or captured environment. The immersive aspect is critical to be true VR, requiring the use of a headset.
- A key aspect of virtual reality is giving the viewer some freedom of movement. These are referred to as degrees of freedom (DoF):
- 3DoF refers to three degrees of freedom (ability to move your head around while experiencing content).
- 6DoF refers to six degrees of freedom (ability to move your head and body position while experiencing content).
- Really effective 360 or VR content tries to generate the concept of presence for users, the sensation or feeling that you’re really there in the scene. The feeling of presence allows us to engage with the virtual environment in a way that feels natural and realistic.
