PDF Production Applications

Adobe InDesign CS6 and CC

At the time of testing, Adobe InDesign CS6 (April 2013) and Adobe InDesign Creative Cloud 2019 (December 2019) provide a set of accessibility features that are sufficient to enable the production of accessible digital documents.
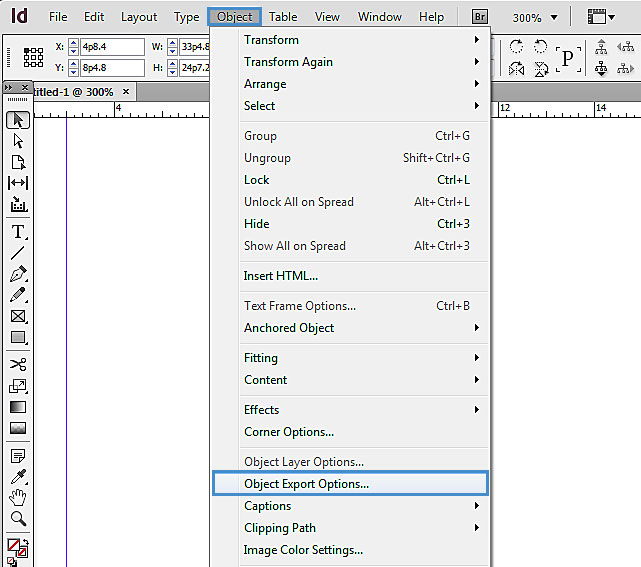
What is “InDesign”?

You should use the technique below when you are using InDesign to create documents that are:

  • Intended to be used by people (i.e., not computer code),
  • Text and Image based (intended for design)
  • Fully printable and can be digitized
  • Creative design (layout, e.g., books, packages, poster, interactive web)

Note: InDesign is best for print design, but there are also options of doing web and digital publishing. If you are creating forms, web pages, applications, or other dynamic and/or interactive content, the techniques below will be useful, but consult the W3C-WAI Web Content Accessibility Guidelines (WCAG 2.0) because these are specifically designed to provide guidance for highly dynamic and/or interactive content.
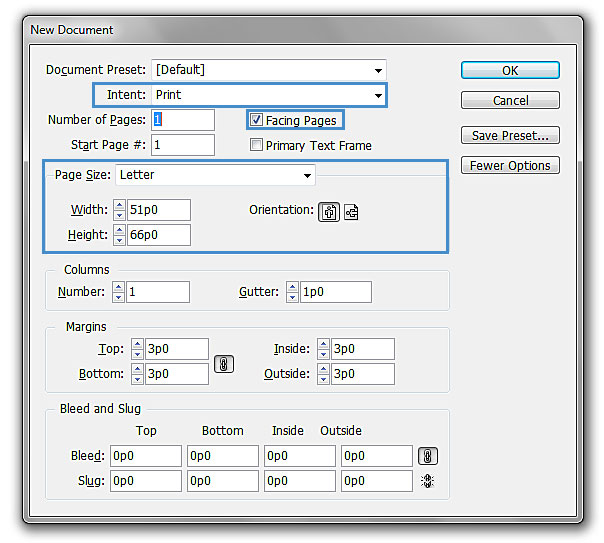
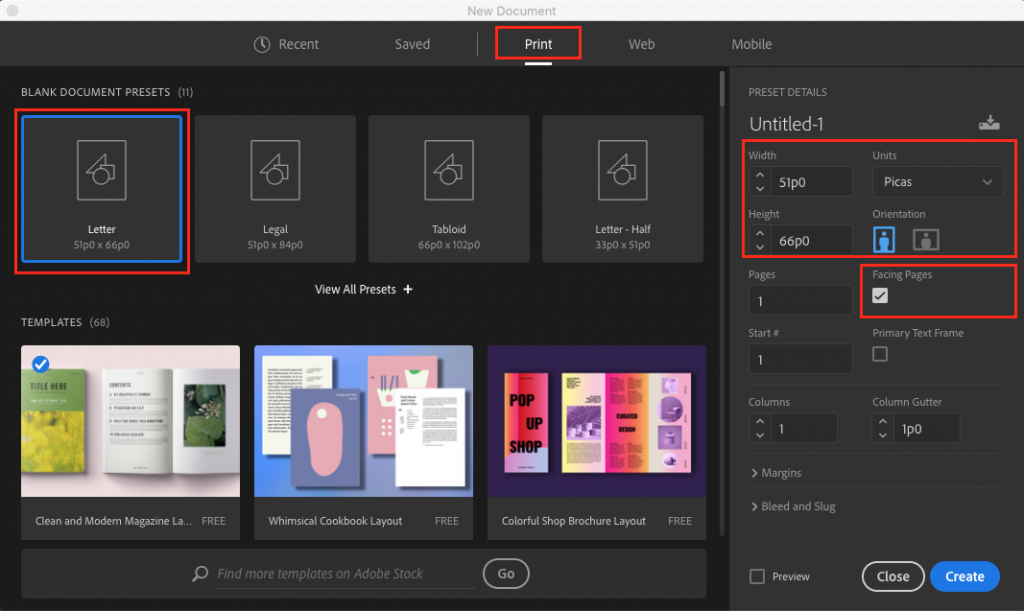
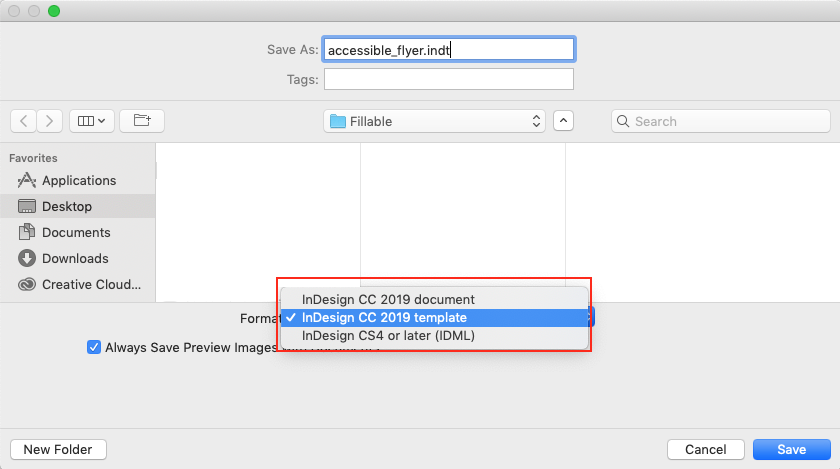
File Formats

The default file format for InDesign is (.indd).

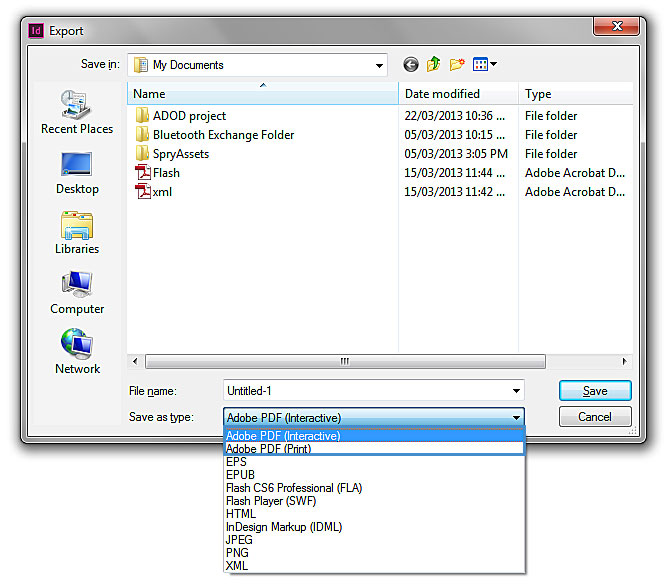
In addition, InDesign offers many other web format saving options. Most of these have not been checked for accessibility.

  • ePub
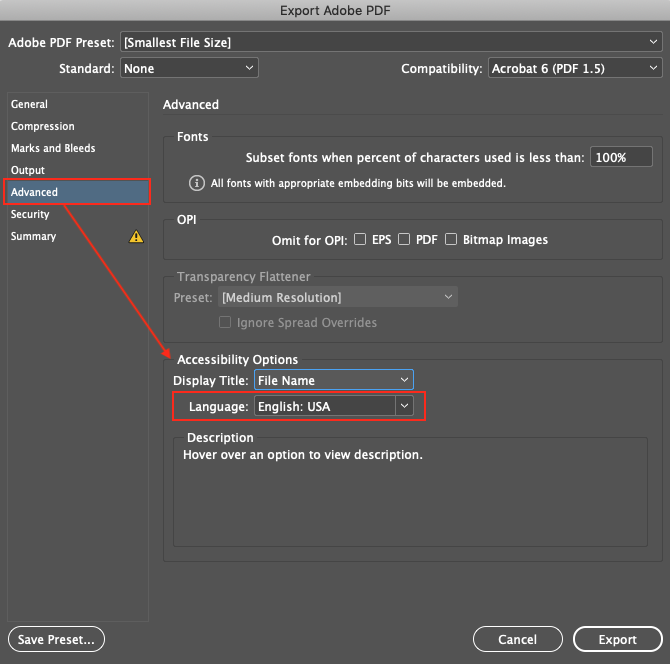
  • PDF (print and interactive)
  • Flash Player SWF (for interactive)
  • HTML, XHTML
  • XML

Document Conventions

We have tried to formulate these techniques so that they are useful to all authors, regardless if they use a mouse. However, there are several instances where mouse-only language is used for clarity purposes . Below are the mouse-only terms and their keyboard alternatives:

  • *Right-click: To right-click with the keyboard, select the object using the Shift+Arrow keys and then press either (1) the “Right-Click” key (some keyboard have this to the right of the spacebar) or Shift+F10.

Disclaimer and Testing Details:

Following these techniques will increase the accessibility of your documents, but it does not guarantee accessibility to any specific disability groups. In cases where more certainty is required, it is recommended that you test the documents with end users with disabilities, including screen reader users.

InDesign starts with a simple blank page that can be adjusted to any size. There are no build-in templates for InDesign. However, you can create your own templates from scratch or download already made templates from Adobe.

Templates provide the starting point for documents, so accessibility is critical. If you are unsure whether a template is accessible, check the document using Acrobat Pro. Export the file and use the Accessibility Checker in Acrobat Pro.

To create an accessible template

  • Select File > New > New Document
Keyboard shortcut: Ctrl + N (on Windows) and Cmd + N (on Mac)
  1. Select print, web, or mobile and Page Size
  2. Uncheck the Facing Pages box if your document is NOT intended to be in book format
  3. Select OK
    Image demonstrates the changes that should occur within the new document dialog box.

Editor’s note: Adobe InDesign CC users will see a different version of the dialog box with the same menu items.

Image demonstrates the changes that should occur within the new document dialog box.

To Saving File as a Template

  • Select file > Save
Keyboard shortcut: Ctrl + S (on Windows) and Cmd + S (on Mac)
  1. Insert file name and under Save as type select CS6 InDesign template
  2. Select Save

Editor’s note: InDesign CC, users will see the following dialog box.

Image demonstrates where the “save type” is located in the “save as” dialog box.


The language setting in InDesign will set language within the program only. This language setting in InDesign will not carry over to the exported PDF. Be sure to set the document language in Adobe Acrobat after exporting to PDF.

To specify the document language for an exported PDF

  1. Choose File > Export.
  2. Specify a name and location for the file. For Compatibility, choose the lowest PDF version necessary to open the files you create.
  3. For Save As Type (Windows) or Format (Mac OS), choose Adobe PDF (Print), and then click Save.
  4. Find the Advanced tab, and go to Accessibility Options.
  5. Under Language, choose the document language for the PDF. This determines the default language for the exported PDF.
    Image demonstrates the Accessibility Options under the Advanced settings section of the Export Adobe PDF dialog box.

The artifact tag allows users to hide items on the page, such as page numbers or unimportant objects, when viewing the exported PDF file in Reflow view, which displays only tagged items. This is also useful when viewing PDF files on a mobile device or in other PDF readers.

There are two options to creating artifacts:

  • Option 1 uses Object Export Options Dialog box where the user select the images in the document individually and add artifact.
  • Option 2 uses Tag pane where the users individually select the object and add the required tagging.

Artifact Option 1

  1. Select the image or object
  2. Select Object > Object Export Options Image demonstrates the location of “Object Export Options” dialog box.
  3. Select Tagged PDF > Apply Tag
  4. Choose either Artifact or Based on Object
  5. Select Done
    Image demonstrates the changes that should occur under "Tagged PDF" in the "Object Export Options" box.

Artifact Option 2

    1. Select the object or artifact
    2. In Tag pane select Artifact
      Note: to view Tags Panel: (Window > Utilities > Tags)
      Image of Tag pane
      Note: for more detail information on tagging and structure pane see Technique 7.

When using images or other graphical objects, such as graphs, shapes, and background, it is important to ensure that the information you intend to convey using the image is also conveyed to people who cannot see the image. This can be accomplished by adding concise alternative text to each image.

Tips for Writing Alternative Text

  • Try to answer the question “what information is the image conveying?”
  • If the image does not convey any useful information, leave the alternative text blank and create an artifact (e.g., background images should generally have no alt text, other decorative images should only have alt text if they form a crucial part of the content, message, and purpose of the document).
  • If the image contains meaningful text, ensure all of the text is replicated.
  • For logos, the alternative text should be the organization’s name.
  • For groups of logos, one logo can be chosen to represent the group.
  • Sometimes text is included as part of a logo or footer image (e.g. the image might contain a phone number), this text should be set as the alternative text of the image.
  • Alternative text should be fairly short, usually a sentence or less and rarely more than two sentences.
  • Test by having others review the document with the images replaced by the alternative text.

Tips for writing longer descriptions

  • Long descriptions should be used when text alternatives (see above) are insufficient to answer the question “what information is the image conveying?”
  • In some situations, the information being conveyed will be how an image looks (e.g., an artwork, architectural detail, etc.). In these cases, try to describe the image without making too many of your own assumptions.
  • One approach is to imagine you are describing the image to a person over the phone
  • Ensure that you still provide concise alternative text to help readers decide if they are interested in the longer description.

There are two options to add Alternative Text to images Option one uses the Object Export Options dialog box where the user select the images in the document individually and add the alternative text. Option two uses Structure panel that create attribute to individual images.

When you export the document, the alt text you’ve assigned will travel with the image.

  1. Select the image or object
  2. Select Object > Object Export Options

To add alternative text to images (Option 1)

    1. Select Alt Text > Alt Text Source drop down menu
    2. Choose Custom
      Image demonstrates the changes that should occur under "Alt Text" in the "Object Export Options" box.
    3. Type the description in the box below
    4. Select Done

To add alternative text to images (Option 2 – Using Structure Panel)

    1. Structure Panel (View > Structure > Show Structure)
    2. Select the Figure in the panel.
    3. Select Image of a button. or Image of a button with three stripes.
    4. Select New Attribute
      Image demonstrates the location of “New Attribute” dialog box.
    5. Insert Alt (case sensitive) under Name (Note: You must use a capital “A” and lowercase “lt” to be valid)
    6. Place the descriptions under Value
      Image demonstrates the changes that should occur within the “New Attribute” dialog box.


Any document that is longer than a few paragraphs require structure to make them more straightforward for readers to understand. Creating Paragraph styles will set the headings and style for the document. It will also help in creating a Table of Contents. The structural elements that indicate order and level provide a meaningful sequence to users of assistive technologies.

  • Select Paragraph Styles (in typography workspace)
Keyboard shortcut: F11 (on Windows) Cmd + F11 (on Mac)
    1. Select Image of a button. or Image of a button with three stripes. in the top right corner for more options.
    2. Select New Paragraph Style… Image demonstrates the location of “new paragraph style” dialog box.
    3. Select General > Style Name and insert a title for the style (e.g., header, body text, caption .etc)Image demonstrates the change that should occur in the paragraph style dialog box.
    4. Select Basic Character Formats located in the left side pane
    5. Choose the font, font style and the size

When using tables, it is important to ensure that they are clear and appropriately structured. This helps all users to better understand the information in the table and allows assistive technologies (e.g., screen readers) to provide context so that the information within the table can be conveyed in a meaningful way.

When creating accessible tables in InDesign, there are some things to keep in mind:

  • Be sure to add alternative text to facilitate understanding of the table (see Technique 3).
  • After converting your InDesign document to PDF, be sure to review the document in Adobe Acrobat and ensure that the table is properly tagged.

Tips for tables

  • Only use tables for tabular information, not for formatting, such as to position columns.
  • Use “real tables” rather than text formatted to look like tables using the TAB key or space bar. These will not be recognized by assistive technology.
  • Keep tables simple by avoiding merged cells and dividing complex data sets into separate smaller tables, where possible.
  • If tables split across pages, set the header to show at the top of each page. Also set the table to break between rows instead of in the middle of rows.
  • Create a text summary of the essential table contents. Any abbreviations used should be explained in the summary.
  • Table captions or descriptions should answer the question “what is the table’s purpose and how is it organized?” (e.g., “A sample order form with separate columns for the item name, price and quantity”).
  • Table header cell labels should be concise and clear.

To create tables

Keyboard short cut: Ctrl + Alt + Shift + T (on Windows), Cmd + Shift + Option + T (on Mac)
  1. Create a table, go to Table > Create Table
  2. Insert Body Rows and Columns
    Image show "Insert Table" dialog box.
  3. Select OK

To convert Text (with tabs) to a Table

If you have created text with tabs. To convert the text to a table:

  1. Select all the text
  2. Table > Convert To Table
  3. Column Separator > Tab
  4. Select OK
    Image show "convert text to table" dialog box.

Removing Table Lines

  1. Place the Type cursor on top of the table until the cursor changes to an upside down black arrow.
  2. Click and drag the cursor to select all of the chart (or part of the chart)
  3. In the top navigation. It’ll show a line box where you can choose which side you would like to remove the line from.
  4. Once selected. Click on the “None” outline button
    Image locate how to removed line from table.

Repeat table header

If you have a table that spans more than one page or spread, it’s important to ensure that table headers are repeated to facilitate understanding of the content.

  1. Go to Table > Table Options > Table Setup…
  2. The Table Options dialog box appears.
  3. Under the Table Setup tab, indicate the number of Header Rows, under Table Dimensions.
  4. Next, go to the Headers and Footers tab. Here you can indicate if you would like your table header repeated on every page, column, or frame.
    Image demonstrates the Table Options dialog box, with the Repeat Header options are displayed.

Tagging items will help assistive technologies (e.g., screen readers) to locate the logical order of the assigned headings. Also, when exporting the document to a PDF, the tagging will automatically be embedded, therefore, the user does not need to apply tagging in Acrobat.

To quickly tag the items in the file

Note: This does not tag all content correctly. To correctly tag all content, you would have to assign the tags manually (see To Assign Tags Manually).

  1. Structure Panel (View > Structure > Show Structure)
    keyboard shortcut Alt + Ctrl + 1 (on Window), Cmd + Option + 1 (on Mac)
    Image show the location of Structure Panel.
  2. In the structure pane click the three line button and choose Add Untagged ItemsImage demonstrates how to add tag to untagged items.

To view which items have been tagged

  1. View > Structure > Show Tagged Frames
  2. The boxes will be coloured according to the tagging in the Tags Panel. (Window > Utilities > Tags)Image show the tagged item in the file.
    Note: You must be in preview mode (keyboard shortcut W) to view the tagged items.

To Assign Tags Manually (and correctly)

    1. Tag pane (Window > Utilities > Tags)
    2. Click Image of a button. > Map Style to Tags…
      Image demonstrates where the “Map Style to Tags” is located in the Tags pane.
    3. Select the style and change [Not Mapped] to a heading title (e.g. H, H1, H2 etc.).Image demonstrates the changes that can occur in the “Map Style to Tags” dialog box.

Option 2: Export Tagging (manually assign tagging)

  1. Double click on the paragraph style (e.g., “heading”).
  2. In the dialog box Paragraph Style Options choose Export tagging.
  3. Under PDF > Tag: select the appropriate heading title (e.g. style name: heading & Tag: H).Image demonstrates location of tag with in the paragraph style options dialog box.
    Note: To make the reading order and tags easier to manage make thread text boxes. If possible make one text box per page.

  1. Create a paragraph style (see Technique 5)
  2. For all the contents in the table of contents assign the title to the style “TOC”Image demonstrates the changes that should be made to create the “table of contents” contents.
    Optional: creating another style for the body of the table of content once all the contents are in the style of “TOC”
    1. Select Layout > Table of Contents…
    2. Under Other Styles select the style
    3. Select the << Add button to transfer the style to Include Paragraph Styles:Image demonstrates how to create table of contents.

Optional: to change the body of the table of contents to a different style than the header of the table of contents. Select entry style and change same style to another style.Image demonstrates how to change the table of contents body to a different style.

  • Drag the cursor to create a large box for the table of content.
    Note: The table of contents will automatically create the title, contents and page numbers.

8.1 Columns

Use Columns feature for placing text in columns instead of creating multiple text boxes.

8.2 Use Page Numbering

Numbering the pages of your document helps those reading and editing your document effectively navigate and reference its content. For users of assistive technologies, it provides a valuable point of reference within the document.

8.3 Naming PDF before exporting

  1. File > File Info
    keyboard shortcut: Ctrl + Alt + Shift + I (on Window), Cmd + Shift + Option + I (on Mac)
  2. Descriptions > Document title: Insert the file title
    Image demonstrates the change or changes that can occur in the "File Info" box.
    Note: You can also fill in the author’s name and description.

Here are some other things to keep in mind:

9.1 Format of Text

When formatting text, especially when the text is likely to printed, try to:

  • Use font sizes between 12 and 15 points for body text.
  • Use fonts of normal weight, rather than bold or light weight fonts. If you do choose to use bold fonts for emphasis, use them sparingly.
  • Use standard fonts with clear spacing and easily recognized upper and lower case characters. Sans serif fonts (e.g., Arial, Verdana) may sometimes be easier to read than serif fonts (e.g., Times New Roman, Garamond).
  • Avoid large amounts of text set all in caps, italic or underlined.
  • Use normal or expanded character spacing, rather than condensed spacing.
  • Avoid animated or scrolling text.

But can’t users just zoom in? Because printing is an important aspect of many workflows and changing font sizes directly will change documents details such the pagination, the layout of tables, etc., it is best practice to always format text for a reasonable degree of accessibility.

9.2 Use Sufficient Contrast

The visual presentation of text and images of text should have a contrast ration of at least 4.5:1. To help you determine the contrast, here are some examples on a white background:

  • Very good contrast (Foreground=black, Background=white, Ratio=21:1)
  • Acceptable contrast (Foreground=#767676, Background=white, Ratio=4.54:1)
  • Unacceptable contrast (Foreground=#AAAAAA, Background=white, Ratio=2.32:1)

Also, always use a single solid color for a text background rather than a pattern.

In order to determine whether the colors in your document have sufficient contrast, you can consult an online contrast checker, such as:

9.3 Avoid Using Color Alone

Color should not be used as the only visual means of conveying information, indicating an action, prompting a response, or distinguishing a visual element. In order to spot where color might be the only visual means of conveying information, you can create a screenshot of the document and then view it with online gray-scale converting tools, such as:

  • GrayBit v2.0: Grayscale Conversion Contrast Accessibility Tool

Editor’s note: GrayBit v2.0 is no longer available. However, multiple tools can be found online: Google Search: gray-scale conversion tool.

9.4 Avoid Relying on Sensory Characteristics

The instructions provided for understanding and operating content should not rely solely on sensory characteristics such as the color or shape of content elements. Here are two examples:

  • Do not track changes by simply changing the color of text you have edited and noting the color. Instead use InDesign’s “Track Changes” feature to track changes.
  • Do not distinguish between images by referring to their appearance (e.g., “the bigger one”). Instead, label each image with a figure number and use that for references.

9.5 Avoid Using Images of Text

Before you use an image to control the presentation of text (e.g., to ensure a certain font or color combination), consider whether you can achieve the same result by styling “real text”. If this is not possible, as with logos containing stylized text, make sure to provide alternative text for the image following the techniques noted above.

Write Clearly

By taking the time to design your content in a consistent way, it will be easier to access, navigate and interpret for all users:

  • Whenever possible, write clearly with short sentences.
  • Introduce acronyms and spell out abbreviations.
  • Avoid making the document too “busy” by using lots of whitespace and by avoiding too many different colors, fonts and images.
  • If content is repeated on multiple pages within a document or within a set of documents (e.g., headings, footings, etc.), it should occur consistently each time it is repeated.

To check for accessibility, first, the InDesign file must be exported to a PDF and viewed in Acrobat Pro.

  1. File > Export (keyboard shortcut: Windows: Ctrl + E; Mac: Cmd + E)
  2. Save as: PDF (Interactive or Print)
  3. Select Save Image show “Export” dialog box.

To evaluate PDF accessibility in Adobe Acrobat Professional

  1. Go to menu item: Advanced > Accessibility > Full Check…
  2. In the Full Check dialog, select all the checking option
  3. Select the Start Checking button

Editor’s note: For detailed instructions, see our section on how to check accessibility using Adobe Acrobat Professional.

Using the Acrobat 10 Action Wizard

In Acrobat 10 Pro, there is a special accessibility Action Wizard for InDesign CS6 where the user can follow to make the file accessible.

  • To Follow the Action Wizard in Acrobat 10: select Tools > Action Wizard> InDesign (CS6) Accessibility Touch up.

Editor’s note: At the time of testing (December 2019), we were not able to download and use the Acrobat 10 Action Wizard. If you do already have the required application, see how to use the Action Wizard for InDesign for more details.

If you are interested in what features are provided to make using InDesign more accessible to users, documentation is provided in the Help button or the search bar.

Authors: Vellicia Christanto, Jan Richards

This document was produced as part of the Accessible Digital Office Document (ADOD) Project.

This project has been developed by the Inclusive Design Research Centre, OCAD University as part of an EnAbling Change Partnership project with the Government of Ontario and UNESCO (United Nations Educational, Scientific and Cultural Organization).

Partner logos: UNESCO-United Nations Educational, Scientific and Cultural Organization, the Government of Ontario and the Inclusive Design Research Centre (OCAD University)


Source: Authoring Techniques for Accessible Office Documents: Adobe InDesign CS6 by the Inclusive Design Research Centre (IDRC) used under CC-BY-SA 3.0.

License

Icon for the Creative Commons Attribution-ShareAlike 4.0 International License

Understanding Document Accessibility Copyright © 2020 by The Chang School, Toronto Metropolitan University is licensed under a Creative Commons Attribution-ShareAlike 4.0 International License, except where otherwise noted.

Share This Book