
Chapter 3 – Respiratory System Assessment
Objective Assessment
An objective assessment of the respiratory system includes:
- Brief scan of the respiratory system.
- Inspection and palpation of the nose and sinuses.
- Inspection, auscultation, palpation, and percussion of the posterior and lateral thorax followed by the anterior thorax.
An objective assessment is usually completed after the subjective assessment, but if the client shows signs of respiratory distress, you may proceed directly to the objective assessment and associated interventions. In this case, it is important to prioritize care after a brief scan that involves components of the primary survey. The physical techniques of inspection and auscultation are usually prioritized.
It is important to be aware of the landmarks of the anterior and posterior chest. This knowledge helps you accurately landmark and also informs the documentation of the findings. See Figure 3.2 for anatomical locations and Figure 3.3 for reference lines.
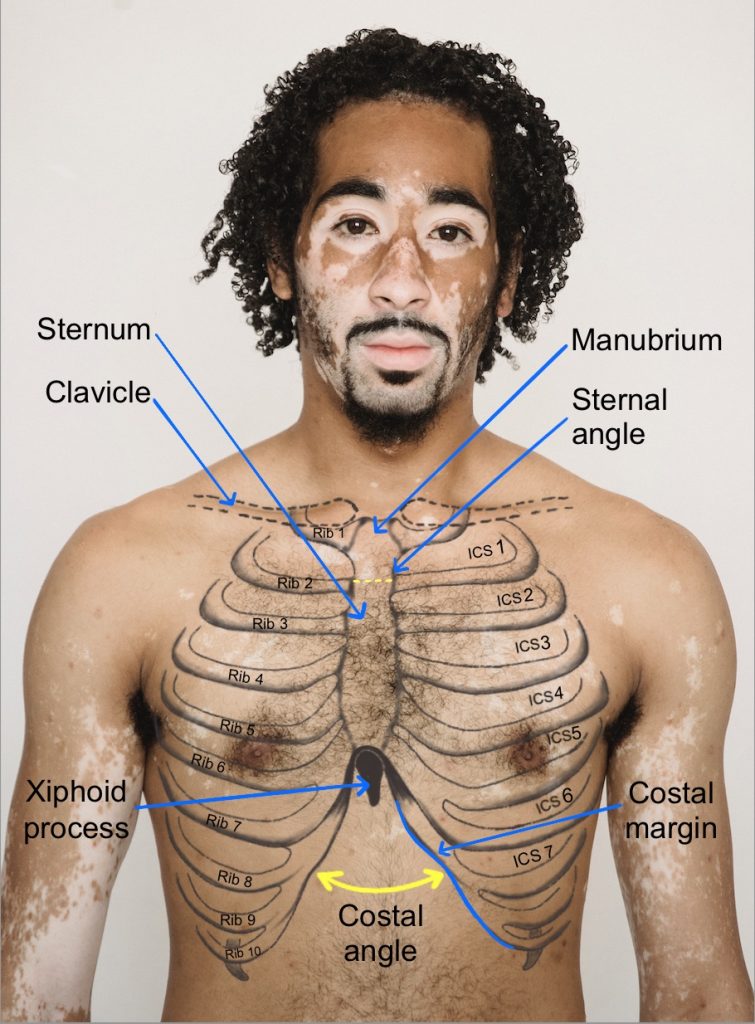
Figure 3.2: Anatomical landmarks
Photo by Armin Rimoldi from Pexels (image was cropped and illustrated upon for the purposes of this chapter)
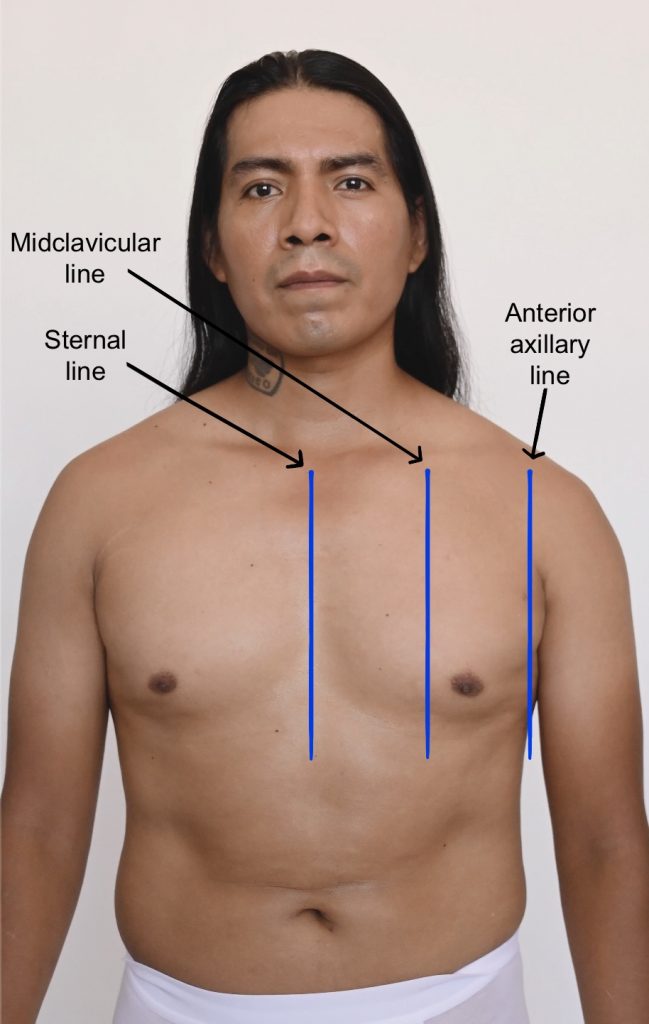
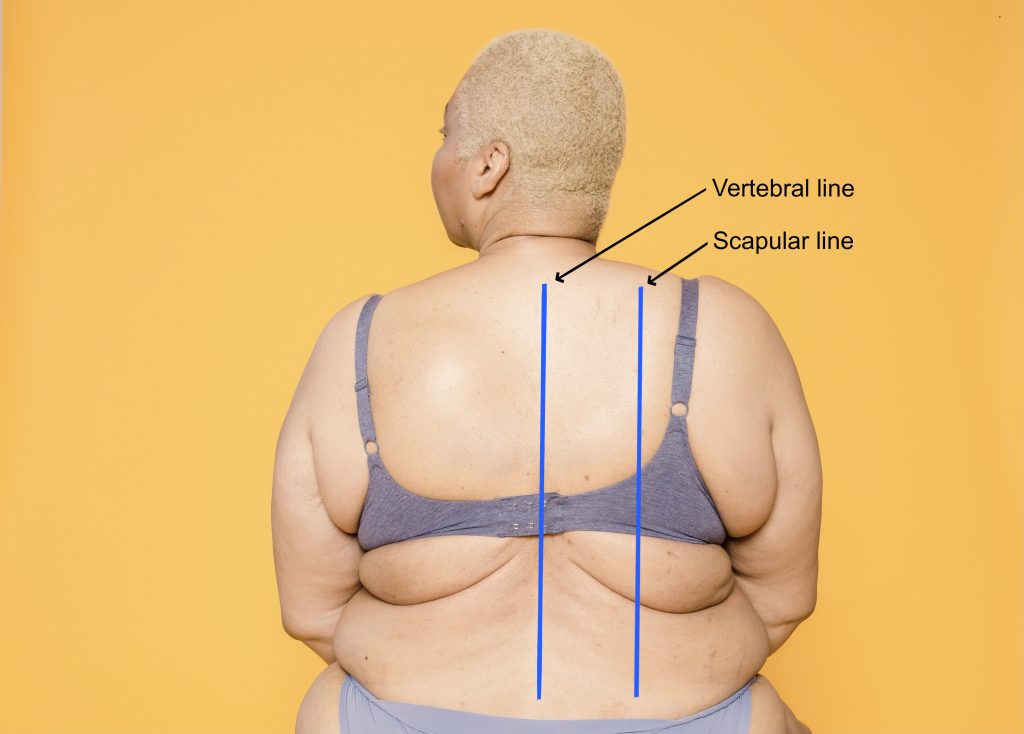
Figure 3.3: Reference lines
Image on left: Photo by Armin Rimoldi from Pexels (image was cropped and illustrated upon for the purposes of this chapter)
Image on right: Photo by Laura Tancredi from Pexels (image was cropped and illustrated upon for the purposes of this chapter)
Be aware of the environmental temperature in the room and the temperature of your hands. Room temperatures are not easily modified, so you should attempt to limit exposing the client and keep them covered. You should also try to warm your hands and stethoscope before placing them on the client’s body.
Ensure the client is positioned in the best way to assess the lungs: usually seated or in the high-fowlers position with the client looking straight ahead so that the lungs can fully expand. If you are assessing a young child or newborn, you could ask someone (e.g., care partner, healthcare provider, parent) to help hold the client upright on the exam table or sit the client in their lap while assessing the respiratory system.
You should help the client into the side-lying position if they are in a supine position and cannot sit upright. This repositioning may require the help of another healthcare provider if the client is unable to roll over themselves.
Assessment of the posterior and lateral thorax involves assessing from the shoulders and the axillary area down to the bottom of the rib cage. Assessment of the anterior thorax involves assessing from the lung apices (just above the clavicles) down to the bases (at bottom of the rib cage). To help visualize, see Figure 3.4 for the location of the lobes on the anterior and posterior thorax and Figure 3.5 for the location of the lobes on the lateral thorax (shown upon inspiration).
Keep in mind, you should do the entire assessment on the bare skin.
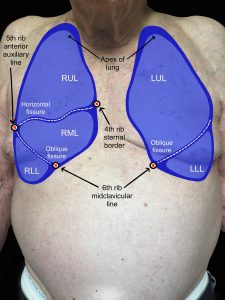
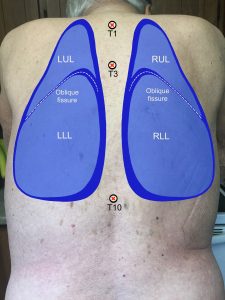
Figure 3.4: Location of lobes on anterior and posterior thorax
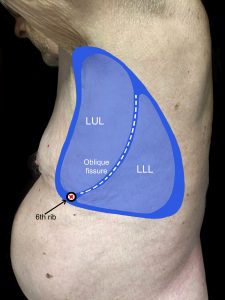
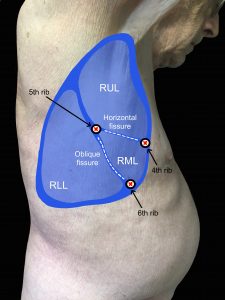
Figure 3.5: Location of lobes on lateral thorax
Clinical Tip
Always use a trauma-informed approach to inform your respiratory assessment. This is particularly important considering that areas of the chest will be exposed. Do not assume who may have experienced trauma: it can happen to anyone, regardless of gender, age, or socioeconomic/educational level.
You could start by asking the client if they would like a family member or friend present or another healthcare provider. You should explain what you are doing throughout the assessment and explain why these actions are important to perform. Sometimes it is helpful to show on your own chest (over your uniform) where you will be palpating and placing your hands or the stethoscope.
Maintain privacy by closing the door and/or curtains. Use draping and only expose the necessary areas of the chest. Clients may feel awkward or embarrassed having their thorax exposed, particularly the anterior side. This feeling can be felt by people of all genders and ages. While you have the gown open at the back, use the drape to cover the lower half of the thorax. When you need to assess the anterior thorax, use the drape to cover any area not being assessed; the drape can be secured around the abdomen. With the anterior thorax, you can ask the client to lower the patient gown at the top so that you can assess the upper thorax and then, you can have them pull the gown up at the bottom to assess the lower thorax. Another alternative method is to have gown open at the front instead of the back.
You should always be professional, confident, and efficient. Try to be responsive to the client’s verbal and non-verbal cues. If they seem uncomfortable, you could acknowledge this by saying, “Many clients feel uncomfortable having their lungs assessed because it involves exposing their chest. I will only ask you to expose the areas that I need to assess and then you can cover back up again. Is there anything I can do to make this easier for you?”
Contextualizing Inclusivity – Chest Binding
An inclusive approach to health assessment is vital because clients need to feel accepted for who they are. Some non-binary and transmasculine clients may wear a chest binder because they feel uncomfortable or distressed about having breast tissue. Binders are garments designed to flatten the appearance of the chest wall. They come in different forms and can extend from the chest down to the diaphragm or to the hips: they may look like a sports bra or tank top, and some clients may use compression bandage.
The binder needs to be removed to adequately listen to the lungs, as these sounds may be diminished through the binder. You may or may not be aware of whether the client you are assessing wears a chest binder, so you can apply an inclusive approach by acknowledging the vulnerability that clients may feel. Provide step-by-step instructions so that they are prepared, and ask non-judgmental questions like “Assessing your lungs requires me to assess on the bare skin on the front and back of your chest. Is there anything that would impede me from doing so?” You can also ask if they have any questions before beginning such as “Do you have any questions before we begin?”
You should also assess the binder for proper fit: a good fit allows for normal chest expansion and deep breathing.
