
Peripheral Vascular System Assessment
Inspection and Palpation of Feet and Legs
This assessment can be done while the client is supine with their head on a pillow. The client will need to remove their shoes and socks and uncover the legs from the upper legs down to the feet. You should inspect the anterior as well as the posterior side of the legs; ask the client to roll on their side to do so.
Steps of inspection and palpation of legs and feet include (see Video 5 for technique):
Video 5: Inspection and palpation of feet and legs (showing technique) [1:44]
- Inspect the legs and feet for colour and hair distribution. Remember that clients will have different skin tones: assess abnormal findings related to skin discolouration in comparison to the rest of the skin. In addition to inspecting the legs, it is important to assess the toes for hair distribution, because hair loss associated with (PAD) often begins at the toes and moves upward.
-
- Normally, the skin colour is consistent and hair distribution is equal. Remember that the plantar side of the feet are lighter in colour, particularly among clients with darker skin tones.
- Describe any abnormal findings such as skin discolouration (e.g., colour and location) and any uneven hair distribution, particularly if asymmetrical. Some clients remove leg hair with hair laser removal, waxing, or shaving; this is not considered an abnormal finding related to hair distribution.
- Inspect (and palpate) the legs and feet for size and edema.
- Normally, the upper and lower leg circumference and ankle circumference are equal bilaterally at each site.
- If you suspect a size difference of the ankle, calf or upper leg circumference, use a tape measure to accurately note the size on both limbs.
- If you observe edema, assess for pitting edema: an indentation that remains after applying pressure over the location. See Figure 11 for a picture of pitting edema. Apply pressure with the pad of your finger on a distal location (feet and medial malleolus) for about 3-5 seconds and then release. If you observe an indentation (a “pit”), note the location and how long the indentation remains. If you observe it in a distal location, assess proximal such as over the tibia. Always check with the unit you work on about the scale used to evaluate pitting edema; scales are usually 1 to 4 (see Figure 12). Assess the pit depth and the rebound time (the time for the indentation to disappear). Pitting edema is often rated as 1 mild, 2 moderate, 3 severe, and 4 very severe.
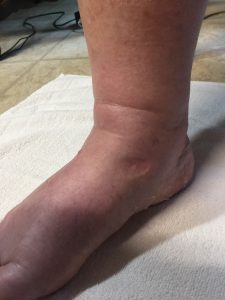
Figure 11: Pitting edema.
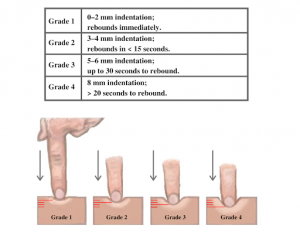
Figure 12: Pitting edema scale. (Attribution, taken from https://wtcs.pressbooks.pub/nursingskills/ CC-BY 4.0.)
- Inspect the feet and legs for lesions and ulcers. Ensure you inspect between the toes and on the plantar side of the feet.
- Normally, no lesions or ulcers are present.
- Describe the location and quality of any lesions and ulcers.
- Palpate skin temperature using the dorsa of your hands from the anterior side of the upper legs down to the toes. Use your fingertips to assess skin texture.
- Normally, the temperature is warm to touch and equal bilaterally. The feet are sometimes slightly cooler than the upper legs, but they should be equal bilaterally. The skin texture is normally smooth.
- Describe any asymmetry in skin temperature, extreme temperatures, and skin textures such as dry, flaky skin.
- Inspect the nails for colour and test capillary refill on two or three toenails of each foot. Start by applying pressure with your own finger to the client’s nail; this causes the nail to blanch (become pale in colour). Apply the pressure for 5 seconds and then release and observe the return in colour.
- Normally, the nails are translucent in colour with a slight pinkish tone underneath. Colour should return within 3 seconds or less when assessing capillary refill.
- Describe any pallor or cyanosis of the nails. A sluggish return for capillary refill suggests that there may be issues with oxygenated blood perfusion, which might be related to peripheral vascular issues (and/or cardiac and/or respiratory issues).
- Gently palpate the dorsalis pedis pulses bilaterally and simultaneously, and then palpate the posterior tibial pulses (see Figure 13 and Video 6). Simultaneous assessment helps you compare the force (strength of pulsation); recall the 4-point scale for pulse force. Assessment of pulses for presence, force, and symmetry of force provides information about perfusion (flow of blood) to the limbs. If you are concerned about blood flow into the extremities (e.g., neither the dorsalis pedis or posterior tibial pulses are palpable on one foot), use a Doppler device to assess blood flow.
- Normally, pulses are present, 2+ force and equal bilaterally.
- Decreased pulse force or absent pulses can be associated with arterial insufficiency. A decreased pulse force (1+) can be described as “thready,” which is a weak pulse that is difficult to feel.
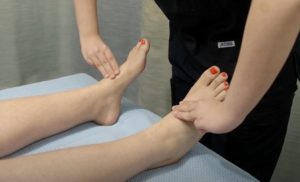
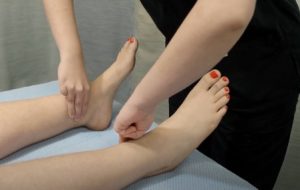
Figure 13: Location of dorsalis pedis and posterior tibial pulses.
Video 6: Palpating dorsalis pedis and posterior tibial pulses [0:30]
- Palpate the popliteal (Figure 14) and femoral pulses. For the popliteal pulse, slide your fingers behind the knee just medial to the the middle of the popliteal fossa (typically located slightly lateral to the medial tendon). While palpating, push up with pressure, because this pulse is high up in the fossa and can be difficult to palpate. For the femoral pulse, palpate inferior to the inguinal ligament less than halfway from the pubis bone to the anterior superior iliac spine. While palpating, press firmly up into the bone. If you do not feel a pulse right away, reduce the pressure slightly.
- Normal and abnormal findings are the same as item 6 above: if you can find a femoral and dorsalis pedis pulse, a non-palpable popliteal pulse is usually not of concern.
- Normal and abnormal findings are the same as item 6 above: if you can find a femoral and dorsalis pedis pulse, a non-palpable popliteal pulse is usually not of concern.
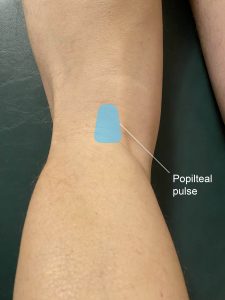
Figure 14: Popliteal pulse.
- If the findings from the above assessments make you suspect arterial insufficiency, assess for elevational pallor and dependent rubor (Wennberg, 2013). Elevational pallor is when the extremities become pale when they are raised above the heart level. Dependent rubor is an erythematous discolouration, particularly of the dorsal sides of the toes, when the feet/legs are below the level of the heart (Bahrani & Sladden). Step 1: While the client is in a supine position, hold their legs at 45 degrees for about 30 seconds; this action helps push the venous blood back to the heart, and the skin colour is reflective of the sufficiency of arterial blood flow. Step 2: Return the client’s legs to the table and assist the client into a sitting position with their legs dangling over the edge or into a standing position.
- During Step 1, the skin colour normally becomes just slightly paler in comparison to the client’s normal skin colour (best seen on the sole of the foot), demonstrating good arterial blood flow. During Step 2, the colour of the client’s foot normally returns within 10 seconds.
- Abnormal findings associated with Step 1 include significant pallor in comparison to the client’s normal skin colour (best seen on the sole of the foot). Abnormal findings associated with Step 2 are the normal colour of the client’s feet taking more than 10–15 seconds to return, as well as dependent rubor. Dependent rubor in combination with other cues (such as claudication) may be associated with PAD.
- Ask the client to stand so that you can inspect the legs and feet for vascularity. If the client is unable to stand, you can complete the inspection while they are in a supine position.
- Normally, you will observe no vascularity or a fine and flat venous pattern. Athletes may have superficial veins.
- Describe any vascular patterns you observe on the legs and feet, such as varicose veins.
- Note the findings:
- Normal findings might be documented as: “Skin colour consistent from upper legs to toes, equal limb circumference with no edema or ulcers. No presence of cyanosis or pallor on nails. Good capillary refill. Dorsalis pedis and posterior tibial pulses 2+ force and equal bilaterally. Skin temperature warm to touch and equal bilaterally from upper legs to toes.”
- Abnormal findings might be documented as: “Pallor in nails, cool to touch in feet and toes bilaterally, sluggish capillary refill 4-5 seconds, 1+ dorsalis pedis pulses equal bilaterally.”
Contextualizing Inclusivity
A large majority of pregnant people have edema in their feet and legs due to increased blood volume and pressure on veins from the growing fetus (Smyth et al., 2015). In addition to edema, the increased volume and pressure on veins can lead to venous insufficiency and varicose veins, in which the blood pools in the feet and legs, particularly when in dependent positions (Smyth et al., 2015). Although edema is a normal part of pregnancy, a pregnant person should be referred to their physician or nurse practitioner if they experience a sudden onset of edema associated with other symptoms such as headache, high blood pressure, and vision changes; these symptoms can be associated with .
Knowledge Bites
The ankle-brachial index (ABI) test is one test used to assess the presence of peripheral arterial disease. The test is sometimes performed by nurses, but it is usually associated with an advanced practice nursing role.
The ABI can be performed in various ways, so you should receive advanced training in the procedure and always be consistent with your practice.
Begin with the client in supine position at rest (US Preventive Services Task Force, 2018). Measure BP using a Doppler ultrasonic device (Fowkes, 2008). Follow this sequence:
- Measure BP:
- right arm (brachial)
- right posterior tibial
- right dorsalis pedis
- left posterior tibial
- left dorsalis pedis
- left arm
- repeat right arm measurement (average both right arm measurements).
- Next, calculate an ABI for the right side and an ABI for the left side using the following equation:
highest systolic pressure of the posterior tibial or dorsalis pedis is the numerator (some may average the two)
Highest systolic arm pressure is the denominator (some may average the two)
(Aboyans et al., 2012)
Divide the numerator by the denominator to obtain a ratio, which is the ABI. A ratio of less than 0.9 indicates the presence of PAD (Fowkes, 2008; US Preventive Services Task Force, 2018).
For example, if the ankle pressure is 122 and the brachial systolic is 148, the ABI is 0.82, which is suggestive of peripheral arterial disease.
Priorities of Care
An urgent priority of care is signs suggesting absent or severely reduced arterial blood flow such as absent or diminished pulses, which are usually accompanied by sluggish capillary refill, cool limbs, pain, numbness, decreased sensation, and pallor or cyanosis. Assess these if you have not already. If you cannot detect dorsalis pedis and/or posterior tibial pulses, use a Doppler device. Report these findings immediately to the physician or nurse practitioner so that additional intervention can be taken to re-establish blood flow.
Any signs related to deep vein thrombosis (DVT) should also be reported to the physician or nurse practitioner. A combination of unilateral leg pain, swelling, warmth, and erythema can be an urgent situation: a DVT may be blocking blood flow. A DVT can loosen from the vessel wall and travel to the lungs, causing a pulmonary embolism that blocks blood flow. Risk factors for blood clots and DVT include advancing age, smoking, oral contraceptives, sedentary lifestyle, obesity, and pregnancy. Other conditions related to DVT include prolonged sitting, immobilization of limbs, fractures, damage to veins, varicose veins, and
Activity: Check Your Understanding
References
Aboyans, V., Criqui, M., Abraham, P., Allison, M., Creager, M., Diehm, C., Fowkes, G., Hiatt, W., Jonsson, B., Lacroix, P., Marin, B., McDermott, M., Norgren, L., Pande, R., Preux, P., Stoffers, H., & Treat-Jacobson, D. (2012). Measurement and interpretation of the ankle-brachial index: A scientific statement from The American Heart Association, 126(24), 2890-2909. https://doi.org/10.1161/CIR.0b013e318276fbcb
Bahrani, B., & Sladden, C. (2017). Dependent erythema of the legs associated with mild autonomic nervous system dysfunction. J Cutan Med Surg, 21(6), 556-558. https://doi.org/10.1177/1203475417714801
Brodovicz, K., McNaughton, K., Uemura, N., Meininger, G., Girman, C., & Yale, S. Reliability and feasibility of methods to quantitatively assess peripheral edema. Clinical Medicine & Research, 7, 1-2, 21-31. https://doi.org/10.3121/cmr.2009.819
Fowkes, G. (2008). Ankle brachial index combined with Framingham Risk Score to predict cardiovascular events and mortality: A meta-analysis. JAMA, 300(2), 197-208. https://doi.org/10.1001/jama.300.2.197
Smyth, R., Aflaifel, N., & Bamigboye, A. (2015). Interventions for varicose veins and leg oedema in pregnancy. Cochrane Database of Systematic Reviews, 10, https://doi.org/10.1002/14651858.CD001066.pub3
US Preventive Services Task Force (2018). Screening for peripheral artery disease and cardiovascular disease risk assessment with the ankle-brachial index: US Preventive Services Task Force Recommendation Statement. JAMA, 320(2), 177-183. https://doi.org/10.1001/jama.2018.8357
Wennberg, P. (2013). Approach to the patient with peripheral arterial disease. Circulation. 128, 2241-2250. https://doi.org/10.1161/CIRCULATIONAHA.113.000502
a condition causing narrowed arteries and restricting or blocking blood flow to the extremities.
is a serious and life-threatening condition associated with a rise in blood pressure, proteinuria, and swelling.
is an inherited red blood cell disorder that affects the hemoglobin causing red blood cells to become sticky and C-shaped.
