
Integumentary System Assessment
Skin: Palpation
Palpation of the skin can be performed with the client sitting upright on the exam table or lying in a supine position. You may need to ask or assist the client to reposition as needed. Palpate the arms from shoulder to fingertips and the leg from the upper legs to toes.
Steps for palpating the skin include:
- Palpate the skin temperature using the dorsa of your hands: start at the upper arms and move down to the fingertips. Repeat on the legs from upper legs to the tips of the toes (see Video 1 for an example).
-
- Normally, the temperature is warm to touch and equal bilaterally. The hands and feet are sometimes slightly cooler than the upper arms and legs, but they should be equal bilaterally.
- Note any asymmetry in skin temperature or extreme skin temperatures. Inflammation is typically accompanied by warmth. Describe the characteristics (e.g., warm, cool) and location of asymmetry in skin temperature or extreme skin temperatures.
Video 1: Palpating for temperature [0:17]
- Palpate for skin texture, thickness, and moisture using your fingertips: start at the upper arms and move down to the fingertips. Repeat on the legs from upper legs to the tips of the toes.
-
- Normally, the skin is smooth and dry with uniform thickness.
- If the skin feels excessively sweaty and clammy, this is referred to as diaphoresis. The skin should feel smooth, free from cracks, peeling, or flaking. Describe the quality and location of dry (xerosis) and flaky skin if present. Darker skin tones may have an ashy appearance, which is a result of dry skin and can appear as white/grey and can range from mild to severe. Describe and note the location of thickened areas of the skin or areas of the skin that are thin. Thickened areas of the skin may be the result of calluses. There are several factors that cause thin skin (e.g., aging, medications).
- Palpate the skin for turgor to assess for skin elasticity (see Video 2 for an example). Use your fingertips and thumb to grasp a fold of skin in the midclavicular region under the clavicle (collarbone) or on the forearm or hand. Pull upward gently and then release. The skin’s ability to recoil or return to normal may be affected by the client’s hydration status.
-
- Skin that returns immediately to its normal position is considered normal/resilient and described as good skin turgor (associated with adequate hydration).
- Skin that remains tented or takes time to return to its normal position is considered abnormal and is described as lacking skin turgor (associated with dehydration).
Video 2: Assess for skin turgor on forearm [0:19]
Video 3: Assess for skin turgor below clavicle [0:17]
- Palpate lesions and masses if present. Wear gloves for open lesions. Use your index finger and thumb to size the lesion and get a sense of the depth. Note innervation by asking the client if they can feel you palpating it. Press down on the lesion to see if it blanches. This provides contrast to get a better visual of the lesion, providing information about the skin variation. Petechiae generally does not blanch, while other skin lesions will momentarily blanch. Assess consistency (soft or hard) and shape (e.g., round, irregular).
-
- Normally, no lesions or masses are present.
- If you observe lesions or masses, describe the location and characteristics: what they look like, whether they are intact or open, consistency, and shape.
- Palpate for size and edema. Compare limb circumference of one arm to the other arm and from one leg to the other leg. Generally, you will visually observe the upper and lower part of each limb.
-
- Normally, limb circumference is equal bilaterally at each site.
- If you suspect a size difference, use a tape measure to accurately assess the size on both limbs on the lower and upper limb. If you observe edema, assess for pitting edema: an indentation that remains after applying pressure over the location (see Figure 8). Apply pressure with the pad of your finger on a distal location (feet and medial malleolus) for about 3-5 seconds and then release. If you observe an indentation (a “pit”), note the location and how long the indentation remains. If you observe it in a distal location, assess a proximal location such as over the tibia. Check with the unit you work on about the scale used to evaluate pitting edema. It is usually classified using a scale from Grade 1–4 based on pit depth and rebound time (time for the indentation to disappear), with 1 indicating mild, 2 moderate, 3 severe, and 4 very severe (see Figure 9 for scale).
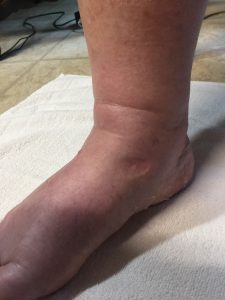
Figure 8: Pitting edema.
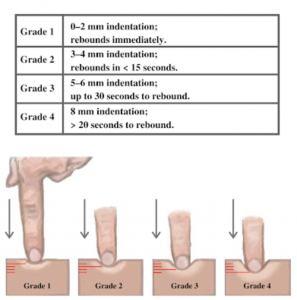
Figure 9: Pitting edema scale. (Attribution, taken from https://wtcs.pressbooks.pub/nursingskills/ CC-BY 4.0)
- Note the findings:
-
- Normal findings might be documented as: “Skin temperature is warm and equal bilaterally on arms and legs. Skin is smooth with no perspiration and no lesions. Good skin turgor. Limb circumference is equal bilaterally with no edema.
- Abnormal findings might be documented as: “Right foot is cold in comparison to left foot. Poor skin turgor and dry skin.”
Priorities of Care
All abnormal findings should be investigated further and reported to the physician or nurse practitioner. For example, poor skin turgor suggests possible dehydration and the client may have other signs such as dry mouth/mucous membranes, cracked lips, decreased urine output/dark urine, and light-headedness. With severe dehydration, client’s can experience tachypnea, tachycardia, and hypotension. Dehydration can also be associated with clients who have a fever, nausea, vomiting, diarrhea or reduced fluid intake. Ask whether they have experienced recent vomiting, diarrhea, or reduced fluid intake. If the client is an infant, ask the caregiver/parent if they have observed a decrease in the number of wet diapers. If the dehydration is mild, encourage the client to increase their fluid intake. More severe dehydration may require fluid replacement with intravenous to replace fluid loss.
Contextualizing Inclusivity
Use a trauma-informed approach to touch by creating a trusting, safe environment. Clients might have experienced trauma resulted to experiencing or observing physical, sexual and/or emotional abuse, childhood neglect, a family member with mental illness or substance use disorder, violence, and poverty and systemic discrimination (Menschner & Maul, 2016). This can affect how they perceive touch (including palpation). Discuss with the client what they can expect from the objective assessment in terms of touch and explain what you are doing and why.
References
Menschner, C., & Maul, A. (2016). Key ingredients for successful trauma-informed care implementation. Centre for Health Care Strategies Inc, Robert Wood Johnson Foundation. https://www.samhsa.gov/sites/default/files/programs_campaigns/childrens_mental_health/atc-whitepaper-040616.pdf
