
Musculoskeletal System Assessment
Thoracic Cage and Spine
Ask the client to reposition into a sitting position on the exam table with their legs and feet hanging off the side. Parts of the assessment can be performed in a sitting position and then reposition into standing. If the client cannot sit or stand, you will need to modify the assessment approach.
As always, use a trauma-informed approach. You will need to expose the thoracic cage and back, so you should explain what you are doing and why and provide a drape as needed. The thoracic cage is part of both MSK and respiratory systems, so these assessments are often combined.
Inspection and Palpation
Steps for inspection and palpation include:
- Inspect the thoracic cage for deformities that may be related to injury/trauma or congenital anomalies.
- The thoracic cage is normally symmetrical.
- Abnormal findings may be related to fractured ribs that can appear as a deformity or a sunken chest such as with . If you note these abnormal findings, auscultate the lungs because both conditions can affect breathing. For example, a broken rib can be associated with a risk of .
- Use your four finger pads to palpate the thoracic cage for masses, swelling, and deformities. You may also palpate for , which can result from a rib fracture. Ask the client if they have pain.
- Normally, no pain, masses, swelling, and deformities are present.
- Describe the characteristics and location of any pain, masses, swelling and deformities.
- To palpate for temperature, use the dorsa of your hands to palpate down the spine from T1 to the lower back (about L4 at the superior iliac crest).
- Temperature is normally warm to touch.
- Be attentive to areas that are excessively warm and possibly associated with redness, swelling, and deformities.
- Using two or three finger pads, including the index and middle finger, palpate down spinous processes to feel for deformities and pain from T1 to L4. A moderate pressure with a circular motion is best. Use the same technique, with both hands, to palpate down the paravertebral muscles on either side of the vertebra for pain and spasms.
- Normally, there are no deformities or pain along the spinous process and no pain and spasms on the paravertebral muscles.
- Describe the location and characteristics of pain, deformities, or spasms.
For the next steps, ask the client to stand.
- From a posterior view, inspect the spinal alignment from C1 to L4. At this point, you have already inspected the neck, but it can be helpful to look at the whole spine to assess alignment as well as head position. Also inspect the back for symmetry: compare the level of the shoulders, scapula, iliac crest, gluteal folds, and arm hang bilaterally. Ask the client to keep their legs straight and bend down toward their toes; this can accentuate any asymmetry if present.
- Normally, the spine is straight with no curvature from a posterior view and the back is symmetrical and arms hang at an equal length.
- Any curvature and asymmetry should be described including the location. One type of curvature is a spinal condition called scoliosis (Figure 4). It appears as an S or a C curve affecting either or both thoracic and lumbar sections of the spine. This curvature also affects the head position and asymmetry of the arm hang.
- From a lateral view, inspect the spinal curvature.
- Note the normal thoracic convex (outward) curve and the cervical and lumbar concave (inward) curve.
- Note any variations in curvature such as kyphosis and lordosis (Figure 4). Kyphosis is increased curvature of the thoracic section of the spine (the upper back). A person can be born with it (congenital) or it can develop as a result of poor posture (postural kyphosis) or MSK-related conditions such as osteoporosis. Lordosis is an inward curve of the lumbar section of the spine. It can occur for pathological reasons in various age groups, but especially during pregnancy as a way to realign the centre of gravity as the fetus grows.
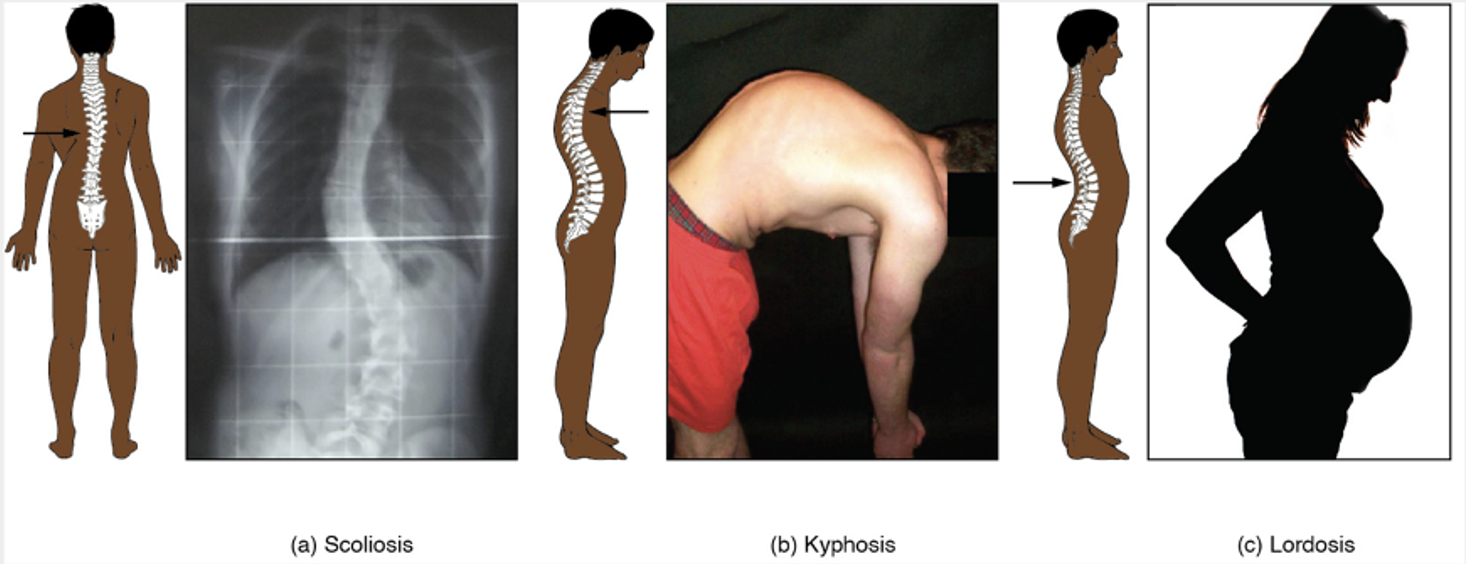 Figure 4: Scoliosis, kyphosis, and lordosis.
Attribution: Gordon Betts, J., Young, K.A., Wise, J.A., Johnson, E., Poe, B., Kruse, D.H., Korol, O., Johnson, J.E., Womble, M., & DeSaix, P. (2013). The Autonomic Nervous System. In Anatomy and Physiology. OpenStax. Creative Commons Attribution License v4.0. Book URL: https://openstax.org/books/anatomy-and-physiology/pages/1-introduction. Section URL: https://openstax.org/books/anatomy-and-physiology/pages/7-3-the-vertebral-column
- Note the findings:
-
- Normal findings might be documented as: “Client’s thoracic cage is symmetrical with no reported pain, and no swelling, masses, or deformities, temperature warm to touch and equal bilaterally. Spinal column is straight with no abnormal curvatures. No deformities and pain along the spinous process and no pain and spasms on the paravertebral muscles.”
- Abnormal findings might be documented as: “Swelling at L4-5, tender to touch, with tingling and radiating pain to the right buttock and upper thigh area. Client reported tenderness as 4/10 upon palpation.”
NOTE: See Video 13 for inspection and palpation of thoracic cage and spine.
Video 13: Inspection and palpation of thoracic cage and spine (note, you can also inspect the spinal curvature from the lateral view) [3:17]
Contextualizing Inclusivity
An inclusive approach to health assessment is vital because clients need to feel accepted for who they are. For example, some non-binary and transmasculine clients may wear a chest binder because they feel uncomfortable or distressed about having breast tissue. Binders are garments designed to flatten the appearance of the chest wall. They come in different forms and can extend from the chest down to the diaphragm or to the hips: they may look like a sports bra or tank top, and some clients may use compression bandages.
The binder needs to be removed to adequately assess inspect and palpate the spine. First, decide whether the assessment is necessary. Also, you may or may not be aware of whether the client you are assessing wears a chest binder, so you can apply an inclusive approach by acknowledging the vulnerability that clients may feel. Provide step-by-step instructions so that they are prepared, and ask non-judgmental questions like “Assessing your spine requires me to assess on the bare skin of your back. Is there anything that would impede me from doing so?” You can also ask if they have any questions before beginning.
You should also assess the binder for proper fit: a good fit allows for normal movement and chest expansion.
For a client with breast tissue, you may need to have them reposition their breast so that you can palpate the thoracic cage. It may feel awkward for the client to perform this action, so some nurses demonstrate on themselves over their own uniform to show the client what they would like them to do. If the client is unable to do so, you may ask permission to reposition their breast. In this case, do so with the ulnar aspect of your hand. Avoid grasping or cupping the breast with your hand as this can be misinterpreted as a sexual motion. Always ask permission and inform the client what you will be doing in order to apply a trauma-informed approach and support the therapeutic nurse-client relationship.
Range of Motion (ROM)
When possible, ROM of the spine is best performed in a standing position to ensure full movement. Start with the client standing straight, looking forward with the face and body, and arms/hands hanging at the side (neutral position). When assessing cervical spine ROM, you will assess the gross ROM, which is the cumulative ROM of all of the spinal segments together. See Table 6 for normal ROM for each movement.
Steps for assessing ROM:
- To perform lumbar spine flexion and extension, ask the client to bend forward at the waist, keeping their legs straight and bending down toward their toes, and then return to a neutral position. Next, ask the client to bend back at the waist, keeping their pelvis and hips still, and then return to a neutral position.
- To perform lumbar spine lateral flexion, ask the client to bend to the right side with arms/hands reaching toward their toes while looking forward and keeping pelvis/hips still and facing forward. Return to a neutral position and then repeat on the opposite side.
- To perform lumbar spinal rotation, ask the client to twist to the right while keeping arms/hands at the side and legs/pelvis/hips facing forward. Return to a neutral position and then repeat on the opposite side.
- Note the findings:
-
- Normal findings might be documented as: “Full ROM of lumbar spine with symmetrical and smooth movements, no crepitation and pain noted.”
- Abnormal findings might be documented as: “Client has limited ROM of lumbar spine flexion of 30 degree, no crepitation. Rates pain 3/10 during movement.”
Note: See Video 14 for ROM of the spine.
Table 6: ROM of spine (adapted from Luttgens & Hamilton, 1997).
|
Joint |
Range of motion |
|
Lumbar spine: Flexion |
65–90 degrees (see Figure X showing where to measure, angles are based on Šavlovskis & Raits, 2021; Washington State, 2014) |
|
Lumbar spine: Extension |
25 degrees |
|
Lumbar spine: Lateral flexion |
25 degrees |
|
Lumbar spine: Rotation |
30 degrees |
NOTE: There are many variations of what is described as “normal” spine flexion; we have based these numbers on “lumbar” spine flexion specifically. Always ensure that the client does not engage/move the hips when assessing spine flexion.
Video 14: ROM of spine [1:07]
Manual Muscle Testing (MMT)
You should assess MMT after completing your assessment of ROM. Demonstrate the procedure before applying resistance, and then perform MMT on each joint bilaterally. Ask the client if they experience any pain and where. Grade the resistance according to the institution’s grading scale (e.g., MRC or Oxford testing scale).
MMT of the spine begins with the client in a standing position with feet placed under hips (slightly apart) for stability and arms hanging down at the side (neutral position).
Steps for MMT of the spine:
- To perform MMT of spinal flexion, stand in front of the client with each hand on the anterior aspect of the shoulder applying force, and ask the client to flex the spine by bending (at the waist) forward toward their toes while resisting your force. Apply resistance once the client begins to bend (about 10 degrees). This technique can also be performed in a supine position if needed. Note any engagement of surrounding muscles to compensate for the movement.
- To perform MMT of spinal extension, stand behind the client with each hand on the posterior aspect of the shoulders and scapula applying force, and ask the client to extend the spine by bending back at the waist while resisting your force. Apply resistance once the client begins to extend (about 10 degrees). This technique can also be performed in a prone position if needed. Note any engagement of surrounding muscles to compensate for the movement.
- Note the findings:
-
- Normal findings might be documented as: ““full resistance on spine ROM with no pain.”
- Abnormal findings might be documented as: “partial resistance equal bilaterally on spine ROM with mild pain.”
Priorities of Care
Activity: Check Your Understanding
References
American Academy of Orthopaedic Surgeons. (1965). Joint motion: Method of measuring and recording. AAOS.
Arthritis Society. (2022). Support for Childhood Arthritis. Retrieved from https://arthritis.ca/support-education/support-resources/support-for-childhood-arthritis
Edgecombe L, Sigmon DF, Galuska MA, et al. Thoracic Trauma. [Updated 2022 May 8]. In: StatPearls [Internet]. Treasure Island (FL): StatPearls Publishing; 2022 Jan-. https://www.ncbi.nlm.nih.gov/books/NBK534843/
Luttgens, K. & Hamilton, N. (1997). Kinesiology: Scientific basis of human motion, 9th Ed., Brown & Benchmark.
Šavlovskis, J. & Raits, K. (2021). Range of the motion (ROM) of the cervical, thoracic and lumbar spine in the traditional anatomical planes. https://www.anatomystandard.com/biomechanics/spine/rom-of-spine.html
Washington State Department of Social & Health Services. (2014). Range of motion evaluation chart. https://www.dshs.wa.gov/sites/default/files/forms/pdf/13-585a.pdf
is a congenital condition where the sternum is sunken into the chest at birth and can worsen with age, affecting breathing.
is when air leaks into the pleural space pushing on the lung and causing partial or complete collapse of the lung.
is when air shifts out of the lungs and into the subcutaneous tissues as a result of traumatic, surgical, or infectious causes.
