
Module 9: Interactive Fiction/Twine Workshop
9.6 Twine Workshop: Storytelling
Twine is a platform that predominantly uses two types of storytelling: horizontal and vertical. As you move into working with Twine to create a choose-your-own-adventure game, you should know about these two types of storytelling and how they can shape the scenarios and gameplay you are creating.
Horizontal Storytelling
In horizontal storytelling, the interactivity takes the reader horizontally through the text, offering additional information, quotations, poems, or moments of reflection on the main story. The choice of the player to interact with these elements does not move the story forward but instead provides context, nuance, or additional details to enrich gameplay.
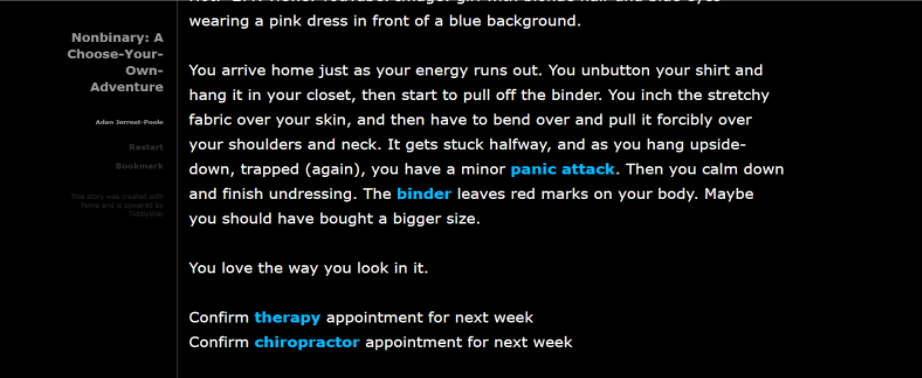
For example, in the screenshot above from Non-Binary: A Choose-Your-Own-Adventure, there is a paragraph with a few links that a player can engage with, as well as two linked actions or choices at the bottom of the page. The player is still able to make the choice of clicking on the ‘panic attack’ link in the body of the descriptive paragraph and see how that may affect their game but since this is a horizontal choice, the player is taken to the next screen (the player, in the context of the story, has a panic attack):

There are no more links on this ‘panic attack’ screen, no choices to make except clicking back. In this way, the player is moved horizontally from the previous screen to the next (and back again) without any diverging pathways – choosing ‘panic attack’ or ‘binder’ does not preclude the player from making other choices or seeing other screens.
Vertical Storytelling
In vertical storytelling, the reader makes choices that impact the narrative arc and shape how the story develops, influencing plot development and perhaps even how the story ends. This tactic shares the narratorial role with the reader and gives them more agency about how the story unfolds and/or how the story ends. This may mean that once a choice has been made, the player will be ‘cut-off’ from experiencing the story branch that the unchosen option leads to. The figure below shows a vertical storytelling map, which is a common way to organize vertical storytelling, branching scenarios, and/or Twine stories. In this map, if the player chooses option A as their first choice, they will only see the consequence of that choice and so on (i.e. given option C or D and not option E or F and their subsequent path).
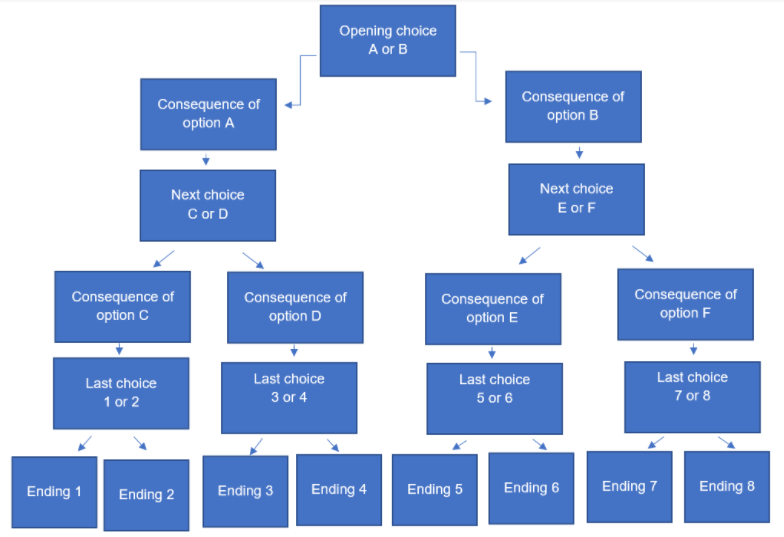
In this way, vertical storytelling works a little like a flow chart, drilling down and branching out with each choice until endings are reached. A good question to gauge whether your interactive game involves vertical storytelling is: is there a clear ending or multiple endings? You may or may not have vertical storytelling in your interactive game, depending on the narrative structure you are working with.

Begin to develop your story
For this activity, choose a previous analysis or narrative you have created or create a new script on a topic related to disability and digital media. Here is a quick reminder of some of the notes/reflections you may have created and downloaded throughout this Pressbook:
- Your reflection on your personal relationship with an object in your space (module 2)
- Your analysis of the representation of disability and technology in advertising or science fiction (module 3)
- Your global map following the production of electronic devices (module 4)
- Your narrative/analysis of technology for podcasting (module 6)
- Your reflection on video creation and technology (module 7)
Once you have chosen a reflection to work with, follow the following steps.
Note: for this activity, you can use any text editor such as Microsoft Word or Google Docs, or even pen and paper, whatever works best for you!
You can also follow the following link to make a copy of a Google Doc that has the questions embedded within it:
https://docs.google.com/document/u/3/d/18lyOctDE7L8mN8idYHnh664iopMp-Ab0uZzHY_rs-ps/copy
- Cut and paste the transcript or notes into a new document.
- Rearrange your notes into a series of steps or use your notes to create an endpoint you want players to arrive at. Use the questions below to guide your writing:
- What part of the text would be the very first screen?
- What scenarios, joys, or barriers would have to happen to create the situation described in your notes?
- What options would players have to move through the story?
- Create at least 2 different endpoints for players to arrive at.
- Within these steps, highlight 3-5 words you would like to expand on in some way.
- Write 1-3 sentences to accompany each word. This might be additional information about the object or concept, a personal story, reflection, critical analysis, or a quote from one of the readings. Be creative and experiment!
Save these notes to use in the next chapter where we will learn more about and play with Twine!
